
On this page
Start here
Quick answer
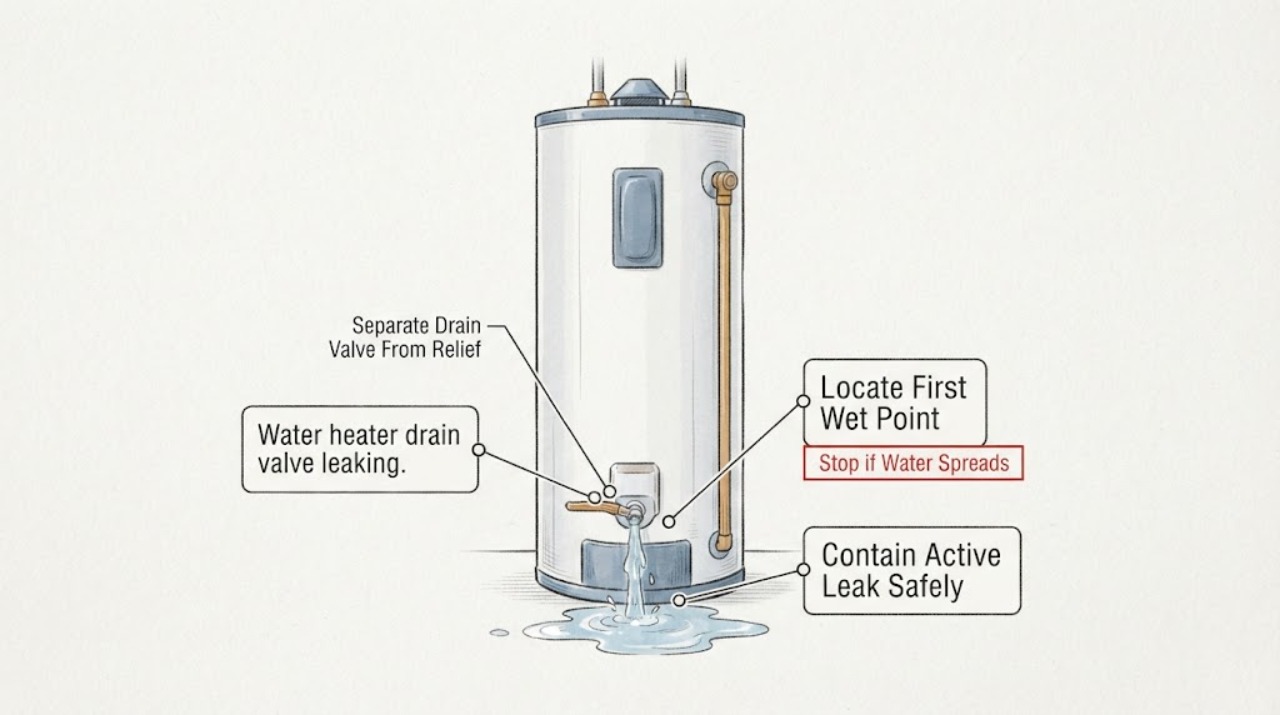
A Bradford White water heater that appears to leak at the drain valve may instead be leaking from the drain-valve outlet or stem, a nearby water connection, the temperature-and-pressure relief discharge, a condensate line, or the tank itself. Do not touch or open the drain valve while the water may be hot or pressurized, and never plug the relief-valve outlet. From a safe position, contain the water, close the cold-water inlet only if the accessible shutoff works normally, identify the exact leak location, and use the model manual for the correct shutdown procedure. An active leak, water near electrical parts, a gas heater with combustion or gas symptoms, a tank seam leak, or a valve that will not stop needs a qualified plumber; replacing a drain valve is not a simple tightening exercise.
Work through in order
Diagnostic checks
Use only checks that match the exact appliance or system and its official guide.
-
Check 1
From a dry, stable position, keep people away from the heater and place a suitable container or absorbent material where it can catch cool drips without touching hot metal or electrical parts. If the accessible cold-water inlet shutoff operates normally by hand, close it; do not force the valve or disconnect tubing.
Expected result: The leak stops or slows, continues at the same rate, becomes a spray, or water is spreading to the floor, a lower level, electrical equipment, or a gas-control/burner area.
Next step: If water cannot be controlled, stop using the heater and call a plumber promptly. If the leak is contained, do not operate the heater or open a drain path until the water temperature, energy source, and exact model procedure are established.
Stop if: Stop immediately for scalding steam or hot spray, a stuck shutoff, water near electrical connections or gas controls, a tank rupture, or water flowing toward a lower floor.
Why this matters
Why: A controlled drip permits a short external inspection. Continued or spreading water is an active damage risk; water near electrical or combustion components can make the heater unsafe even when the drain valve appears to be the source.
-
Check 2
Only after the exterior is cool and safe to approach, use a dry paper towel or cloth on the outside of the drain-valve outlet, valve stem/cap area, nearby cold-water and hot-water connections, relief-valve discharge pipe, condensate outlet if present, and the bottom jacket. Do not reach behind covers or touch the relief-valve lever.
Expected result: The first wet point is the drain-valve outlet or stem, a threaded connection above it, the relief discharge, a condensate outlet, the tank seam/bottom, or no source is visible.
Next step: Record the location and keep the supply/energy in the safe state while arranging model-specific service. Do not tighten a valve, remove a cap, or plug the relief discharge based only on where the water lands.
Stop if: Stop if the exterior is hot, the source cannot be reached without removing a panel, the relief discharge is hot, or the tank jacket/porcelain insulation is damaged.
Why this matters
Why: A drain-valve outlet/stem drip supports a valve or seal issue; a fitting above it may be tracking downward; a relief discharge points to a separate temperature/pressure or thermal-expansion issue; and a seam or bottom leak raises concern for tank failure. No visible source means water may be traveling from an inaccessible area.
-
Check 3
Compare the observed wet point with the marked drain-valve location and the separate temperature-and-pressure relief discharge route. Look for a drip from the relief pipe outlet or a puddle that begins above the drain valve, but do not lift the relief lever, cap an outlet, or place hands under a discharge.
Expected result: Water starts at the relief discharge, begins at a connection above the drain valve, or clearly starts at the drain-valve outlet/stem.
Next step: For relief or upper-connection water, leave the outlet unobstructed and call a qualified plumber. For a drain-valve source, keep the valve closed as found and request a model-correct repair; do not use a plug as a pressure fix.
Stop if: Stop for hot discharge, repeated relief-valve opening, pressure noises, a missing discharge pipe, or any urge to plug, cap, or manually operate the relief valve.
Why this matters
Why: A relief discharge is not repaired by replacing or tightening the drain valve, and its outlet must remain unobstructed. Water from above can be a connection or relief issue. A clear drain-valve source makes service of that valve or its seal more plausible but still does not make opening a hot tank safe.
-
Check 4
Record whether the heater was recently drained, flushed, moved, serviced, or refilled, and whether a hose or cap was recently attached to the drain valve. Do not repeat draining or attach a hose to test the leak while the tank may be hot or pressurized.
Expected result: The leak began immediately after draining/refilling or service, started without recent work, appears only while the heater is heating, or the history is unknown.
Next step: Give the timeline and leak behavior to the plumber and use the exact model manual for any approved service. Do not open the drain valve or relief valve to reproduce the leak, and do not restore energy after a water supply shutdown until the model procedure confirms a full tank.
Stop if: Stop if the tank may be empty while powered, if the drain hose connection is hot, or if restoring service would require lighting a gas burner or energizing electrical elements without professional confirmation.
Why this matters
Why: Recent work can leave a valve not fully seated, a disturbed seal, or a connection that needs professional reassembly; a leak that appears only during heating can also involve expansion or a relief event rather than the drain valve. An unexplained leak is not evidence that flushing will cure it.
-
Check 5
Read the rating plate from a safe position and record the complete Bradford White model and serial numbers, whether the heater is gas, electric, indirect, or another type, and whether the drain-valve area has a cap, hose connection, pan, or condensate outlet. Do not remove access panels to find the label.
Expected result: The identity and type are clear, or the label is unreadable, the heater type is uncertain, or the valve area does not match the available manual.
Next step: Use Bradford White's model/serial documentation path or provide the information to a qualified plumber. If the identity cannot be confirmed, keep the heater out of service and do not order a generic drain valve.
Stop if: Stop if the rating plate is missing, the fuel does not match the installation, a gas or electrical enclosure is damaged, or any panel must be removed to continue.
Why this matters
Why: Bradford White technical documentation and service boundaries are model-specific. An uncertain type means the correct energy-shutdown, drain, valve, gasket, and refill procedure cannot be safely inferred.
-
Check 6
Prepare a service note with the first wet point, drip rate or spray behavior, water temperature if known without touching it, whether the cold-water shutoff worked, recent drain/service history, model and serial numbers, and any gas, electrical, relief-valve, tank, or floor-damage signs.
Expected result: The leak location and heater identity are documented, or the source remains uncertain or unsafe to observe.
Next step: Arrange qualified plumbing service for any persistent drain-valve leak. If the source is a tank seam, active spray, relief discharge, or uncontrolled connection leak, request urgent service and keep the heater out of operation until inspected.
Stop if: Stop all DIY work when the next step involves draining a hot tank, removing the drain valve, opening a gas/electrical compartment, lifting the relief lever, or pressure-testing the system.
Why this matters
Why: A drain-valve leak can require a valve/seal repair, while a nearby relief, connection, condensate, or tank leak needs a different remedy. A clear note lets a plumber isolate the heater and choose the model-correct repair without a risky homeowner pressure test.
Use your observations
Decision map
Find the observation that best matches what you see, then follow the next safe action.
-
PATH 01Next step
What you see
The first wet point is the drain-valve outlet or stem, with no water tracking from above and no active relief discharge.
Do this next
Leave the valve in its existing position, keep the heater isolated as appropriate for its model, and have a plumber verify temperature, pressure, valve condition, and replacement fit before draining or changing it.
-
PATH 02Next step
What you see
The drain-valve area is wet, but the first wet point is a cold/hot connection, relief discharge, condensate outlet, or another point above the valve.
Do this next
Do not replace the drain valve by appearance. Keep relief outlets open and arrange plumbing service to diagnose the upper source.
-
PATH 03Next step
What you see
Water begins at the tank bottom, jacket seam, insulation, or an inaccessible area rather than at the valve outlet.
Do this next
Keep the heater out of operation and call a qualified plumber promptly. Do not remove the jacket, attempt a tank patch, or continue heating while water is escaping from the tank body.
-
PATH 04Next step
What you see
Water exits the temperature-and-pressure relief discharge, or the heater makes pressure-related sounds, while the drain valve itself stays dry.
Do this next
Keep the relief outlet unobstructed and call a qualified plumber or follow Bradford White's model-specific service path. Do not lift the lever as a casual test or plug the outlet.
-
PATH 05Next step
What you see
The leak is hot or spraying, water reaches electrical equipment or gas controls, the heater has been flooded, a gas odor or combustion symptom is present, or the shutoff cannot control the water.
Do this next
Leave the area if gas or combustion danger is suspected, keep people away, and contact emergency or qualified plumbing/gas service from a safe location. Do not touch switches, open panels, drain the tank, or force a valve.
Helpful context
Understand the symptom
A drain-valve drip is not always a drain-valve failure
Water can travel along the bottom jacket and make a nearby fitting look like the source. The drain-valve outlet or stem, the cold-water connection above it, the temperature-and-pressure relief discharge, a condensate drain on some models, and the tank seam have different implications. Dry the outside only when it is safe to do so and locate the first point that becomes wet; do not use a hot or pressurized tank as a DIY draining project.
Use the exact Bradford White manual
Bradford White directs owners and professionals to model-specific technical documentation using the model or serial number. Tank type, fuel source, drain-valve design, electrical controls, venting, and access vary. A manual for one Bradford White series is not proof that its valve, gasket, torque, or shutdown sequence fits another series.
Protect against scalding, shock, gas, and water damage
Water in a working heater can be hot and under pressure. Electric heaters can be damaged if energized without a full tank, while gas heaters add combustion and venting hazards. Keep children and pets away, do not open the temperature-and-pressure relief valve for this diagnosis, and do not continue if water is reaching electrical equipment, the burner area, a floor below, or a gas-control compartment.
Safety boundary
Stop conditions
- Do not open the drain valve, temperature-and-pressure relief valve, or a tank connection while water may be hot or pressurized.
- Do not plug, cap, bend, or obstruct the relief-valve outlet, even if it appears to be the leak source.
- Do not tighten or remove the drain valve, use a sealant, attach a hose, or pressure-test the heater as a homeowner shortcut.
- Do not energize an electric heater or relight a gas heater after the water supply has been shut off until the model procedure confirms a full, safely connected tank.
- Stop for hot spray, water near electrical or gas-control parts, flooding, a tank seam leak, gas odor, combustion/vent concern, or an inaccessible source.
Only after diagnosis
Potential parts
- water-heater drain valve
Consider only when the first wet point is the drain-valve outlet or stem and a qualified plumber confirms the valve body or seat is leaking rather than an upper connection, relief path, or tank.
Confirm the complete Bradford White model, valve connection, material, and manufacturer's fit information; do not select a generic valve by appearance. - drain-valve seal or washer
Consider only when the exact model and valve design have a serviceable seal and professional inspection identifies a seal leak rather than a cracked or corroded valve body.
A seal may not be separately replaceable on every valve. Confirm model-specific parts and a safe, depressurized service procedure. - temperature-and-pressure relief valve
Consider only when water is confirmed to originate at the relief discharge and qualified diagnosis identifies a relief-valve or pressure/temperature condition.
Never block the relief outlet or infer fit from the thread size alone; confirm the rating, model, and code-compliant installation through a qualified plumber. - water heater tank or tank connection
Consider only when service or a professional leak test shows the tank body or an inaccessible internal connection is leaking rather than the drain valve.
Tank replacement and connection work are plumbing projects; confirm model, fuel/energy type, installation requirements, and local code with a professional.
When checks do not resolve it
Need a professional?
Call a qualified plumber when the drain-valve leak persists, the shutoff cannot control the water, the first wet point is uncertain, the tank or a relief discharge is involved, or the valve must be removed or replaced. Request urgent help for hot or spraying water, water reaching electrical or gas controls, a tank seam leak, flooding, or any gas/combustion symptom. Provide the full Bradford White model and serial numbers, heater type, first wet point, leak timing, shutoff result, and recent drain or service history.
Have this ready
- Complete Bradford White model and serial numbers; gas/electric/other heater type; first wet point; whether the water is hot or spraying; whether the cold-water shutoff works; recent draining or service; relief-discharge behavior; tank/floor damage; and any gas, vent, or electrical warning sign.
Common questions
FAQ
Can I just tighten a leaking Bradford White drain valve?
Do not assume tightening will stop it. The tank may be hot or pressurized, the leak may be from the valve body or a nearby connection, and excessive force can damage the fitting or tank. Have a plumber isolate and identify the valve before attempting a model-correct repair.
How can I tell whether the drain valve or relief valve is leaking?
From a safe, cool exterior, identify the first wet point without touching the relief lever or opening any valve. Water at the relief discharge is a separate safety issue; water that starts at the drain-valve outlet or stem supports a drain-valve diagnosis. Water tracking from above can fool you, so a plumber may need to verify it.
Should I open the drain valve to empty the tank?
Not as a first response. Draining can release hot water under pressure and may require energy isolation, a safe discharge route, and a model-specific refill procedure. If the valve itself is leaking, opening it can worsen the leak. Arrange qualified service unless the exact manual and conditions clearly authorize the work.
What if water is coming from the temperature-and-pressure relief pipe?
Keep the relief outlet unobstructed and do not plug it or lift the lever as a casual test. A discharge can relate to temperature, pressure, or thermal expansion and needs qualified plumbing diagnosis, especially if the water is hot.
Can I keep using the water heater if the drain valve only drips?
A small drip can worsen, damage flooring, or hide a tank or relief problem. Keep the area monitored only long enough to arrange service, and do not operate the heater if water is near electrical or gas controls, the tank is damaged, the leak is hot or spraying, or the source is uncertain.
What information does a plumber need for a Bradford White drain-valve leak?
Provide the complete model and serial numbers, heater type, first wet point, whether the water is hot, whether the cold-water shutoff works, the leak timing, recent draining or service, relief-discharge behavior, and any floor, gas, vent, or electrical warning signs. Bradford White uses model-specific documentation for technical and service information.
Read the exact guide
Official sources
- FAQs - Bradford White Water HeatersBradford White · Bradford White water-heater service escalation, model documentation, leak protection, drain-pan guidance, and plumbing-professional support
- Do I need a drain pan? - Bradford White Water HeatersBradford White · Bradford White water-heater leakage protection and professional drain-pan assessment
- Pressure Testing A Tank For Leaks - Bradford White For The Pro®Bradford White · Bradford White professional tank-leak verification and distinction between repairable connections and possible tank leaks
- Where can I find the technical documentation for my water heater? - Bradford White Water HeatersBradford White · Bradford White model and serial number lookup for water-heater manuals and technical documentation
- 238-48144-00_EBradford White · Bradford White water heater drain valve, filling, leak checks, relief valve, and model installation/operation guidance
Community feedback
Share a repair observation
Share a plain-text repair observation. Accepted observations are published automatically; this page may take a moment to update.