
On this page
Start here
Quick answer
Treat a Rheem water-heater leak as a water-damage and equipment-safety issue, not as a reason to tighten every fitting or open the heater. From a dry, safe position, identify whether water is coming from an external pipe or fitting, the temperature-and-pressure relief discharge, the drain or service opening, condensation, or the tank body. If the leak is active, pooling, near electrical equipment, accompanied by gas odor, or coming from the tank shell, stop using the heater and obtain qualified help. Rheem recommends turning off water and the gas or electrical supply when a water-heater leak is present; do not touch wet electrical equipment or a gas control.
Before you begin
Safety first
- Owner checks are limited to safe external observation, an accessible water shutoff only when the area and controls are dry, documentation, and keeping people away from hazards. A qualified professional must handle gas or electrical isolation when unsafe, pressure and thermal-expansion testing, relief or drain components, wiring, heating elements, tank openings, internal controls, moving the heater, and repair-versus-replacement decisions.
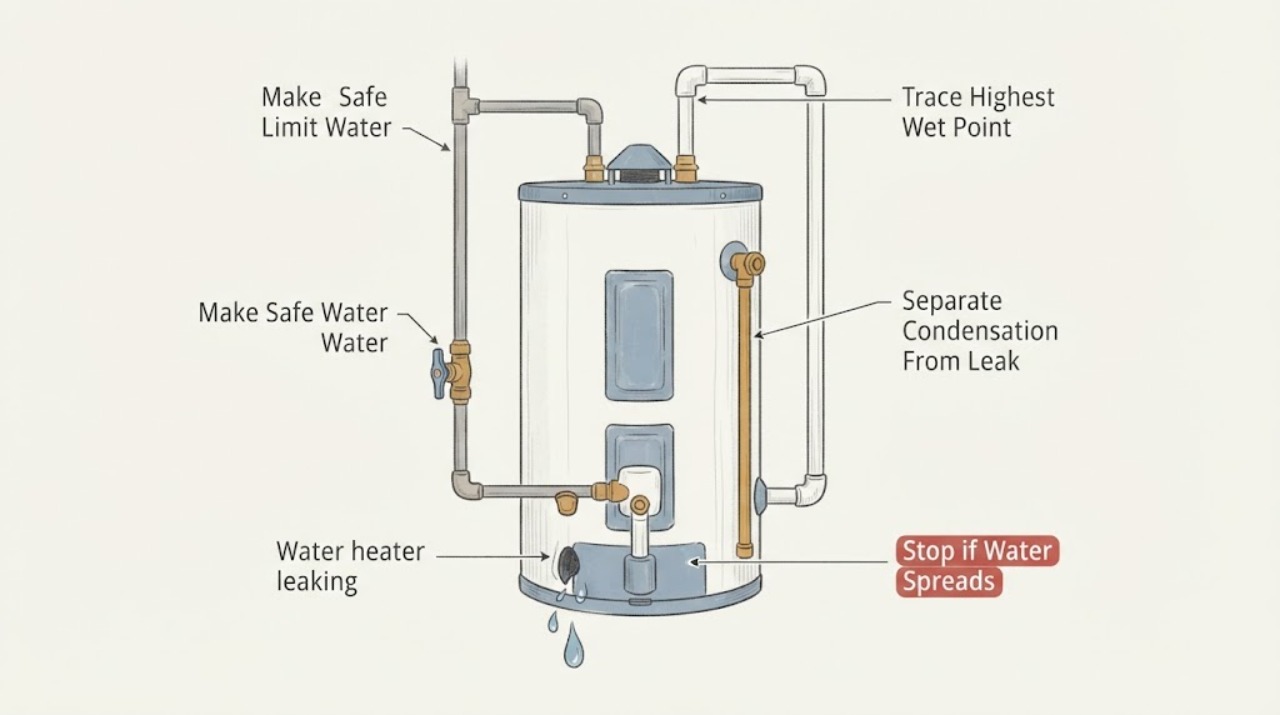
Work through in order
Diagnostic checks
Use only checks that match the exact appliance or system and its official guide.
-
Check 1
From a dry, safe position, check whether water is actively flowing, pooling, or reaching the heater controls. Keep people away from hot water and standing water. If the floor and controls are dry and the water shutoff is safely accessible, close the cold-water supply to the heater; do not touch wet electrical equipment, wet wiring, or a gas control.
Expected result: The leak is a small isolated drip; water is actively pooling or spreading; water is near an electrical disconnect or control; the unit is gas-fired and gas odor is present; or the source cannot be reached safely.
Next step: For active flooding, gas odor, smoke, exposed conductors, or water near electrical parts, leave the area as appropriate and obtain emergency or qualified professional help. Otherwise, keep the water limited and continue only with safe visual observation.
Stop if: Stop immediately for gas odor, smoke, sparking, a scalding discharge, a wet electrical disconnect, exposed wiring, rapidly increasing flow, or any need to step into standing water near equipment.
Why this matters
Why: Active pooling, wet electrical or gas equipment, gas odor, or an unreachable source increases the risk of damage or injury and is not a routine tightening task. A small, clearly external drip still needs prompt source identification because a pressurized water heater can worsen suddenly.
-
Check 2
With the heater isolated as safely as possible, use a flashlight and dry absorbent paper from outside the cabinet to trace the highest visible wet point. Check nearby cold-water inlet and hot-water outlet connections, other piping above the heater, the relief-valve discharge pipe, and the floor around the base; do not remove insulation, covers, or fittings.
Expected result: Water starts at piping above the heater; a threaded connection is wet; water appears below the relief discharge; the base is wet with no higher source; or water is visible through a cabinet seam or from the tank body.
Next step: Photograph the first wet point and arrange a licensed plumber or qualified water-heater technician. Do not tighten a relief valve, disconnect piping, or open the cabinet to confirm the source.
Stop if: Stop when the source is inside the cabinet, at a gas or electrical component, at a hot discharge, or requires moving the heater or loosening a fitting.
Why this matters
Why: An upstream pipe or connection can be mistaken for a tank failure. Moisture below the relief discharge suggests a pressure, thermal-expansion, or relief-valve path. Water at the tank body or base is more concerning for corrosion or internal failure and cannot be confirmed safely by exterior tightening.
-
Check 3
Observe the area after it has been made safe, without using a flame, heat gun, hair dryer, or forced heat. Note whether moisture is limited to cold-water piping, whether a small damp area dries and stays dry, and whether water returns or remains pooled at the base. Do not wipe into an opening or use the result to justify restarting a wet heater.
Expected result: Moisture is only on cold pipes; a small spill dries and does not return; water remains or returns at the base; or water appears at a valve, discharge pipe, or tank seam.
Next step: Document the pattern and have a professional verify the source before restoring normal operation. If water returns, keep the heater isolated as appropriate and escalate rather than continuing to monitor indefinitely.
Stop if: Stop if the floor remains wet near electrical equipment, if water returns quickly, or if checking the pattern would require energizing or firing the heater.
Why this matters
Why: Condensation or a one-time installation spill can resemble a leak, but repeated pooling or water that remains at the tank points to an active plumbing or equipment problem. Drying alone does not prove that the heater is safe to operate.
-
Check 4
Look only at the outside of the temperature-and-pressure relief discharge, drain-valve area, and any visible service openings. Record where water emerges and whether the discharge is hot or forceful. Do not lift the relief-valve handle, open the drain, remove an element, alter an expansion tank, or loosen a valve to see whether the leak changes.
Expected result: Water is below the relief discharge; water is at the drain or service opening; the discharge is hot or forceful; or these areas are dry while the tank body or base is wet.
Next step: Keep the heater out of normal operation and call a qualified plumber or water-heater technician for pressure, relief-valve, expansion, drain, and tank evaluation. Provide photos from a safe distance.
Stop if: Stop for hot water, forceful discharge, a relief valve that is dripping continuously, or any temptation to test, cap, block, or replace a safety valve yourself.
Why this matters
Why: Water below a relief discharge can reflect pressure or thermal-expansion conditions, while a drain or service opening may have a valve or seal problem. A hot or forceful discharge is a safety event, not a homeowner adjustment. A dry relief and drain path shifts concern toward connections, condensation, or the tank itself.
-
Check 5
From paperwork or a safely visible label, record the Rheem model, fuel type, approximate age, and any displayed leak, service, or fault indication. Note whether the heater is a tank, tankless, or hybrid unit and whether the leak began after installation, maintenance, freezing weather, or a power event. Do not remove panels to locate the label or clear a persistent alert.
Expected result: A model-specific leak alert is active; the heater is a different type than expected; the leak followed freezing or recent work; the tank is older and the body or base is wet; or no clear pattern is available.
Next step: Give the model, fuel type, photos, leak location, alert text, and timeline to Rheem support or a licensed plumber. Keep the unit off or isolated when the leak persists, and do not bypass a safety alert to restore service.
Stop if: Stop when the next step requires accessing controls, gas combustion parts, electrical components, refrigerant-like sealed components, pressure testing, or internal tank parts.
Why this matters
Why: Rheem diagnostic and leak-detection behavior varies by product type and model. Recent installation or freezing can involve external plumbing or freeze damage, while persistent tank-body moisture on an older tank makes repair-versus-replacement evaluation more important. Uncertainty is itself a reason for professional diagnosis.
-
Check 6
Prepare a service record with the first wet point, whether water returns, the shutoff state, Rheem model and fuel type, visible corrosion, relief or drain observations, leak-alert behavior, and photos taken without touching the equipment. Keep the area ventilated and dry without using heat, and protect nearby belongings only if doing so does not require contact with wet equipment.
Expected result: The leak stops after water is isolated; it continues or returns; the tank body or base is wet; a valve or connection is implicated; or the technician needs access to gas, electrical, pressure, or internal components.
Next step: Schedule a licensed plumber or qualified Rheem technician; request an urgent response for active flooding, gas odor, electrical hazard, hot discharge, or structural water damage. Do not resume operation merely because the floor has dried.
Stop if: End owner troubleshooting once the source is uncertain or the repair involves a relief valve, gas valve, wiring, heating element, pressure, tank opening, moving the heater, or replacement selection.
Why this matters
Why: A stopped leak can still leave a failed valve, connection, or tank condition. Continued or body-origin leakage requires a prompt repair-or-replacement decision, while component-origin leakage requires model-specific diagnosis and compatible parts. The record helps a professional avoid restarting an unsafe unit.
Use your observations
Decision map
Find the observation that best matches what you see, then follow the next safe action.
-
PATH 01Next step
What you see
The highest wet point is on piping above the heater or at a cold inlet, hot outlet, or other threaded connection, while the tank body is dry.
Do this next
Keep the water limited if needed, photograph the source, and have a plumber repair or verify the connection. Do not tighten, disconnect, or heat a wet fitting as a trial.
Why this path and its safety boundary
Why it matters: An external plumbing connection, nearby pipe, or condensation source is more likely than a failed tank shell, but the fitting may still worsen under water pressure.
-
PATH 02Next step
What you see
Water collects below the temperature-and-pressure relief discharge or a hot/forceful discharge is observed, with no obvious leak higher on the piping.
Do this next
Keep clear of the discharge and obtain qualified plumbing service for pressure, expansion, and relief-valve diagnosis. Treat a hot or forceful discharge as urgent.
Why this path and its safety boundary
Why it matters: Pressure, thermal expansion, or a relief-valve condition becomes more likely. A relief path is a safety function and should not be capped, blocked, or repeatedly tested by the homeowner.
-
PATH 03Next step
What you see
Water remains or returns at the tank base, appears through the tank body or seam, or no external source explains the pooling.
Do this next
Keep the heater isolated and arrange prompt professional evaluation for repair versus replacement. Protect the area from further water damage only from a dry, safe position.
Why this path and its safety boundary
Why it matters: Tank corrosion or internal failure is more likely; Rheem notes that water collecting at the bottom can indicate corrosion requiring replacement. Exterior drying cannot repair a compromised tank.
-
PATH 04Next step
What you see
Moisture is confined to cold piping or a small spill dries and does not return, with no pooling at the tank and no active discharge.
Do this next
Continue observing from a safe position, photograph the dry area, and obtain advice if moisture returns or the heater shows an alert. Do not use a flame or heat source to dry it.
Why this path and its safety boundary
Why it matters: Condensation or residual installation moisture is possible, but a dry interval does not prove that the heater can safely be restarted without checking the source and model guidance.
-
PATH 05Next step
What you see
Water is near electrical equipment, gas odor or smoke is present, the flow is rapidly increasing, a leak alert persists, or the first wet point cannot be safely identified.
Do this next
Leave the hazard area as appropriate, contact emergency or gas service for gas or fire hazards, and call a licensed plumber or qualified technician for the water heater. Do not touch wet equipment or bypass an alert.
Why this path and its safety boundary
Why it matters: The immediate priority is people and property safety, not distinguishing a valve from a tank or ordering a part. Model-specific leak detection and fuel-system behavior may require qualified access.
Helpful context
Understand the symptom
Make the area safe before tracing the water
Keep people away from hot water and standing water. If the floor and controls are dry and the shutoff is safely reachable, close the cold-water supply serving the heater. Do not touch a wet electrical disconnect, wet wiring, or a gas control; if you smell gas, leave the area and contact the appropriate emergency or gas service from outside. Rheem recommends shutting off water and the gas or electrical supply for a water-heater leak, but the safe method depends on the installation and whether equipment is wet.
Trace the source instead of assuming the tank has failed
Use a flashlight from a dry position and look for the highest wet point. Rheem's leak-diagnosis bulletin checks the floor, the temperature-and-pressure relief discharge, the cold inlet and hot outlet connections, the drain valve, heating-element openings on applicable electric models, the gas-valve connection on applicable gas models, and the tank body. Water running down the outside can make a fitting look like a tank leak, so record where it first appears without removing covers or parts.
Use the pattern to decide whether service is urgent
A small amount of moisture on cold pipes may be condensation, while water that repeatedly pools at the tank base or appears through the tank body raises concern for corrosion or internal failure. Water below the relief discharge can point to pressure or thermal-expansion conditions; water at a threaded connection may be a fitting or valve issue. These observations narrow the service path, but they do not authorize a homeowner to test a relief valve, adjust pressure, drain a hot tank, or replace a safety component.
Do not bypass leak detection or dry a spill with heat
Some Rheem models have leak-detection alerts or an automatic shutoff, but model-specific controls must not be overridden to keep a leaking heater operating. Rheem's electric model guidance says to find the source first, call for service when the leak is from the heater, and never use heat to dry residual moisture. Do not scrape corrosion, open an access panel, reset a persistent alert, or restart a wet unit as a test.
Safety boundary
Stop conditions
- Stop and leave the area for gas odor, smoke, sparking, fire, or a rapidly worsening hot-water discharge; contact the appropriate emergency or gas service from a safe location.
- Do not touch a wet electrical disconnect, exposed conductor, gas control, or any equipment standing in water. Obtain qualified electrical or plumbing help instead.
- Do not open covers, remove insulation, loosen pressurized piping, lift the temperature-and-pressure relief handle, open the drain, replace a safety valve, adjust an expansion tank, or alter gas or electrical wiring as a diagnostic test.
- Do not cap, block, or bypass a relief path or leak-detection alert, and do not repeatedly restart a heater that is leaking or wet.
- Do not use a flame, heat gun, hair dryer, or other heat source to dry a spill or leak. Keep operation stopped or isolated when the leak source is uncertain or involves the tank body, controls, pressure, gas, electrical parts, or internal components.
Only after diagnosis
Potential parts
- Rheem temperature-and-pressure relief valve
Consider this only when a qualified technician confirms the relief valve is the source or fails its model-specific evaluation; a discharge can instead reflect pressure or thermal-expansion conditions.
Confirm the exact Rheem model, valve rating, connection, discharge requirements, and local code with the technician before ordering; never cap or substitute a relief device. - Rheem water-heater drain valve
Consider this only when the leak is confirmed at the drain valve and a qualified technician determines that the valve or seal, rather than the tank, is serviceable.
Verify exact model, thread or port configuration, temperature and pressure conditions, and installation requirements; drain and replacement work may involve hot pressurized water. - water-heater inlet or outlet connection
Consider this only when the first wet point is an external connection and a plumber confirms the fitting, nipple, or connector is the failed part.
Confirm the exact connection material, dimensions, fuel and installation configuration, and local requirements; do not choose by appearance or tighten a wet pressurized joint as a test. - thermal-expansion tank
Consider this only after a qualified plumber confirms pressure or thermal expansion and determines that an expansion tank is required, damaged, or incorrectly configured.
Sizing, precharge, location, backflow conditions, and local code depend on the plumbing system; do not adjust or install one based only on water below the relief discharge.
When checks do not resolve it
Need a professional?
Call a licensed plumber or qualified Rheem water-heater technician promptly for any recurring leak, pooling, wet tank body or base, relief-valve discharge, drain or service-opening leak, persistent leak alert, visible corrosion, or source that cannot be identified safely. Call urgently for active flooding, hot or forceful discharge, water near electrical equipment, smoke, exposed wiring, gas odor, or major water damage. A qualified professional must handle pressure, thermal-expansion, relief-valve, gas, electrical, tank, and repair-versus-replacement decisions.
Safety scope: Owner checks are limited to safe external observation, an accessible water shutoff only when the area and controls are dry, documentation, and keeping people away from hazards. A qualified professional must handle gas or electrical isolation when unsafe, pressure and thermal-expansion testing, relief or drain components, wiring, heating elements, tank openings, internal controls, moving the heater, and repair-versus-replacement decisions.
Common questions
FAQ
Why is my Rheem water heater leaking from the bottom?
Trace the highest wet point first. Water at the tank base with no external source can indicate tank corrosion or internal failure, while water from a drain, relief path, or pipe may be repairable. Isolate the heater safely and arrange prompt professional evaluation.
Should I turn off my Rheem water heater if it is leaking?
Rheem recommends turning off water and the gas or electrical supply for a water-heater leak. Only use an accessible shutoff when the area is dry and safe; never touch wet electrical equipment or a gas control.
Can condensation look like a Rheem water-heater leak?
Yes. Moisture on cold piping or a one-time installation spill can dry without returning. Repeated pooling, water at the tank body, or a wet valve or discharge path is not explained by condensation alone and needs service.
What if water is coming from the temperature-and-pressure relief pipe?
Water below that discharge can involve pressure, thermal expansion, or the relief valve. Keep clear of hot or forceful discharge and have a qualified plumber evaluate it; do not cap, block, or test the safety valve yourself.
Can I tighten the fitting that is leaking?
Do not tighten a wet, hot, or pressurized fitting as a trial. Photograph the first wet point, limit water safely, and have a plumber confirm whether the fitting, nipple, valve, or tank is responsible.
What if my Rheem leak alert is on but I cannot find a leak?
A spill, condensation, external plumbing leak, or heater leak can trigger model-specific detection. Do not bypass a persistent alert or use heat to dry the area; identify the source safely and contact qualified service if the alert remains.
Is a Rheem water heater leak always a reason to replace the whole unit?
No. External connections, valves, discharge conditions, or condensation may be serviceable. Water through the tank body or persistent pooling at the base is more concerning for corrosion and requires a professional repair-versus-replacement decision.
Can I open the drain valve to stop or diagnose a leak?
Do not open the drain to diagnose a leak. Water may be hot and pressurized, and the drain itself may be the failed part. Have a qualified technician isolate, drain, and repair the unit using the exact model procedure.
What should I do if water is near the electrical parts?
Do not touch a wet disconnect, wiring, or control, and do not step into standing water near the heater. Move away and obtain qualified electrical or plumbing help; treat smoke, sparking, or exposed conductors as an emergency.
What information should I give a plumber about a Rheem leak?
Provide the model and fuel type, first wet point, whether water returns or pools, photos from a safe distance, any relief or drain observations, leak-alert behavior, recent work or freezing weather, and whether the water supply was isolated.
Read the exact guide
Official sources
- Work Smarter with the Rheem Fix It ToolRheem Manufacturing Company · Rheem official support page used only to establish that product-specific diagnosis asks for product type, issue, and error information before suggesting steps; the contractor tool is not a homeowner repair procedure.
- 7 Signs You Need to Call a PlumberRheem Manufacturing Company · Rheem official consumer guidance used for service escalation and the distinction between professional diagnosis and homeowner observation.
- Water Heater Tips for Winter Weather ConditionsRheem Manufacturing Company · Rheem official consumer guidance used for the immediate leak response and licensed-plumber boundary; the article is written for winter conditions but its leak-safety instruction applies to a water-heater leak generally.
- Gladiator Electric Residential Water Heater with Electronic Control — Use and Care ManualRheem Manufacturing Company · Rheem official manual opened as a model-family example; its leak-detection controls must not be generalized to an unspecified Rheem heater, so the article uses it only to set a cautious boundary against bypassing alerts or using heat to dry moisture.
- What to Do Before Calling a Plumber or Replacing Your Water HeaterRheem Manufacturing Company · Rheem official consumer article used for safe external observation, pooling and tank-base interpretation, model identification, and when to call a professional; exact model instructions remain controlling.
- How to Diagnose A Leaker — Technical Service Bulletin 1223Rheem Manufacturing Company · Rheem technical bulletin opened from the manufacturer's technical-bulletin index; it provides diagnostic distinctions for residential water-heater leaks, while the exact model and local installation govern service.
Community feedback
Share a repair observation
Share a plain-text repair observation. Accepted observations are published automatically; this page may take a moment to update.