
On this page
Start here
Quick answer
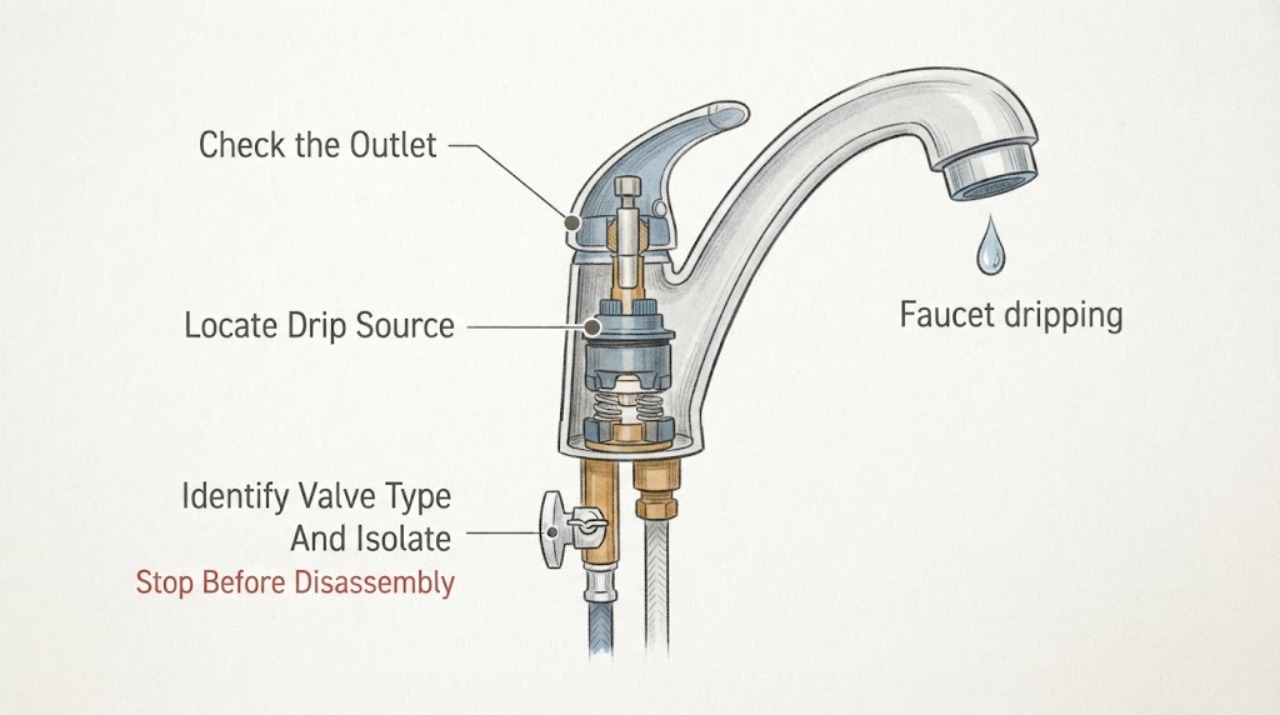
A Delta faucet that drips can have debris at the outlet, worn seats and springs, a worn cartridge or stem, or a leak at the handle, spout base, hose, or supply connection. First locate where the water starts and whether it drips with the faucet fully off or only while water is running. Close the appropriate under-sink or fixture shutoff before loosening any fitting, protect the drain, and inspect only parts covered by the exact Delta model instructions. A spout drip after the water is off points toward the valve's sealing parts; a leak under a handle or at the base points toward a stem, cartridge, O-ring, or connection. Stop for a seized shutoff, hidden-wall leak, damaged valve body, flooding, or water near electrical equipment, and call a qualified plumber.
Work through in order
Diagnostic checks
Use only checks that match the exact appliance or system and its official guide.
-
Check 1
Dry the faucet and the area below it, close the handles fully, and watch from a safe position for several minutes. Identify the first wet point and whether water appears with the faucet off, only while it runs, or after the spout or pull-out hose is moved.
Expected result: Record a drip from the spout outlet, water under a handle, water around the spout base, a leak from the spray or supply hose, water below the counter, or no repeatable drip.
Next step: Photograph the wet point and identify whether the faucet has one or two handles before selecting a repair path. Close the appropriate water shutoff for any active leak.
Stop if: Stop for rapid flow, a loose faucet body, water entering a wall or cabinet, a seized shutoff, or water near an outlet or electrical device.
Why this matters
Why: A spout drip with the faucet off points toward an internal cartridge, stem, seats, springs, or debris. A handle or base leak points toward a stem seal, cartridge, O-ring, or connection. A hose or below-counter leak may be a supply or mounting issue rather than the valve's outlet seal.
-
Check 2
Confirm that each handle reaches its normal closed position without force, then inspect the visible outlet or aerator for grit, scale, or a loose screen. If the exact Delta instructions allow aerator removal, place a stopper over the drain, remove it carefully, rinse loose debris, and restore the screen without cross-threading.
Expected result: Record a handle that does not close, debris at the outlet, an aerator that is damaged or stuck, a clear outlet with the same drip, or water that starts at the handle or base instead of the outlet.
Next step: Reinstall only clean, undamaged parts and retest once. If the drip continues or the aerator cannot be removed without force, use the model-specific Delta instructions or arrange plumbing service.
Stop if: Do not pry the aerator with sharp tools, force a handle, drill the outlet, or continue if the faucet body twists or the connection begins to leak.
Why this matters
Why: Loose debris can hold a valve seal slightly open or make an outlet appear to drip. A clear outlet with a continuing drip points more toward the cartridge, stem, seats, springs, or valve body. A handle that binds or will not close can indicate an internal valve issue rather than a simple screen blockage.
-
Check 3
With the drain covered and the water supply off, identify whether the Delta faucet is single-handle or two-handle and record any model marking under the counter or on the product. For a two-handle faucet, close one supply at a time only if the stops operate normally and the exact instructions permit it; do not remove the valve solely to guess the part.
Expected result: Record a drip that stops when one handle's supply is isolated, a drip that continues from both sides, an unknown valve type, a worn or loose handle, a model marking, or a shutoff that will not close.
Next step: Use Delta's product identifier and the exact model instructions to determine the correct valve service path. Ask a plumber to isolate the supply if a stop will not close or the valve body moves.
Stop if: Do not loosen a bonnet, cartridge, stem, or supply fitting until water is fully isolated; stop if the shutoff leaks, spins freely, or cannot be reopened safely.
Why this matters
Why: A two-handle spout drip that stops when one side is isolated narrows the issue to that valve's seats, spring, or stem. A single-handle or both-side drip points toward the cartridge, shared valve body, or debris. An unknown model or unusable shutoff makes internal work unsafe and prevents a reliable part choice.
-
Check 4
With the water off, wipe the handle, spout base, mounting area, flexible hoses, and visible supply connections dry. Check for a wet seam, mineral track, loose connection, damaged O-ring area, or water that travels from above; do not reach into a wall or remove the faucet from the counter.
Expected result: Record a dry base with the drip still at the outlet, moisture under the handle, water at the spout base, a wet supply or spray hose, a loose mounting connection, or water emerging below the counter or wall.
Next step: Tighten nothing unless the exact Delta instructions identify an accessible user adjustment; otherwise leave the supply off and arrange a model-specific repair. Protect the cabinet from further water.
Stop if: Do not over-tighten fittings, twist copper or rigid piping, pull the faucet through the counter, or continue with a leak inside a wall or cabinet.
Why this matters
Why: Water under a handle or at a base can require a stem seal, cartridge, O-ring, mounting seal, or connection repair. A wet hose or below-counter source may be a supply or plumbing problem. A dry exterior with an outlet drip keeps the focus on the valve's internal sealing path.
-
Check 5
If the drip is from the spout with the faucet off and a permitted outlet rinse did not help, compare the exact Delta model with its parts diagram and instructions before any internal service. For a two-handle model, the documented candidates may include seats, springs, or a stem; for a single-handle model, the candidate may be a model-specific cartridge.
Expected result: Record an exact model match and approved procedure, no model information, a stuck retaining nut or cartridge, visible corrosion or damage, a valve body that moves, or a drip that remains after a qualified internal repair.
Next step: Have a qualified plumber perform internal valve service when the model or shutoff is uncertain, the part will not release normally, or the drip continues after the specified repair.
Stop if: Do not force a cartridge, pry against the valve body, use heat or penetrating chemicals near finished surfaces, or leave the faucet pressurized during disassembly.
Why this matters
Why: A model-matched internal sealing part may address a spout drip caused by wear or debris, but a stuck part, damaged body, corrosion, or persistent leak requires professional diagnosis. A generic cartridge or stem cannot be selected from appearance alone.
-
Check 6
After a permitted screen cleaning, model-approved adjustment, or qualified repair, restore the water supply slowly while watching every connection. Operate hot and cold through one normal cycle, close the handles, and place a dry towel under the base and connections to reveal a new drop.
Expected result: Record a dry faucet, a continuing outlet drip, a leak under a handle or base, a wet supply connection, a leak that appears only when flowing, or a shutoff or fitting that begins to seep.
Next step: Close the water supply and arrange qualified plumbing service for any recurring leak, damaged body, hidden-wall water, or failed retest. Keep the towel and photos for diagnosis.
Stop if: Stop immediately for rapid leakage, flooding, a fitting that moves in the counter, water inside the wall, or water near electrical equipment.
Why this matters
Why: A dry retest supports that the identified debris or model-approved repair addressed the issue. A continuing or newly relocated leak suggests another seal, connection, valve-body, or supply fault and should not be managed by tightening random fittings.
Use your observations
Decision map
Find the observation that best matches what you see, then follow the next safe action.
-
PATH 01Next step
What you see
Water forms at the spout outlet after the Delta faucet is fully closed, while the handle, base, and supply connections remain dry.
Do this next
Identify the exact model and follow its approved valve-service instructions, or arrange a plumber if the shutoff, retaining part, or valve type is uncertain.
Why this path and its safety boundary
Why it matters: An internal sealing path is more likely: debris, a model-specific cartridge, or, on applicable two-handle designs, worn seats, springs, or a stem.
-
PATH 02Next step
What you see
Water appears under a handle, around the spout base, or along the faucet body while the outlet itself is not the first wet point.
Do this next
Keep the supply off, document the first wet point, and use the exact Delta model diagram or qualified plumbing service to address the seal or connection.
Why this path and its safety boundary
Why it matters: A stem or cartridge seal, O-ring, mounting seal, or connection is more likely than an outlet drip. Water can travel down the body and hide the source.
-
PATH 03Next step
What you see
A two-handle Delta faucet drips from the spout and the drip stops when one side's supply is isolated, provided the shutoff operates normally.
Do this next
Use the exact model instructions or have a plumber service the identified side; do not assume a common repair part fits every Delta series.
Why this path and its safety boundary
Why it matters: The isolated side's seats, spring, stem, or related valve seal is more likely. Delta documents worn seats and springs as a cause of two-handle spout leaks.
-
PATH 04Next step
What you see
Water appears at a flexible hose, supply connection, below the counter, inside a cabinet or wall, or the leak continues when the faucet outlet is dry.
Do this next
Close the appropriate water supply, protect the cabinet and floor, and arrange qualified plumbing service. Do not pull the faucet or twist rigid piping to expose the source.
Why this path and its safety boundary
Why it matters: The source is likely a supply connection, hose, mounting or valve-body path, or household plumbing rather than a simple spout seal.
-
PATH 05Next step
What you see
The outlet, handle, or base still drips after the correct model procedure, or a retaining part is seized, the body is corroded, or the valve moves in the counter.
Do this next
Keep the supply off and obtain qualified plumber diagnosis for the faucet and surrounding plumbing.
Why this path and its safety boundary
Why it matters: The valve body, cartridge or stem interface, connection seal, or installation may be damaged. Repeated tightening or force can turn a small drip into a larger leak.
Helpful context
Understand the symptom
Locate the drip before choosing a Delta repair path
A drop at the spout outlet after the handles are closed is a valve-sealing symptom. Water that appears only around the handle, spout base, spray hose, or supply connection follows a different path and can be mistaken for a spout drip when it runs down the faucet body. Delta's parts guide groups leak parts by where water appears—spout, base, or under the handle—so the wet point and timing matter before a cartridge or stem is selected.
Delta valve designs are not interchangeable
Delta faucets may use a single-handle cartridge, a two-handle stem with seats and springs, or another model-specific valve. Delta's official guidance says normal wear can affect seats and springs in two-handle faucets, and its parts finder asks for the product identity before presenting a repair part. Do not infer a part from the faucet finish or handle shape alone; record the model information and use the matching installation instructions.
Shut off water before opening any valve area
A faucet repair can release more water than the original drip if a shutoff is not closed or cannot be reopened. Close the fixture stops or the home water shutoff as appropriate, open the faucet briefly to relieve pressure, cover the drain, and keep a towel or container ready. If a stop will not turn, the valve body moves in the counter, or water continues after the supply is closed, stop and use a plumber rather than forcing the fitting.
Only after diagnosis
Potential parts
- Delta single-handle cartridge or valve cartridge
Consider only when the exact model and qualified testing link a spout, handle, or base leak to a worn or damaged single-handle cartridge.
Confirm the exact Delta model, valve series, cartridge orientation, retaining method, and manufacturer fit information before ordering or installing. - Delta two-handle seats, springs, or stem assembly
Consider only when a two-handle spout drip is isolated to a valve and qualified testing or the exact Delta instructions identify worn seats, springs, or a stem.
Match the exact faucet model and valve design; Delta parts that look similar are not assumed interchangeable. - faucet O-ring, hose seal, or connection gasket
Consider only when inspection confirms a wet base, hose, or connection seal rather than an outlet valve leak.
Confirm the exact Delta model, seal location, material, connection type, and installation procedure; do not use a random ring or over-tighten the fitting.
When checks do not resolve it
Need a professional?
Arrange qualified plumbing service when the Delta faucet drips after a model-approved outlet or valve repair, the leak is under a handle or base, a cartridge or retaining part is stuck, the valve body moves, a shutoff will not close, or water appears below the counter, in a wall, or at a supply connection. Stop immediately for rapid flow, flooding, water near electrical equipment, or a fitting that could damage the counter or piping.
Have this ready
- Give the plumber the Delta model marking, one- or two-handle configuration, first wet point, drip timing, hot or cold isolation result, aerator and outlet observations, shutoff condition, photos, and any prior cartridge, stem, seat, spring, O-ring, or connection work.
Common questions
FAQ
Why is my Delta faucet dripping from the spout when it is off?
The valve may have debris or a worn model-specific cartridge, stem, seats, or springs. First confirm the handle is fully closed and the outlet is the first wet point, then identify the exact Delta model before any internal repair.
Why does my Delta faucet leak under the handle?
A stem or cartridge seal, O-ring, or connection can leak under the handle while the outlet remains dry. Close the water supply, dry the faucet, and identify the first wet point; do not tighten random parts or force the handle.
Do Delta faucets use the same cartridge?
No. Delta valve designs and parts vary by model and series. Use the faucet's model information and Delta's product identification or parts diagram rather than choosing by finish, handle shape, or a generic image.
Can debris cause a Delta faucet to drip?
Debris at the outlet or inside the valve can hold a sealing surface open. Clean only an accessible aerator or screen as the exact instructions allow; if the drip remains, the valve may need model-specific service.
Should I repair a Delta faucet if the shutoff valve will not close?
No. A shutoff that will not close, spins freely, leaks at the stem, or moves the valve body makes internal faucet work unsafe. Stop and ask a qualified plumber to isolate the water and inspect the fitting.
When is a Delta faucet drip an urgent plumbing problem?
Close the supply and obtain service for rapid flow, flooding, a leak inside a wall or cabinet, a damaged valve body, a seized shutoff, or water near electrical equipment. Do not keep the faucet pressurized while searching for a hidden leak.
Read the exact guide
Official sources
- What do I do about water dripping from the spout of my two-handle lavatory faucet?Delta Faucet · Official Delta two-handle guidance used for the applicable valve branch; it is not a universal procedure for single-handle or other faucet designs.
- Find Parts and Identify Your ProductDelta Faucet · Official Delta parts and identification guide used for leak-source and model-matching logic; actual parts vary by faucet series.
Community feedback
Share a repair observation
Share a plain-text repair observation. Accepted observations are published automatically; this page may take a moment to update.