
On this page
Start here
Quick answer
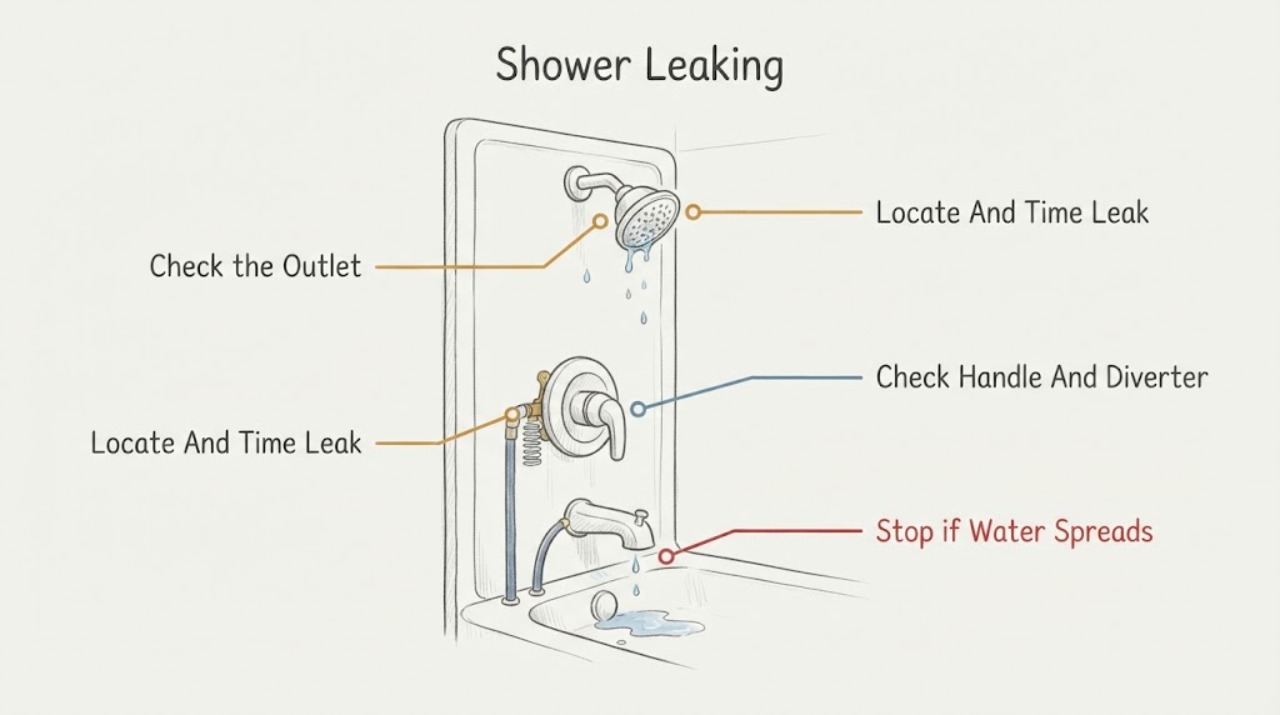
First locate where the Delta shower leaks and whether it leaks only briefly after shutoff, while water is running, or continuously with the control off. A short drip from the showerhead can be the head emptying; a leak that continues long after shutoff or appears at the handle or tub spout points toward the valve cartridge or related seals. A connection between the showerhead and arm may instead have a loose or overtightened nut, damaged gasket, or debris screen. Dry the area, check the handle and diverter through their normal range, and inspect only visible connections without forcing them. Use the exact Delta model to identify parts. Do not remove the handle, bonnet, cartridge, seats, springs, or concealed fittings under pressure. Arrange qualified plumbing service for a continuous leak, water behind the wall, a failed shutoff, or any repair that requires valve disassembly.
Work through in order
Diagnostic checks
Use only checks that match the exact appliance or system and its official guide.
-
Check 1
Turn the Delta shower fully off using its normal control position. Dry the showerhead, tub spout, handle, escutcheon, and exposed showerhead-to-arm joint, then watch from a dry position. Record whether water appears only at the outlet, at the handle or plate, at the tub spout, or behind the wall, and whether it stops after the outlet drains.
Expected result: A few drops come from the showerhead and stop; the showerhead or spout continues dripping; water appears around the handle or plate; or water reaches the wall or ceiling.
Next step: Continue only with the appropriate visible checks if the area stays dry. Keep the shower off and arrange qualified plumbing service for a continuous leak, a concealed leak, or water around the trim.
Stop if: Stop immediately if water is running, the wall or ceiling is wet, the trim is loose, or moisture is near electrical equipment; do not open the wall.
Why this matters
Why: A brief, non-returning outlet drip can be residual water. A continuing or returning outlet drip keeps the valve cartridge or related seals in consideration. Water at the handle, plate, wall, or ceiling is a separate seal, connection, valve-body, or concealed-pipe path.
-
Check 2
If water appears only where the showerhead meets the shower arm while water is running, inspect that exposed joint after turning the water off. Note whether the head is loose, the connection has visible residue, or the leak comes from the spray nozzles or a seam in the head. Do not twist the concealed arm or overtighten the head.
Expected result: The joint is loose or wet; the spray holes have mineral deposits or an uneven spray; the head body or seam leaks; or the joint is dry while the shower still leaks after shutoff.
Next step: Follow the exact Delta showerhead instructions for any permitted cleaning or exposed-gasket check and stop if the head or arm resists. Arrange service for a seam leak, recurring connection leak, or any leak that continues with the water off.
Stop if: Do not use excessive force, remove a concealed shower arm, apply unapproved chemicals, or continue if the wall fitting moves or water enters the wall.
Why this matters
Why: A loose joint, compressed gasket, debris screen, or nozzle deposits can cause a leak while running. A leak from a head seam may require the head to be replaced or evaluated. A dry connection with a persistent off-position drip shifts attention back to the valve rather than the head.
-
Check 3
Operate the Delta handle, temperature control, and any tub-shower diverter only through their normal range, then return the handle to its normal off position without forcing it. Observe whether the drip changes when selecting the showerhead versus tub spout, or when the control reaches off.
Expected result: The handle does not reach its normal stop; the drip changes with the diverter; water comes from the tub spout while the shower is selected; or the drip is unchanged in every position.
Next step: Record the control position and affected outlet. Do not force or adjust the control; use the exact Delta model information and arrange qualified service if the leak persists or the control is stiff or loose.
Stop if: Do not remove the handle, adjust a temperature limit stop, pry the diverter, or continue if the control binds, cracks, sprays water, or moves the trim.
Why this matters
Why: A control that stops short can leave the valve partly open. A symptom that follows a diverter can involve that outlet path. An unchanged continuous drip with a correctly positioned handle keeps the valve cartridge, seats, springs, or valve body in consideration.
-
Check 4
With water off, dry the handle, escutcheon edge, tub-spout connection, and accessible wall area. Look for a fresh bead, mineral trail, grout discoloration, soft wall material, dampness behind the plate, or a ceiling stain below. Do not remove the plate or probe the wall.
Expected result: Only the outlet drips and the trim stays dry; water reappears around the handle or escutcheon; the tub-spout connection leaks; or moisture is entering the wall or ceiling.
Next step: Keep the shower out of service for trim, wall, or supply leaks and arrange qualified plumbing service. Photograph the first wet location and provide the model rather than tightening concealed parts.
Stop if: Do not caulk over an active leak, remove the escutcheon, open the wall, tighten a hidden fitting, or use the shower when moisture is spreading.
Why this matters
Why: A dry trim area makes an outlet or valve-seat path more likely. Water around the handle or plate can indicate a stem or cartridge seal, while a tub-spout or wall leak can involve a connection, diverter, valve body, or concealed piping.
-
Check 5
Photograph the Delta model or serial information if it is visible without disassembly, along with the handle, trim, outlets, and any exposed connection. Record whether the shower is shower-only or tub-and-shower, single- or multi-handle, and whether the leak started after installation or a cartridge repair.
Expected result: The model is identifiable; the model is unknown; the leak began after installation or repair; or a previously dry valve now leaks continuously with the control off.
Next step: Use Delta's product-identification and parts resources or give the model and photos to a qualified plumber. Isolate the supply when safely possible for continuous or concealed leakage.
Stop if: Do not order a cartridge from appearance alone, remove a retaining part under pressure, or continue using a fixture with concealed leakage or a failed shutoff.
Why this matters
Why: The model determines the cartridge, seats and springs, retaining method, diverter, and safe repair sequence. A post-installation leak can reflect seating, debris, orientation, or connection issues; a new leak on an established valve can reflect wear or damaged sealing surfaces. Neither pattern proves a particular part.
Use your observations
Decision map
Find the observation that best matches what you see, then follow the next safe action.
-
PATH 01Next step
What you see
Do this next
Monitor without forcing the control. Arrange service if the drip continues long after shutoff, returns after the head is dry, or appears anywhere other than the spray holes.
Why this path and its safety boundary
Why it matters: The showerhead may simply be emptying water retained in its outlet path rather than receiving a continuing supply through the valve.
-
PATH 02Next step
What you see
Do this next
Keep the shower off and arrange qualified plumbing service for model-specific diagnosis. Do not remove the cartridge or bonnet under pressure.
Why this path and its safety boundary
Why it matters: Water is likely passing the closed valve or related sealing path; the cartridge, seats and springs, O-rings, diverter, debris, or valve body may be involved depending on the Delta model.
-
PATH 03Next step
What you see
Do this next
Stop using the shower, isolate the supply if safely accessible, and obtain qualified plumbing service. Do not conceal the leak with caulk or open the wall as a first check.
Why this path and its safety boundary
Why it matters: A handle or cartridge seal, retaining component, valve body, supply connection, or concealed pipe is more plausible than outlet drain-down, and water may travel before becoming visible.
-
PATH 04Next step
What you see
Do this next
Follow the exact Delta showerhead cleaning or connection guidance without overtightening. Have the head or connection serviced if the seam leaks, the joint recurs, or the arm or wall fitting moves.
Why this path and its safety boundary
Why it matters: The exposed showerhead connection, gasket, debris screen, nozzle deposits, selector, or head body is more likely than the closed valve.
-
PATH 05Next step
What you see
Do this next
Keep the shower off if cross-flow or continuous leakage persists and arrange qualified plumbing service with the model, outlet position, and wet-location photos.
Why this path and its safety boundary
Why it matters: A diverter, outlet connection, cartridge assembly, valve-body seal, or concealed piping issue is possible; the symptom does not identify one universal Delta repair part.
Helpful context
Understand the symptom
Classify the leak before choosing a part
Dry the showerhead, tub spout, handle, escutcheon, and the joint between the showerhead and shower arm. Then note where the first new water appears and whether it stops after the outlet drains. Delta says a little dripping after shutoff can be the showerhead emptying its reservoir, while a showerhead that keeps dripping long after shutoff or water from another location is a leak. This distinction prevents replacing a valve cartridge when the issue is only outlet drain-down, and prevents treating a continuously leaking valve as normal.
The Delta model changes the repair path
Delta tub-and-shower products use different valve families and parts. Depending on the model, a persistent off-position drip may involve a cartridge, seats and springs, O-rings, a bonnet or retaining part, a diverter, or the valve body. The model number and parts diagram—not the trim appearance alone—determine what fits. Delta's parts guidance groups tub-and-shower cartridges by leak location and directs users to identify the product first.
Keep ordinary checks outside the valve
A homeowner can safely dry and observe the leak, operate the handle or diverter normally without forcing it, and inspect a visible showerhead connection for movement or mineral residue. If the leak is at that exposed connection, a model-approved cleaning or gasket check may be relevant. Valve-cartridge work is different: it requires water isolation, pressure relief, and model-specific disassembly. Stop before opening the wall, removing the escutcheon, or loosening a bonnet or cartridge unless a qualified person is handling the work.
Safety boundary
Stop conditions
- Stop using the shower for a continuous or returning drip, water around the handle or escutcheon, cross-flow, or moisture entering the wall or ceiling.
- Do not remove the handle, escutcheon, bonnet, cartridge, seats, springs, retaining components, or concealed fitting under pressure.
- Do not force a stiff or loose handle or diverter, twist a concealed shower arm, overtighten a showerhead, or caulk over an active leak.
- Do not choose a Delta cartridge, seal, or diverter part from appearance alone; valve families and repair parts vary by model.
- Stop immediately for running water, spreading water damage, an unreliable shutoff, or water near electrical equipment; isolate the supply only if safely accessible.
Only after diagnosis
Potential parts
- Delta shower valve cartridge
Consider this only when a qualified diagnosis connects a persistent off-position drip or handle leak to the cartridge or its sealing surfaces after residual outlet water and exposed connections are ruled out.
Delta valve families use different cartridges and retaining methods; confirm the exact model and parts diagram before ordering. - Delta seats, springs, or cartridge seals
Consider this only when the exact Delta model and diagnosis identify worn, damaged, or debris-affected sealing parts as the cause of a continuous tub-spout or showerhead drip.
Seal type, dimensions, location, and whether the model uses seats and springs or a self-contained cartridge vary by valve family. - Delta showerhead gasket, debris screen, or selector component
Consider this only when water leaks from the exposed head-to-arm joint, spray nozzles, nonselected spray mode, or head body while the valve and wall remain dry.
Connection, gasket, screen, selector, and head construction are model-specific; do not force or overtighten the exposed fitting.
When checks do not resolve it
Need a professional?
Call qualified plumbing service for a continuous or returning drip, water at the handle or escutcheon, a tub-spout cross-flow, a leak after installation or cartridge work, a wet wall or ceiling, an unreliable shutoff, or any repair requiring cartridge, valve-body, or concealed-pipe access. Seek prompt help for running water or spreading damage.
Have this ready
- Delta model or clear photos of the handle, trim, outlets, and any visible label
- Whether the fixture is shower-only or tub-and-shower and its handle or diverter arrangement
- The first wet location and whether the drip stops after the showerhead or spout drains
- Whether the leak occurs with water on, with water off, continuously, intermittently, or after recent installation or repair
- Photos of wet trim, wall or ceiling stains, mineral deposits, and exposed connection leaks
Common questions
FAQ
Is a short drip from my Delta showerhead after shutoff normal?
It can be. Delta says a showerhead may drip briefly while its reservoir empties. If the showerhead keeps dripping long after shutoff, the drip returns after the head is dry, or water comes from the handle, tub spout, wall, or ceiling, treat it as a leak and arrange diagnosis.
Why does my Delta shower keep dripping with the handle off?
A continuous or returning drip can involve the valve cartridge or, depending on the Delta valve family, seats, springs, O-rings, a diverter, debris, or valve body. Identify the model first and do not remove the cartridge or bonnet under pressure.
What if the Delta shower leaks only where the head meets the arm?
A loose connection, compressed gasket, debris screen, or mineral deposits may be involved. Inspect only the exposed joint with water off and follow the exact Delta instructions without overtightening. A leak from the head body seam or a joint that keeps leaking needs service.
Can a Delta tub-shower diverter cause a leak?
Yes, a drip that changes with diverter position or water at both outlets can involve the diverter or outlet path, but it does not prove which part has failed. Use normal control movement only, do not force the diverter, and arrange model-specific plumbing service if the symptom persists.
When should I call a plumber for a Delta shower leak?
Call for a continuous or returning drip, water around the handle or escutcheon, cross-flow, a leak after installation or cartridge work, a wet wall or ceiling, an unreliable shutoff, or any valve disassembly. Isolate the supply if safely accessible and provide the model, leak location, timing, and photos.
Read the exact guide
Official sources
- How to Fix a Leaky Shower HeadDelta Faucet · Official Delta troubleshooting guidance used for leak-location and model-specific repair boundaries; exact valve and trim documentation controls the procedure.
- What do I do about water dripping from the spout of my two-handle (or three-handle) tub/shower faucet?Delta Faucet · Official Delta guidance used for the multi-handle branch and professional boundary; single-handle and other Delta valve families use different procedures.
- Cartridge Assembly - 1300 / 1400 Series (04/2006 and earlier) RP19804Delta Faucet · Official Delta parts page used to demonstrate that cartridge compatibility depends on series and production details; it is not a universal cartridge recommendation.
- After turning off my shower, water continues to drip from the shower head for a minute or so. Is something wrong?Delta Faucet · Official Delta guidance used to distinguish a brief showerhead drain-down from a continuing leak; it does not identify the installed valve model.
Community feedback
Share a repair observation
Share a plain-text repair observation. Accepted observations are published automatically; this page may take a moment to update.