
On this page
Start here
Quick answer
First locate the leak and distinguish separated residual drops from continuous flow. With the shower control off, dry and watch the showerhead, head-to-arm joint, handle or escutcheon, tub spout, and visible wall or ceiling. A short showerhead drain-down can be normal, but Moen treats a shower that continues dripping or running with the handle off as a leak; the likely repair depends on the valve family. Moen's guidance identifies cartridges as a common cause, while its M-Core, Standard, and other valve references use different cartridges and symptoms. Clean only accessible showerhead spray holes or a permitted screen if mineral buildup is evident. Do not remove a cartridge, retaining nut, trim, or valve under pressure, and do not guess a replacement by appearance. Stop using the shower and call a licensed plumber for water behind the wall, a growing stream, a failed shutoff, hot-water exposure, or any repair beyond safe observation and model-supported surface care.
Before you begin
Safety first
- Owner checks are limited to observing the leak, gently cleaning permitted accessible showerhead parts, recording model and behavior, and using a known safe shutoff without force. A licensed plumber should handle cartridge, retaining-nut, valve, transfer, concealed-connection, pressure, hot-water, wall-opening, and any other pressurized or model-specific repair.
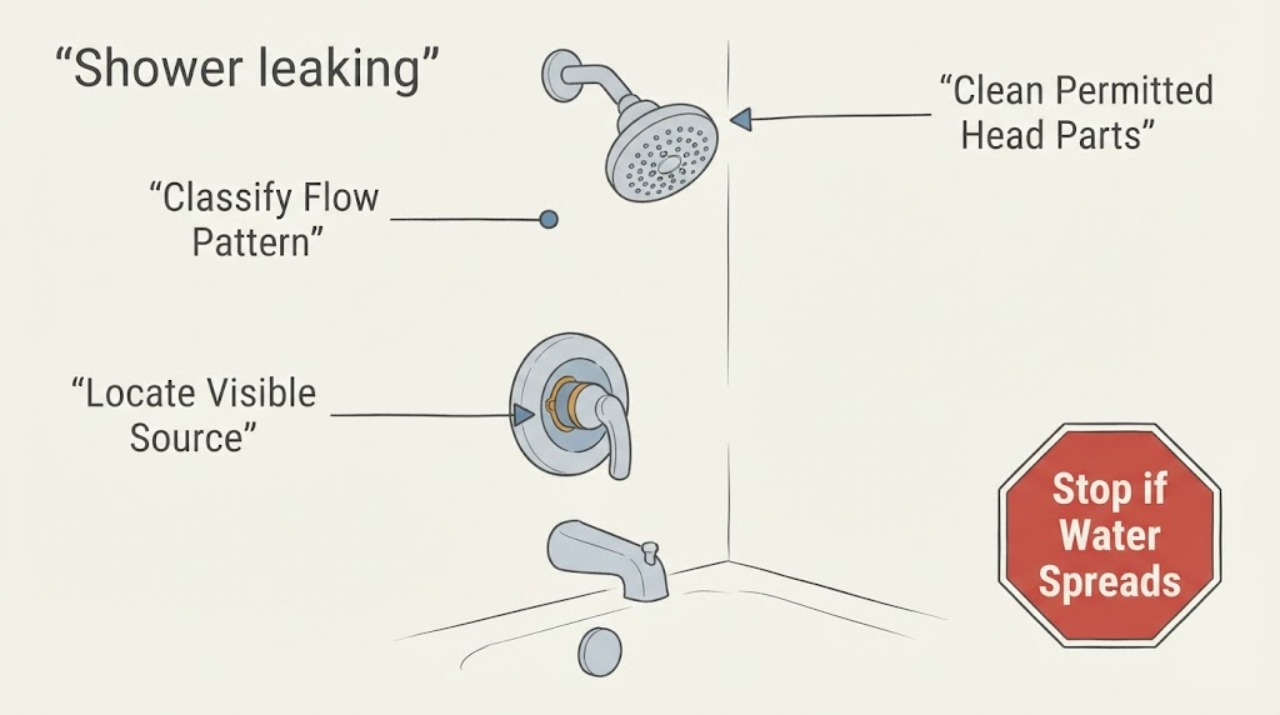
Work through in order
Diagnostic checks
Use only checks that match the exact appliance or system and its official guide.
-
Check 1
Turn the Moen shower control fully off, dry the visible outlets, and observe the showerhead and tub spout without operating another control. Note whether there are separated drops with pauses or a continuous stream.
Expected result: Only a few drops occur and stop, drops continue repeatedly, or water runs continuously.
Next step: Monitor one brief residual-drain event. For continuing drops or flow, keep the shower out of service and identify the exact wet point.
Stop if: Stop immediately for a growing stream, flooding, a wet wall or ceiling, water near electrical equipment, or an inability to isolate water safely.
Why this matters
Why: Residual water can drain from a showerhead, while persistent drops or continuous flow are more consistent with a valve, cartridge, diverter, connection, or concealed leak.
-
Check 2
With the control off, dry and watch the spray holes, head-to-arm joint, head body, handle or escutcheon, tub spout, and any visible wall or ceiling below. Do not remove trim or open the wall.
Expected result: Only the spray holes drip, the head connection or body wets, the handle or escutcheon wets, the tub spout drips, or hidden moisture appears.
Next step: Use the accessible head-care check only for a head or spray-hole source. For handle, tub-spout, or hidden moisture, limit water use and arrange qualified diagnosis.
Stop if: Stop for water escaping into a wall or ceiling, loose trim, movement at the valve, or any uncontrolled leak.
Why this matters
Why: Spray-hole-only water may be residual or valve-passed water. A connection or body seam points to the head or seal. Handle, escutcheon, and tub-spout symptoms point toward valve or diverter service. Hidden moisture may indicate concealed damage.
-
Check 3
If the leak is limited to the accessible showerhead and the exact care guide permits it, gently clean visible spray-hole or screen debris. Do not remove a flow control, use abrasive cleaner, force the connection, or touch the in-wall valve.
Expected result: Mineral or debris buildup is visible and spray improves, no buildup is present, the head body seam leaks, or off-state dripping remains.
Next step: Recheck once with the control off. If the seam or off-state drip remains, stop surface troubleshooting and arrange model-specific service.
Stop if: Stop for a cracked head, damaged threads, chemical or abrasive exposure, hot-water splash, or any need to use force.
Why this matters
Why: Improved spray supports a surface-flow issue but does not prove that a valve seals. A body seam leak is a showerhead defect, and persistent off-state dripping remains a valve or supply-path concern.
-
Check 4
Record whether the shower leaked immediately after installation or began leaking only after it had worked normally. Note whether the symptom is continuous with the handle off, appears around the handle, or is behind the wall.
Expected result: The leak is new after an existing period of normal use, began immediately after installation or service, or is concealed behind the wall or escutcheon.
Next step: Give this history and the wet point to Moen support or a licensed plumber. Do not retighten a hidden retaining component or repeat a prior cartridge installation as a guess.
Stop if: Stop for wall moisture, a failed seal, a moving escutcheon, or any need to remove pressurized trim.
Why this matters
Why: Moen treats new-installation assembly or calibration issues differently from an existing shower that suddenly starts leaking. Behind-wall or escutcheon moisture can involve a valve connection or retaining seal rather than the showerhead.
-
Check 5
Record the Moen model or valve family from an already visible marking, paperwork, or product record. Use handle operation and trim features only as clues; do not remove the handle or cartridge solely to identify the system.
Expected result: The exact model is known, the handle suggests a Standard, Posi-Temp, Moentrol, or M-Core style, or the model is unknown.
Next step: Verify the exact model and valve family in Moen's identification guide or with a plumber before selecting a cartridge, seal, retaining component, or trim. Do not buy by appearance.
Stop if: Stop if identification requires dismantling the valve, the marking is missing, or a proposed part is only visually similar.
Why this matters
Why: Moen lists distinct cartridges for Standard, Posi-Temp, Moentrol, M-Core, ExactTemp, and transfer systems. Handle appearance alone may not establish the installed internal part.
-
Check 6
For persistent leaking, stop using the shower and close a known accessible supply shutoff only if it turns normally without force or hot-water exposure. Record whether flow stops and provide the model, wet point, timing, photos, and any prior service history to a licensed plumber.
Expected result: The flow stops, the shutoff is stuck or ineffective, the shutoff is inaccessible, or water continues behind the wall or below the shower.
Next step: Keep the shower out of service and call a licensed plumber. Do not remove the cartridge, retaining nut, escutcheon, or wall covering to collect more evidence.
Stop if: Stop for a stuck shutoff, uncontrolled flow, hot-water burn risk, flooding, electrical proximity, or structural water damage.
Why this matters
Why: A safe isolation can limit damage while help is arranged. An ineffective or unsafe shutoff leaves the valve pressurized and requires a professional; continuing hidden moisture requires concealed-leak diagnosis.
Use your observations
Decision map
Find the observation that best matches what you see, then follow the next safe action.
-
PATH 01Next step
What you see
Only separated drops come from the showerhead after shutoff, the drops stop, and the handle, tub spout, wall, and ceiling remain dry.
Do this next
Monitor after normal use and follow the exact head guide for gentle cleaning or draining. Reassess if the drip persists, becomes a stream, or appears elsewhere.
-
PATH 02Next step
What you see
The showerhead continues dripping or running with the control off after residual water should have drained, while the head connection is dry.
Do this next
Identify the exact valve and arrange a qualified inspection. Do not guess a 1225, 1222, 1212, 1213, 1214, or other cartridge or open the valve under pressure.
-
PATH 03Next step
What you see
Water wets the showerhead connection or escapes from the head body seam, especially while the shower is running.
Do this next
Use only permitted head-care instructions and avoid over-tightening or forcing the connection. Arrange compatible head or seal service if the seam remains wet.
-
PATH 04Next step
What you see
The handle, escutcheon, or tub spout drips or becomes wet while the shower control is off, with no continuing head-only drain-down.
Do this next
Stop repeated cycling, document the model and handle operation, and have a licensed plumber diagnose and select the compatible repair.
-
PATH 05Next step
What you see
The showerhead leaks while the tub spout is selected, or water appears from the showerhead and tub spout together during a mode change.
Do this next
Do not alter piping, remove a tub spout, or change a flow restrictor as a guess. Provide the valve and outlet configuration to a plumber for model-specific diagnosis.
-
PATH 06Next step
What you see
Water appears behind the escutcheon or wall, on a ceiling below, the flow is increasing, or the supply shutoff is stuck, inaccessible, or ineffective.
Do this next
Stop shower use, isolate water only through a safe working shutoff, protect the area, and call a licensed plumber promptly. Do not open the wall or caulk over the symptom.
Helpful context
Understand the symptom
Start with the leak location, not a replacement part
A Moen shower can leak from the showerhead, its connection, the handle or escutcheon, the tub spout, or behind the wall. A few drops left in a head are different from water that keeps running with the control off. Dry each visible area and observe without opening the trim. The location and whether the symptom began after installation or after normal operation change the next diagnosis.
A persistent off-state leak is often valve-related, but the valve family matters
Moen's M-Core guidance says a continuous leak with the handle off, water at the handle, or water around the escutcheon can require the flow cartridge to be replaced after the correct series is identified. Its Standard valve guidance associates a continuously dripping off-state shower with a particular cartridge family, while Moen's cartridge guide lists several other systems. These are model-specific references, not permission to order a generic cartridge or dismantle the valve without a safe shutoff.
Clean only the accessible showerhead parts your guide permits
Mineral deposits or debris can affect spray quality and may make an on-state connection look wet. If the exact Moen showerhead instructions allow it, clean accessible spray holes or a screen gently and avoid abrasive products. This surface check cannot repair an internal valve leak or a cracked head body. Do not remove a flow-control component or apply force to a seized connection.
New installation and existing shower symptoms are not interchangeable
Moen separates a leak that appears immediately after installation from an existing shower that worked and then began leaking. An installation issue can involve cartridge assembly, seals, retaining components, handle calibration, or concealed connections; an existing leak can indicate wear or a damaged cartridge. Note when the leak began and whether water is behind the wall before any repair is selected.
Keep valve disassembly and concealed leaks professional
Moen's technical instructions require the water supply to be shut off before cartridge work, and concealed leaks are handled separately from an accessible showerhead drip. A stuck shutoff, hot-water risk, water behind the wall, or trim that moves with the valve makes owner disassembly unsafe. Keep the shower out of service and call a licensed plumber when safe observation and permitted surface cleaning do not resolve the issue.
Safety boundary
Stop conditions
- Stop immediately for a wet wall or ceiling, rapidly increasing flow, flooding, water near electrical equipment, hot-water burn risk, or an ineffective supply shutoff; limit water use and obtain qualified help.
- Do not remove the Moen handle, escutcheon, cartridge, retaining nut, or valve body under pressure. Do not alter piping, outlet restrictions, transfer valves, or pressure settings based on a generic diagnosis.
- Do not order or install a Moen cartridge, seal, screen, trim, or valve part by appearance or brand alone. Confirm the exact model, valve family, handle operation, and current service instructions first.
- Do not force a showerhead connection, remove a flow control not covered by the guide, use abrasive or harsh chemicals, open a wall, or seal over hidden moisture. Stop after safe source identification and permitted surface care; persistent or recurring leaking needs qualified diagnosis.
Only after diagnosis
Potential parts
- Moen shower flow cartridge
Relevant only when persistent leaking is diagnosed as an internal valve fault and the exact Moen system identifies a compatible flow cartridge.
Confirm the exact valve family, model, handle operation, cartridge series, orientation, and current Moen instructions; do not substitute a visually similar cartridge. - Moen M-Core cartridge or service kit
Relevant only when an identified M-Core 2, 3, or 4 Series valve has the matching off-state leak and qualified diagnosis supports cartridge or related service.
M-Core series use different cartridges and trim features. Verify the series and valve ports before any service, and do not open the valve under pressure. - Moen valve seal or retaining component
Relevant only when a qualified inspection finds a worn seal or retaining component at the exact valve and rules out a concealed connection failure.
Match the valve model, seal arrangement, and service instructions; do not tighten a hidden component or cover wall moisture as a repair. - Moen showerhead gasket or screen
Relevant only when the leak is at an accessible head connection and inspection confirms an obstructed screen or damaged gasket.
Verify the exact head, screen orientation, seal dimensions, and installation instructions; do not remove an unapproved flow-control component or force threads. - Moen showerhead
Relevant only when the showerhead body seam or selector remains defective after permitted cleaning and manufacturer or plumber confirms replacement.
Confirm connection, flow specification, finish, model, and warranty details; replacing the head does not repair a valve or concealed leak.
When checks do not resolve it
Need a professional?
Call a licensed plumber when the Moen shower continues dripping or running after shutoff, the handle, escutcheon, tub spout, arm, wall, or ceiling is wet, the leak recurs, the model or part compatibility is uncertain, a shutoff is ineffective, or any flooding, hot-water, structural, or electrical hazard is present.
Safety scope: Owner checks are limited to observing the leak, gently cleaning permitted accessible showerhead parts, recording model and behavior, and using a known safe shutoff without force. A licensed plumber should handle cartridge, retaining-nut, valve, transfer, concealed-connection, pressure, hot-water, wall-opening, and any other pressurized or model-specific repair.
Have this ready
- Provide the Moen model or visible marking, handle count and operation, exact wet point, drop-versus-stream behavior, timing after shutoff, whether the head was cleaned, onset after installation or normal use, recurrence, photos of visible conditions, any hidden moisture, and whether a safe shutoff stopped the flow. Do not remove trim or open the wall to collect information.
Common questions
FAQ
Why is my Moen shower leaking when the handle is off?
A short showerhead drain-down can be residual water. If the shower keeps dripping or running, Moen points to an internal cartridge or seal issue, but the correct part depends on the valve family. Locate the wet point and identify the model before service.
Is a few drops from a Moen showerhead normal?
It can be if the drops are separated, limited to the head, and stop as retained water drains. Persistent drops, continuous flow, a wet handle or tub spout, or water behind the wall should be treated as a leak.
Can cleaning the Moen showerhead stop a leak?
Permitted cleaning of accessible spray holes or a screen may improve mineral-related spray or connection problems. It will not reliably repair an internal valve leak or a cracked head body. Do not remove a flow control unless the exact guide permits it.
Which Moen cartridge does my leaking shower need?
Do not choose from a photo alone. Moen lists different cartridges for Standard, Posi-Temp, Moentrol, M-Core, ExactTemp, and transfer systems. Confirm the exact product, valve family, handle operation, and current service instructions.
What if the leak started after I installed a Moen shower?
Moen treats an immediate post-installation leak differently from an existing shower that later begins leaking. Assembly, seals, retaining parts, calibration, or concealed connections may be involved. Stop pressurized disassembly and provide the installation history to a qualified professional.
What if water leaks around the Moen escutcheon?
Water around the escutcheon can indicate a retaining seal, valve connection, cartridge, or concealed leak. Do not simply caulk over it or retighten a hidden component. Stop shower use if moisture is entering the wall and call a licensed plumber.
Why does water come from the Moen showerhead when the tub spout is selected?
Moen calls this pattern stacking and associates it with outlet restriction, piping, transfer behavior, or valve conditions. Do not alter piping or remove an outlet part as a guess; have the configuration diagnosed for the exact valve.
Can I replace a Moen shower cartridge myself?
Only when the exact instructions, a reliable water shutoff, and your plumbing experience make the work safe. Do not remove a cartridge or retaining nut under pressure, and stop for a stuck shutoff, hot-water risk, hidden leak, or uncertain valve identity.
What if my Moen shower leaks behind the wall?
Stop using the shower and limit water safely. A concealed valve or supply connection can damage the wall and requires qualified diagnosis. Do not open the wall, remove trim under pressure, or seal over the visible symptom.
What should I tell the plumber about a Moen shower leak?
Share the model or visible marking, handle type, wet point, drop or stream pattern, timing after shutoff, onset after installation or normal use, head-care checks, photos, recurrence, and whether a safe shutoff stopped the flow.
Read the exact guide
Official sources
- How to Identify Your M-Core CartridgeMoen · Moen's M-Core identification guide used to distinguish series by handle operation and trim features, and to show that the series changes the cartridge selection.
- Faucet Cartridges: ShowerMoen · Moen's cartridge guide used to show that Standard, Posi-Temp, Moentrol, M-Core, ExactTemp, and transfer systems use distinct cartridges and that supply shutoff precedes cartridge work.
- Shower Faucet: Leaking-M-Core 4 Series ValveMoen · Moen's 4 Series guide used for distinguishing new-installation from existing-shower shutoff leaks, concealed leak patterns, supply-shutoff preparation, and model-specific cartridge or handle calibration issues.
- Shower Faucet: Leaking- Standard ValveMoen · Moen's Standard-valve guide used for identifying the push/pull valve style, persistent off-state leaking, handle leaking, and stacking as a separate symptom.
- Shower Faucet: Leaking-M-Core ValveMoen · Moen's official M-Core guide used for continuous off-state leaking, handle or escutcheon leaks, valve-series differences, cartridge selection, concealed leaks, and stacking symptoms.
- Installation and Care GuideMoen · Moen's official care guide used for gentle cleaning of showerhead outlet and inlet holes, avoiding bleach or harsh products, and the distinction between showerhead maintenance and cartridge service.
Community feedback
Share a repair observation
Share a plain-text repair observation. Accepted observations are published automatically; this page may take a moment to update.