
On this page
Start here
Quick answer
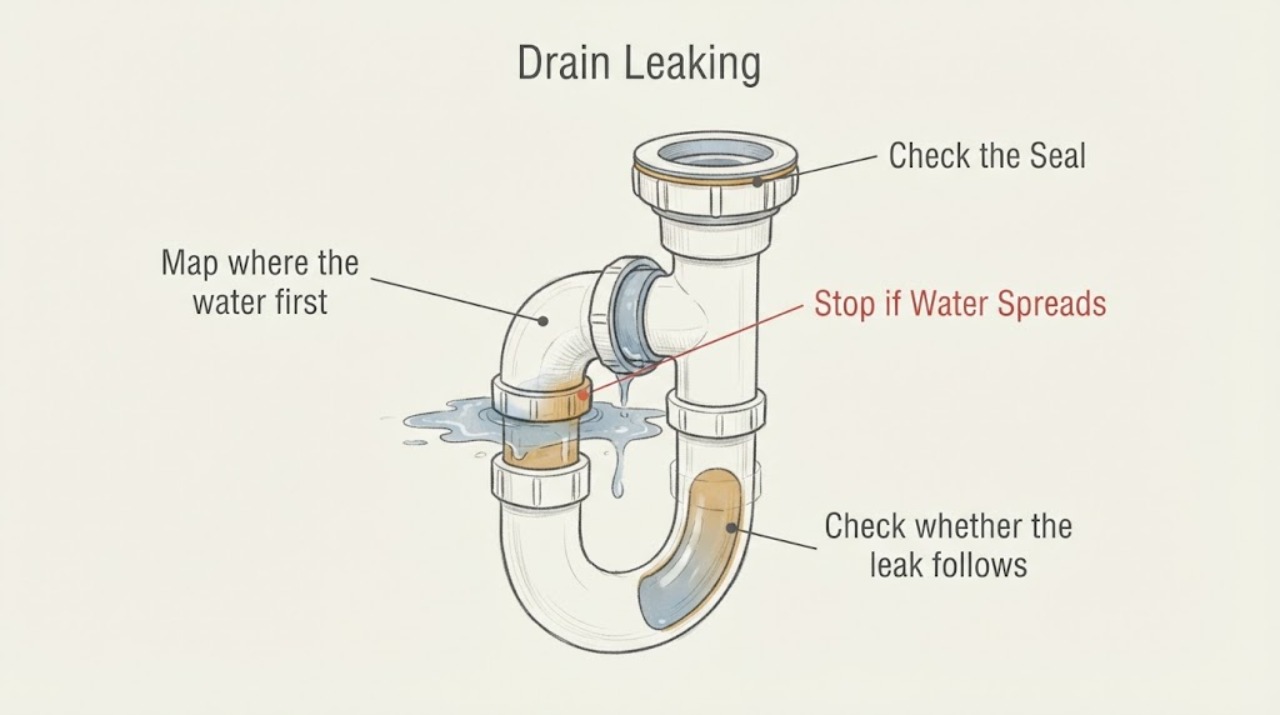
First find the exact point where the water appears and whether it happens only while the drain is carrying water. Dry the area, run a short controlled test, and watch the drain opening, trap joints, wall connection, and nearby surfaces without loosening anything. A drip at an accessible slip-joint may be a loose or mis-seated washer; water that appears around the drain opening, continues when the fixture is unused, comes from a wall or ceiling, or involves sewage needs the fixture isolated and a qualified plumber. Do not overtighten plastic fittings, open a wall, or use a temporary patch as the repair.
Work through in order
Diagnostic checks
Use only checks that match the exact appliance or system and its official guide.
-
Map where the water first appears
Dry the accessible drain area with a cloth, place a shallow pan or dry paper towel below the visible pipe, and inspect from a stable position without loosening fittings. Check the drain opening, tailpiece, trap bend, slip nuts, wall connection, cabinet floor, and the wall or ceiling below if safely visible.
Expected result: The first wet point is at a pipe joint, the drain opening or flange, the wall connection, a broad surface, or an inaccessible wall or ceiling area.
Next step: Photograph and label the first wet point, then continue only with the matching safe check below.
Stop if: Stop for sewage, contaminated water, an unstable floor or ceiling, water near exposed electricity, or any need to open a wall or ceiling.
Why this matters
Why: A joint-level wet point supports a local connection check; water around the drain opening suggests the drain seal or flange path; a broad or concealed wet area may be traveling from another source and cannot be assigned to the drain by appearance alone.
-
Check whether the leak follows drain use
After drying the area, run a small amount of clean water through the fixture for a short period while watching the marked locations; then stop the water and watch briefly without creating an overflow or deliberately flooding the fixture.
Expected result: Water appears only while water is entering or leaving the fixture, appears after the fixture stops, or returns while the fixture has not been used.
Next step: Record the start and stop timing and compare it with the physical location from the first check; stop using the fixture if water is reaching the cabinet, floor, wall, or ceiling.
Stop if: Do not fill the basin, shower, or tub to test it, and stop immediately if the leak becomes a stream, spreads, or reaches electrical equipment.
Why this matters
Why: A leak tied to flow points toward the waste path or drain seal. A leak that continues after use or appears while idle can indicate retained water, a supply-side problem, condensation, or a concealed plumbing leak, so timing alone does not identify a failed part.
-
Inspect accessible trap and slip-joint connections
If the first wet point is an accessible under-sink connection, watch the tailpiece-to-trap, trap-to-wall-tube, and wall-tube-to-waste-connector joints while the fixture drains. Look for a displaced washer, corrosion, a crack, or a nut that is visibly loose; do not remove the trap during this check.
Expected result: One joint becomes wet first, the washer or fitting looks displaced or damaged, several joints seep, or no accessible joint becomes wet.
Next step: For an intact plastic joint that is clearly loose, stop the fixture, hand-tighten the nearest nut only slightly and retest once; if it still leaks, is damaged, or cannot be reached safely, arrange plumbing service.
Stop if: Do not overtighten plastic fittings, force corroded metal, add thread tape to a slip-joint washer connection, or continue if the trap or wall connection moves.
Why this matters
Why: One wet slip-joint can be a local washer or alignment issue, while a crack, corrosion, or several wet joints suggests that tightening alone may worsen the damage. A dry trap during this test makes the drain opening, wall cavity, or another source more likely.
-
Separate an opening or flange leak from a pipe-joint leak
When the area below is dry, observe the drain opening or visible flange from above while a small amount of water passes through; do not remove the stopper, strainer, grate, or trim just to reproduce the leak.
Expected result: Moisture forms around the drain opening or rim, the underside stays dry while the opening is wet, or the leak is visible only below the opening or inside a concealed assembly.
Next step: Stop using the fixture if the seal area leaks, document the exact location and fixture type, and ask a plumber to assess the drain seal and surrounding waterproofing before ordering a part.
Stop if: Do not pry up a grate, cut sealant, remove a tub or shower drain, or test a waterproofed area by flooding it.
Why this matters
Why: Moisture at the opening rather than at the trap points toward the drain seal or flange path. A concealed tub, shower, or floor drain assembly may require access and sealing work that should not be guessed from the visible surface.
-
Check for a hidden or intermittent source
From a dry, safe position, note whether moisture returns after another nearby fixture runs, after rain, during temperature changes, or with no plumbing use at all; inspect only visible surfaces and do not open finishes.
Expected result: The dampness follows another fixture or weather, returns while the drain is idle, leaves a stain or odor, or cannot be traced to an accessible connection.
Next step: Keep the affected fixture or area out of use as needed, document the timing and spread, and arrange a plumber or building professional to trace the source.
Stop if: Stop for sewage odor or backup, sagging drywall, active ceiling leakage, mold-like growth, or any need to enter a wet or unsafe cavity.
Why this matters
Why: An intermittent or concealed pattern can involve another drain line, a supply line, condensation, or water entering a wall or ceiling. EPA notes that small plumbing leaks in concealed cavities may continue unnoticed, so a dry retest does not prove the problem is resolved.
Use your observations
Decision map
Find the observation that best matches what you see, then follow the next safe action.
-
PATH 01Safety boundary
What you see
The leak starts at one intact, accessible slip-joint while the fixture drains.
Do this next
Keep the fixture use minimal, snug only the nearest nut slightly if it is clearly loose, and perform one short retest. If the leak remains, the washer is damaged, or the fitting is cracked or corroded, stop and call a plumber.
Why this path and its safety boundary
Safety stop: Do not overtighten, disassemble a stuck joint, or treat tape, putty, or a clamp as a permanent repair for a drain connection.
-
PATH 02Safety boundary
What you see
Moisture forms at the drain opening, flange, strainer, tub, shower, or floor-drain seal rather than at the visible trap.
Do this next
Stop using the fixture and arrange plumbing assessment of the drain seal, flange, and surrounding waterproofed area; provide the timing and photographs.
Why this path and its safety boundary
Safety stop: Do not pry out the drain assembly, cut surrounding sealant, or flood the fixture to test the repair.
-
PATH 03Safety boundary
What you see
Water appears while the fixture is idle, returns after another fixture or weather event, spreads into a wall or ceiling, or has no accessible source.
Do this next
Stop using the suspected fixture, protect the area without entering unsafe water, and request prompt professional leak tracing and repair.
Why this path and its safety boundary
Safety stop: Escalate promptly for sewage, active ceiling leakage, structural damage, or water near electrical equipment.
-
PATH 04Next step
What you see
A short, safe test shows no moisture at the marked points, but dampness returns later.
Do this next
Do not declare the drain fixed. Keep a time-and-use log and arrange assessment for an intermittent or concealed source.
Helpful context
Understand the symptom
Start with the leak location, not the suspected part
Water can travel along a pipe or cabinet surface, so the first wet spot is not always the source. Dry the accessible area and use a short, ordinary fixture test to see whether the leak starts when water enters the drain, while it drains, or even when the fixture is idle. Oatey's guide identifies the sink tailpiece, trap bend, wall tube, and waste connector as separate connection points that need individual leak checks.
A drain leak is also a moisture problem
Do not leave a cabinet, floor, wall, or ceiling damp while diagnosing the plumbing. EPA guidance says to fix plumbing leaks promptly and dry wet areas, because moisture can damage materials and support mold growth. If the source is behind a finish or the water may be sewage, stop at observation and arrange professional help.
Only after diagnosis
Potential parts
- slip-joint washer
Consider this category only if a specific accessible slip-joint is the first wet point and its washer is displaced, hardened, or damaged after the connection is safely inspected.
Confirm the drain size, connection style, material, and local plumbing requirements before selecting a replacement. - drain flange or sealing gasket
Consider this category only if moisture forms at the drain opening or flange while the visible trap and pipe joints remain dry; the seal path must be confirmed before ordering.
Have the plumber confirm the fixture type, drain assembly, dimensions, and waterproofing details; no fit is assumed from the symptom alone.
When checks do not resolve it
Need a professional?
Request a plumber if a retest still shows a leak, the source is at a drain opening or concealed connection, fittings are cracked or corroded, moisture returns while the fixture is idle, or water is entering a wall, floor, or ceiling. Seek prompt service for sewage, active ceiling leakage, structural damage, or water near electrical equipment.
Common questions
FAQ
Why does my drain leak only when water is running?
A flow-linked leak usually points toward the waste path or drain seal, but the exact location still matters. Dry the area, run a short controlled test, and watch the opening, trap joints, and wall connection separately.
Should I tighten the nut under a leaking sink?
Only if the wet point is an intact, accessible slip-joint and the nut is clearly loose: stop the fixture, snug it slightly, and retest once. Do not force a corroded joint or overtighten plastic, because excessive force can crack fittings or strip threads.
Why is water leaking around the drain opening but not the trap?
That pattern can indicate the drain seal or flange path rather than the visible trap. Stop using the fixture and have a plumber assess the drain assembly and surrounding waterproofing instead of flooding or prying it apart.
Can a drain leak come from inside a wall or ceiling?
Yes. A concealed drain, supply line, condensation path, or water from another fixture can produce a nearby damp spot. If moisture returns while the drain is idle or spreads into a wall or ceiling, stop use and arrange professional leak tracing.
Read the exact guide
Official sources
- Moisture Control Guidance for Building Design, Construction and MaintenanceU.S. Environmental Protection Agency · Supports explaining that leaks in drain lines, sinks, showers, and tubs can cause moisture problems and that small leaks in walls or ceiling cavities may remain unnoticed.
- A Brief Guide to Mold, Moisture and Your HomeU.S. Environmental Protection Agency · Supports drying water-damaged areas, fixing plumbing leaks promptly, and stopping when moisture or mold conditions need professional assessment.
- How to Install a P-TrapOatey · Supports locating sink drain connection points, using washers at slip joints, avoiding overtightening, and testing each connection for leaks.
Community feedback
Share a repair observation
Share a plain-text repair observation. Accepted observations are published automatically; this page may take a moment to update.