
On this page
Start here
Quick answer
Stop using the upstairs tub until you know when the leak starts. If water appears only while the tub is draining, the drain opening, overflow-and-drain assembly, trap, or connected waste line is more likely than the supply. If it appears while the tub is filling, around the overflow, or even when the tub is idle, use a different branch for the faucet, overflow seal, or pressurized supply. Look from a dry, accessible area for the first wet point and for a ceiling stain or sag below; do not deliberately refill a leaking tub. Keep water away from electrical equipment, shut the local water supply or main valve only if it is safe to reach, and call a plumber when water is reaching the ceiling, the source is concealed, or the leak continues.
Before you begin
Safety first
- Keep the tub out of service and keep clear of wet electrical equipment, unstable ceiling material, sewage, and unsafe access points. Do not open the ceiling, dismantle the drain, loosen pressurized plumbing, or re-energize wet electrical equipment without qualified inspection.
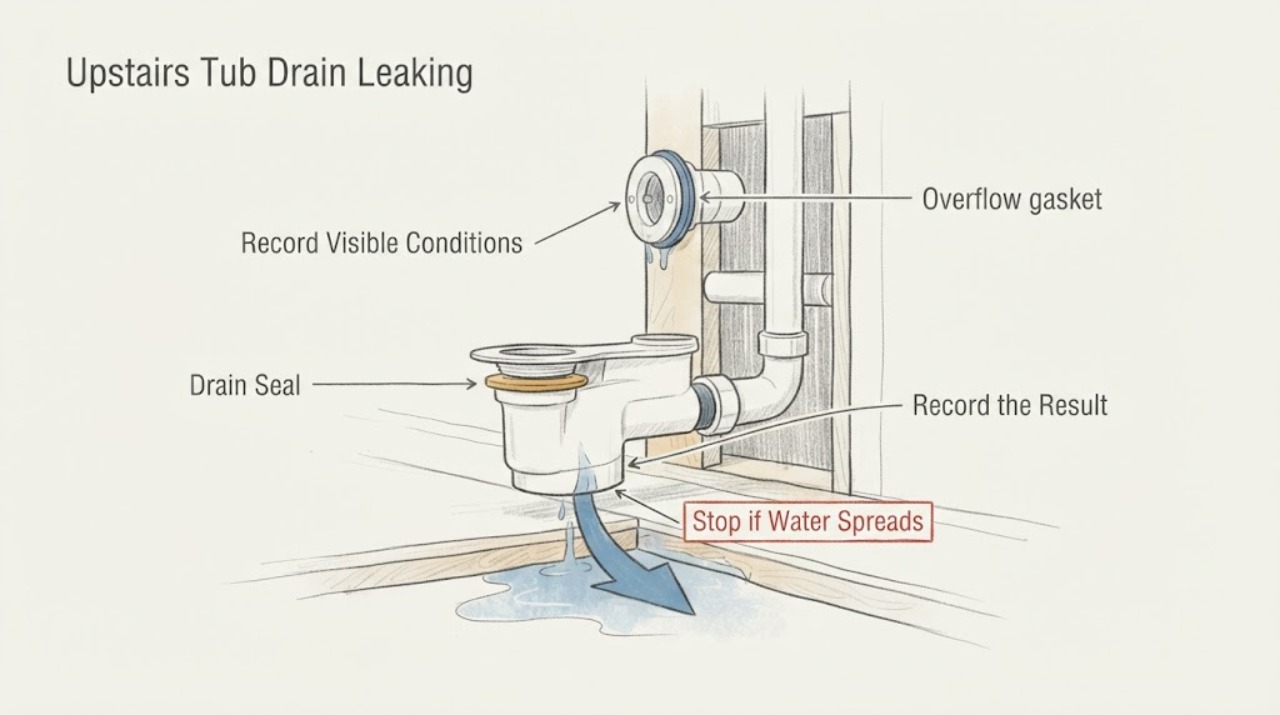
Work through in order
Diagnostic checks
Use only checks that match the exact appliance or system and its official guide.
-
Check 1
Stop using the upstairs tub, dry the bathroom floor, and inspect from a safe standing position. Record where water first appears: at the drain opening, around the overflow cover, at the faucet or supply area, along the tub edge, or on the ceiling below. Do not reach into a wet ceiling or remove a cover to look behind it.
Expected result: The ceiling is sagging, water is actively running, a light or receptacle is wet, water is pooling near electrical equipment, or the first wet point cannot be reached without climbing or opening a surface.
Next step: Keep people clear, stop all tub use, and contact a plumber. If electrical equipment is wet, isolate power only from a dry, safe location and arrange qualified electrical evaluation; never touch wet equipment or a breaker while wet or standing in water.
Stop if: Stop immediately for a sagging ceiling, active flow, water near electrics, visible mold or sewage, or an unsafe access route.
Why this matters
Why: The immediate issue is water damage or an access/electrical hazard, not a low-risk drain-trim adjustment.
-
Check 2
Without intentionally filling the tub, use the next unavoidable water event only if there is no active ceiling damage and a dry observer can watch from a safe location. Note whether the leak begins during filling, when water reaches the overflow, during shower spray or splash, or only after the stopper is opened and the tub drains.
Expected result: Filling or faucet use triggers the leak; the leak begins at the overflow level; shower spray wets the tub edge; or the leak starts only during drainage.
Next step: Stop that water event as soon as the pattern is clear. Tell the plumber the exact trigger instead of repeating the test, especially when the room below is already stained.
Stop if: Do not perform a deliberate bucket, full-tub, or repeated drain test when the ceiling is wet, the leak is active, or the source is near electrical equipment.
Why this matters
Why: A fill-only pattern points toward a supply or faucet connection; an overflow-level pattern points toward the overflow cover or gasket; splash-only water points toward the tub edge or enclosure; drain-only water points toward the drain assembly, trap, or waste line.
-
Check 3
For a drain-only pattern, look at the accessible drain flange and stopper from above with a flashlight. Note a loose-looking flange, a displaced or missing strainer, cracked sealant, movement at the trim, or water that appears at the tub floor before it reaches the overflow. Do not put tools into the drain, remove the flange, or tighten concealed connections.
Expected result: The wet point is directly around the drain opening, the stopper style is identifiable, or the tub surface stays dry while water appears below or at a nearby access panel.
Next step: Leave the tub out of service and give the plumber the drain-only timing and exact visible location. Use the model or assembly instructions to identify the drain style; do not assume a generic stopper or seal fits.
Why this matters
Why: The visible evidence may implicate the drain seat or gasket, but a leak below the tub can also be at the tee, trap, or waste connection; a surface observation cannot confirm which part has failed.
-
Check 4
For an overflow-level pattern, inspect only the face of the overflow cover and the surrounding tub surface for a loose screw, cracked cover, displaced seal, or water tracking behind the cover. Do not remove the cover from above when the room below is occupied or already showing damage.
Expected result: Water begins as the level reaches the overflow, appears around the cover, or occurs only when spray is directed at that area; the overflow area stays dry but the drain still leaks.
Next step: Stop filling and showering, document the cover and stain, and have a plumber inspect the overflow gasket and connected waste assembly using the applicable installation information.
Why this matters
Why: An overflow gasket or its connection becomes more likely when water reaches that opening, while a drain-only pattern points to a different part of the assembly. The exact overflow design and seal arrangement vary by assembly.
-
Check 5
If the tub leaks while filling, while the faucet is on, or while the tub is idle, check only the exposed faucet, supply shutoff area, and visible joints for fresh moisture. Do not loosen a pressurized fitting or open a wall, access panel, or ceiling to find the pipe.
Expected result: The leak continues with the tub empty, begins as soon as water is supplied, or is visibly above the drain and overflow assembly.
Next step: Close the tub or bathroom stop valve, or the main water valve, only if it is clearly identified and safe to reach. Keep the tub out of service and call a plumber; do not use the tub to confirm the diagnosis.
Stop if: Stop if a valve will not turn normally, a fitting is spraying, water is near electrical equipment, or reaching it requires wet or unstable footing.
Why this matters
Why: A supply-side or concealed pressurized connection is more plausible than a drain-only seal. A leak while idle needs prompt isolation because it can continue without a drain event.
-
Check 6
Prepare the service handoff: photograph the tub drain, overflow, faucet, floor, ceiling below, and any access opening from a dry safe position; record the trigger, approximate delay before dripping, whether the leak stops when water stops, and whether the water is clean, soapy, or foul-smelling.
Expected result: The leak is repeatable only during drainage, the stain grows after use, wastewater is foul-smelling, or the leak persists after all water is shut off.
Next step: Leave the tub unused, keep the ceiling area clear, and request plumbing service. Report any wet electrical equipment separately so it is not re-energized before inspection.
Why this matters
Why: The plumber needs to distinguish a fixture drain or overflow seal from a concealed waste-line, supply, or sanitation issue. Persistent or contaminated water also raises the urgency of containment and professional inspection.
Use your observations
Decision map
Find the observation that best matches what you see, then follow the next safe action.
-
PATH 01Next step
What you see
The leak occurs only while the tub drains.
Do this next
Stop using the tub and tell the plumber it is a drain-only leak. Do not remove the drain flange or open the ceiling as a first step.
Why this path and its safety boundary
Why it matters: The drain seat, stopper seal, overflow-and-drain assembly below the tub, trap, or connected waste line needs inspection.
-
PATH 02Next step
What you see
The leak starts while filling or while the tub is idle.
Do this next
Isolate the water supply only from a safe dry location and arrange prompt plumbing service. Do not keep the valve open to watch the leak.
Why this path and its safety boundary
Why it matters: A faucet, supply connection, shutoff, or concealed pressurized line is more likely than a drain-only seal.
-
PATH 03Next step
What you see
Water appears when the level reaches the overflow or when spray reaches the overflow cover.
Do this next
Stop filling and showering, photograph the cover, and have the plumber inspect the model-specific overflow assembly.
Why this path and its safety boundary
Why it matters: The overflow cover, gasket, tubing, or its connection is a focused inspection area.
-
PATH 04Next step
What you see
The leak is near a light, receptacle, switch, wiring, or wet ceiling material.
Do this next
Keep clear and do not touch wet equipment or a breaker from a wet position. Use qualified electrical help and plumbing service; isolate power only if it is safe to do so.
Why this path and its safety boundary
Why it matters: Water and electricity create a shock and fire hazard that takes priority over locating the plumbing part.
-
PATH 05Next step
What you see
The trigger is unclear, the leak persists after water is shut off, the ceiling is damaged, or wastewater is foul-smelling.
Do this next
Keep the bathroom out of service, contain water only from a safe dry position, and call a plumber promptly. Request electrical or water-damage assessment when those systems are affected.
Why this path and its safety boundary
Why it matters: The source may be concealed, continuous, contaminated, or structurally damaging and cannot be safely confirmed by surface inspection.
Helpful context
Understand the symptom
Treat an upstairs leak as active water damage
Do not keep bathing or run repeated tests just to watch the ceiling. Move people away from a sagging ceiling or wet light fixture, place a container only if you can do so without standing under unstable material, and photograph the stain and the first visible wet point from a dry position. A slow drip can travel along framing, so the ceiling mark may be below the real source. If water is near a light, receptacle, switch, wiring, or a panel, keep away and use a qualified electrician; do not touch wet electrical equipment or a breaker while wet or standing in water.
The trigger is more useful than the stain
Record whether the first drip occurs while water is entering the tub, while the water level reaches the overflow, while the tub is emptying, during a shower, or with no one using the bathroom. The drain and overflow assembly can have separate seals and connections, and different stopper styles change how the assembly operates. The trigger narrows the plumber's inspection without requiring you to remove trim or open the ceiling.
Do not open the ceiling or dismantle a concealed drain
An accessible stopper or overflow cover may be identifiable, but the waste tee, trap, branch drain, and connections below the floor can be concealed. Do not cut the ceiling, loosen a threaded connection over an occupied room, or apply sealant as a substitute for finding the leak. Give the plumber the trigger, location, timing, photos, and whether the leak worsens when the tub drains.
Safety boundary
Stop conditions
- Stop using the tub immediately for active flow, a growing ceiling stain, sagging ceiling material, water entering a light or receptacle, or water near wiring. Keep people clear and do not touch wet electrical equipment.
- Do not stand in water, operate a breaker with wet hands, or reach into a wet ceiling. Isolate power only from a dry, safe location and use qualified electrical help when equipment has been wet.
- Do not deliberately fill the tub, repeat a drain test, remove the drain flange, loosen a pressurized fitting, cut the ceiling, or use chemical drain products while the source is unknown.
- Stop and request urgent plumbing help for a leak that continues with the tub empty, foul-smelling or sewage-like water, a failed shutoff, a concealed source, or damage that cannot be reached safely.
Only after diagnosis
Potential parts
- tub drain gasket or seal
Consider this only if a plumber confirms that the leak is at the drain seat or flange rather than at the trap, waste line, overflow, or supply piping.
Drain assemblies, tub materials, and gasket thicknesses vary. Confirm the exact assembly and tub construction before selecting a replacement. - tub overflow gasket
Consider this only when the leak starts at the overflow level or around the overflow cover and professional inspection confirms a failed overflow seal.
Overflow covers, gaskets, and tubing differ by tub and assembly. Confirm the exact design before ordering or fitting a part. - tub drain and overflow assembly
Consider this only when the drain or overflow assembly is damaged or unserviceable after the leak trigger and wet path have been confirmed.
A complete assembly may require access below the tub and model-specific dimensions. Have a plumber confirm fit and installation requirements.
When checks do not resolve it
Need a professional?
Request plumbing service for any confirmed upstairs tub leak, especially a drain-only leak, a leak that continues while the tub is empty, a growing ceiling stain, an inaccessible drain or overflow connection, or a leak that returns after use.
Safety scope: Keep the tub out of service and keep clear of wet electrical equipment, unstable ceiling material, sewage, and unsafe access points. Do not open the ceiling, dismantle the drain, loosen pressurized plumbing, or re-energize wet electrical equipment without qualified inspection.
Common questions
FAQ
Why does an upstairs tub leak only when it drains?
A drain-only trigger makes the drain seat, stopper seal, drain-and-overflow assembly, trap, or connected waste line the focused inspection area. It does not prove which part has failed. Stop using the tub and give the plumber the exact trigger and first wet location.
What if water leaks around the tub overflow?
If water appears when the level reaches the overflow or when spray reaches the cover, stop filling or showering and have the overflow cover, gasket, tubing, and connected assembly inspected. Do not remove the cover when the room below is already damaged or the access is unsafe.
Should I keep testing the tub to find the leak?
No. Record the trigger from a safe, dry position only when there is no active damage, then stop using the tub. Repeated filling or draining can increase ceiling and structural damage, and a concealed leak cannot be safely diagnosed by opening the ceiling yourself.
What should I do if water reaches a light or outlet below the tub?
Keep clear and do not touch wet electrical equipment or operate a breaker with wet hands or while standing on a wet surface. Isolate power only from a safe dry location and arrange qualified electrical inspection along with plumbing service.
Read the exact guide
Official sources
- Flood Electrical Safety: High Water, High StakesElectrical Safety Foundation International · General residential electrical-safety guidance; follow local emergency and qualified-electrician instructions for the specific property.
- TUB WASTE INSTALLATION INSTRUCTIONSMoen · Moen INS079 tub waste instructions; use the exact installation guide for a different assembly or tub.
- Tub and Shower DrainsMoen Solutions · Moen drain reference; operating style and parts vary by assembly and should be confirmed against the applicable guide.
Community feedback
Share a repair observation
Share a plain-text repair observation. Accepted observations are published automatically; this page may take a moment to update.