
On this page
Start here
Quick answer
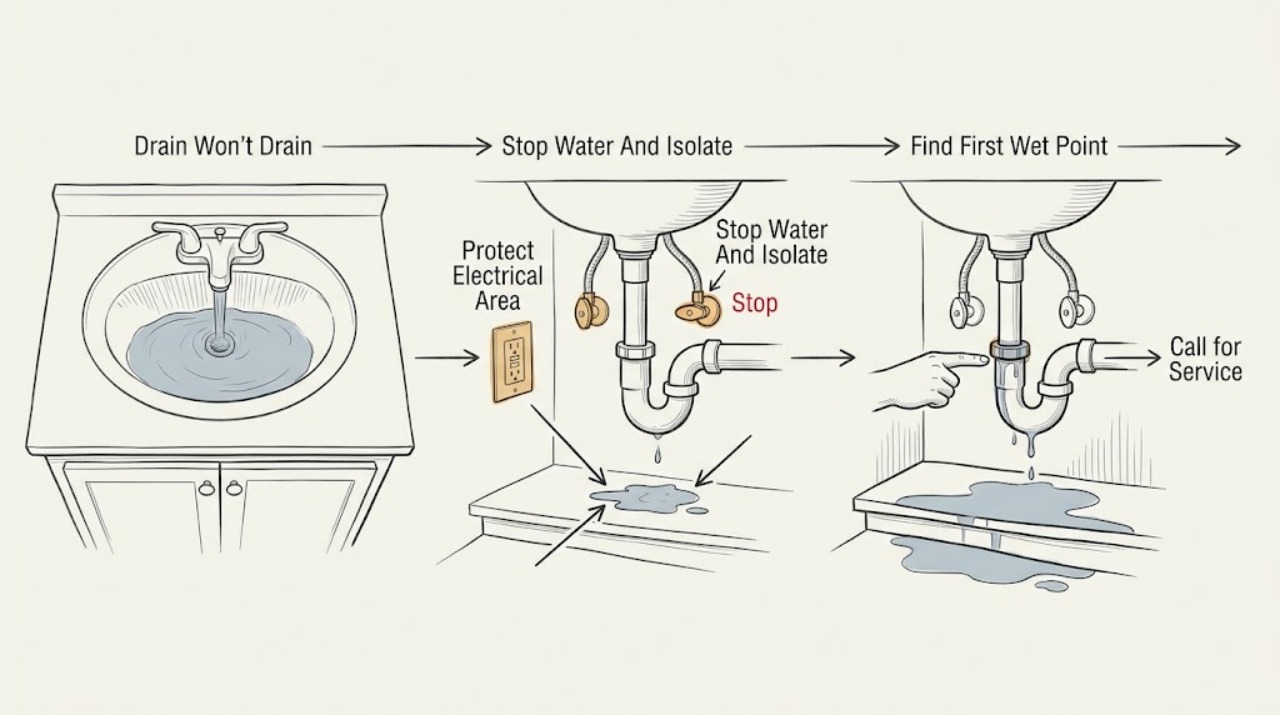
When a bathroom drain will not drain and clean water is also leaking, stop adding water and identify the first wet point before trying to clear anything. Close the nearest fixture shutoff or the home's water supply if the leak is on the supply side; keep water away from electrical equipment and do not stand in it to reach a switch. Then note whether the water comes from a supply hose or valve, the faucet or toilet, the overflow or drain connection, or a wall, ceiling, or floor. A full drain with clean water near it can be a local trap or branch blockage, a loose drain joint, a failed overflow seal, or water escaping from a pressurized supply line. Do not open a concealed or pressurized connection, mix drain chemicals, or plunge after an unknown chemical was used. Persistent leakage, hidden dampness, lower-floor staining, sewage return, or a drain that stays blocked needs a plumber; water near electrical equipment may also require a qualified electrician.
Work through in order
Diagnostic checks
Use only checks that match the exact appliance or system and its official guide.
-
Check 1
Stop using the bathroom fixture and close the nearest fixture shutoff if the valve is dry, visible, and safely reachable; if the leak is substantial or the source is uncertain, close the building water shutoff from a safe location without crossing standing water.
Expected result: The leak stops when the fixture valve closes, continues with the fixture unused, or cannot be isolated safely.
Next step: Keep the water isolated and continue only with safe visual observations. Request plumbing service for continued flow, an inaccessible valve, or any leak that returns when supply is restored.
Stop if: Do not cross standing water, remove a valve or hose, or touch a wet electrical appliance, outlet, cord, or switch.
Why this matters
Why: A leak that stops at the fixture valve favors a pressurized supply, faucet, toilet, or fixture connection. Continued flow suggests a drain-side residual, concealed line, storage source, or another fixture, and an unsafe shutoff location needs professional isolation.
-
Check 2
From a dry position, identify whether water is near outlets, switches, light fixtures, appliances, cords, or the electrical panel; keep people out of standing water and do not turn a wet device or circuit on or off at the device.
Expected result: Water is confined to a dry floor area, water has reached electrical equipment, wiring is wet or sparking, or the panel cannot be reached without entering water.
Next step: Keep clear and contact a qualified electrician or emergency responder if isolation is not safely accessible. Do not use the bathroom circuit or appliance until the area and equipment are cleared.
Stop if: Stop immediately for sparks, burning odor, buzzing, frayed wiring, a wet outlet, or any need to enter standing water to reach a power control.
Why this matters
Why: Water near electrical equipment creates shock and fire risk even when the water looks clean. The CDC says not to enter standing water to reach the main switch and not to restore power until equipment is inspected and fully dry.
-
Check 3
With water isolated and the area safe, use dry towels to trace the first wet point without opening walls or removing a trap: inspect the supply hose or valve, faucet or toilet base, overflow opening, drain rim, visible trap joint, cabinet base, ceiling below, and floor edge.
Expected result: The first wet point is at a pressurized supply connection, at the drain or overflow, below the trap, around the fixture base, or at a wall, ceiling, or floor with no visible fixture source.
Next step: Keep the relevant supply closed and tell the plumber the first wet point and whether the water appeared during use, after the fixture was idle, or after an upstairs discharge.
Stop if: Do not pry trim, cut drywall, remove a ceiling panel, or loosen a concealed connection to chase the water.
Why this matters
Why: A supply connection can leak even when the drain is blocked. A drain or overflow point links the water to the blocked path. A wall, ceiling, or floor origin suggests concealed piping, waterproofing, or a leak from another level.
-
Check 4
Record when the liquid appears and its safe visible characteristics without tasting or handling it: immediately with the faucet or toilet supply, only while the drain is used, after a shower, after another fixture discharges, or with no bathroom use.
Expected result: The liquid is clear and odorless, cloudy or foul-smelling, warm, mixed with debris, or its source and timing remain uncertain.
Next step: Treat uncertain liquid as potentially contaminated, stop water use, and arrange plumbing assessment. Keep a record of any prior drain product because it changes handling safety.
Stop if: Do not touch unknown liquid with bare skin, use a fan that could spread contaminated moisture, or continue testing if sewage, strong odor, or a chemical smell is present.
Why this matters
Why: Clear water can still be from a pressurized supply or a clean fixture spill; foul odor, debris, or return from a drain raises concern for wastewater. Timing after another fixture points toward a shared branch or downstream restriction.
-
Check 5
If there is no standing water near electrical equipment, no chemical history, and the liquid is known to be clean, inspect only the visible drain opening, stopper, strainer, overflow cover, and exposed joint for hair, debris, a displaced gasket, or a loose visible connection; do not dismantle the trap unless the plumber directs it.
Expected result: A visible obstruction is present, the drain opening is clear but full, the overflow or joint is wet, or the water source is not visible.
Next step: Remove only plainly accessible debris without force and keep the supply closed. Ask a plumber to clear or inspect the deeper path and replace a failed seal or joint after the source is confirmed.
Stop if: Do not open a trap containing unknown liquid, loosen a joint under load, use powered tools, or plunge after a chemical product may have been used.
Why this matters
Why: A visible obstruction may explain a local no-drain symptom, while a full clear opening suggests a deeper branch blockage. Moisture at an overflow or joint can explain the clean-water leak separately from the blockage.
-
Check 6
Use only a small, controlled amount of water when safe to observe whether another bathroom fixture changes the level or causes water at the leak point; skip this test entirely if the leak is active, the drain is full, or water is near electrical equipment.
Expected result: Only one fixture stays blocked, several bathroom fixtures are slow, water rises elsewhere, or the leak appears after another fixture discharges.
Next step: Stop high-flow use and tell the plumber the exact cross-fixture pattern. For suspected public sewer or septic involvement, contact the relevant utility or septic professional as well as the plumber.
Stop if: Stop the test at any rise, backup, gurgling, foul odor, floor wetting, or water movement toward electrical equipment.
Why this matters
Why: One fixture favors a local trap or branch issue. Several fixtures or a cross-fixture response suggests a shared branch, building drain, sewer lateral, or septic restriction. A leak after another fixture discharges may be a downstream drain joint or overflow path.
-
Check 7
Dry reachable surfaces, photograph or note staining without opening the structure, and tell the plumber whether any drain opener, bleach, acid, or other cleaner was used; do not add another product or try to neutralize one.
Expected result: The wall, floor, cabinet, or ceiling remains damp; mold or staining is visible; a chemical was used; or the area dries and stays dry once the supply is isolated.
Next step: Arrange plumbing and building-moisture assessment for recurrent dampness or concealed damage. Disclose chemical names and timing before any drain clearing; follow local hazardous-waste directions for unused products.
Stop if: Do not mix cleaners, pour leftover chemicals into the drain, paint or seal over damp material, or disturb suspected mold or contaminated porous material without suitable professional guidance.
Why this matters
Why: Persistent or hidden moisture can damage materials and support mold, while chemical residue can react or injure someone during later drain work. A dry area after isolation supports a supply-side source but does not prove the drain is clear.
-
Check 8
Keep the affected fixture out of use and give the plumber the first wet point, isolation result, drain pattern, timing, photos, lower-floor or wall observations, and any chemical history; leave concealed inspection, drain clearing, and leak repair to the professional.
Expected result: The plumber confirms a supply leak, drain or overflow seal, local blockage, shared branch restriction, concealed leak, sewer or septic issue, or cannot confirm the source without further inspection.
Next step: Follow the professional's isolation, drying, repair, and testing plan. Do not restore the water supply or bathroom circuit until the leak area and any wet electrical equipment are cleared.
Stop if: Stop all DIY work for sewage, substantial flow, hidden structural wetness, chemical residue, unsafe electrical conditions, or a leak that returns after isolation.
Why this matters
Why: A no-drain symptom and a clean-water leak may have different causes and may require different access points. A camera, cleanout inspection, moisture assessment, or pressure-side diagnosis can be selected from the evidence rather than guessed.
Use your observations
Decision map
Find the observation that best matches what you see, then follow the next safe action.
-
PATH 01Next step
What you see
The leak stops when the fixture shutoff or building water supply is closed, and the first wet point is a hose, valve, faucet, toilet connection, or other pressurized fitting.
Do this next
Keep that supply isolated, do not use the fixture, and arrange plumbing service for the supply leak. Treat the blocked drain as a separate diagnosis and do not restore water merely to test it.
-
PATH 02Next step
What you see
Water appears at the overflow, drain rim, visible trap joint, or fixture base only when the blocked bathroom fixture is used.
Do this next
Stop using the fixture and request plumber assessment of the local blockage, overflow path, seal, and visible joint. Do not loosen a wet connection or keep filling the fixture.
-
PATH 03Next step
What you see
The first wet point is a wall, ceiling, cabinet base, floor edge, or other place with no visible fixture source.
Do this next
Keep the bathroom and suspected supply isolated, protect the lower area, and arrange plumbing and moisture assessment. Do not open the structure or cover the damp area before the source is found.
-
PATH 04Next step
What you see
Water is near outlets, switches, lighting, appliances, cords, or the electrical panel, or sparks or burning odor are present.
Do this next
Keep clear and isolate power only from a dry safe position. If the panel cannot be reached without standing in water, contact a qualified electrician or emergency responder; do not restore power until inspection and drying are complete.
-
PATH 05Next step
What you see
Only one bathroom outlet is blocked, there is no active leak or electrical hazard, and the visible opening has a plainly accessible obstruction.
Do this next
Remove only the safe visible material without force and keep the fixture unused if the drain remains full. Request plumber clearing for a deeper blockage or any leak at the drain or overflow.
-
PATH 06Next step
What you see
Several bathroom fixtures are slow, another fixture causes the level to rise, or water returns through a lower outlet.
Do this next
Stop high-flow water use and request branch, building drain, sewer lateral, septic, or public-main assessment. Do not keep plunging or snaking separate fixtures without a system-level plan.
-
PATH 07Next step
What you see
A drain opener, bleach, acid, or other cleaner was used, or the liquid in the drain is unknown.
Do this next
Stop adding products, keep people away from splashes and fumes, disclose the exact product and timing to the plumber, and let the professional choose safe handling.
-
PATH 08Next step
What you see
The water is foul-smelling, cloudy, contains debris, backs up from a drain, or reaches porous materials or another level.
Do this next
Treat it as potentially contaminated wastewater: stop water use, keep people and pets away, avoid contact, and arrange qualified plumbing and cleanup assessment. Do not use ordinary clean-water leak assumptions.
Helpful context
Understand the symptom
Treat the leak and the blockage as two linked but separate clues
A stopped drain does not prove that the leaking water came from the drain. Supply water can leak while the drain is blocked, and water from an overflow, trap, or drain joint can appear clear before it becomes contaminated. Stop water use, find the first wet point, and classify the liquid before touching a fitting.
Start at the safest isolation point
A fixture shutoff may stop a clean-water supply leak without affecting the drain. If the source is uncertain or flow is substantial, close the building water shutoff only if it is safely reachable. Do not cross standing water to reach electrical equipment. Dry reachable surfaces and protect the lower floor from further water while waiting for service.
A hidden leak changes the service boundary
Water that first appears at a wall, ceiling, cabinet base, or floor edge can be traveling from a concealed pipe or failed waterproofing. Surface drying does not confirm the cavity is dry. Recurrent dampness, staining, a soft finish, or mold odor warrants plumbing and possibly building-moisture assessment rather than more drain clearing.
Only after diagnosis
Potential parts
- drain trap or branch-drain fitting
Consider only after a qualified plumber confirms a damaged, displaced, or obstructed local fitting rather than a supply leak or deeper branch restriction.
Confirm fixture type, pipe material, dimensions, access, and local requirements before replacement; a full drain and clean-water leak do not identify a fitting by themselves. - overflow or drain-seal assembly
Consider only when inspection shows water escapes at the overflow, drain flange, gasket, or visible seal during use.
Match the fixture design and seal arrangement. Do not open a wet connection or cover a hidden leak before the source is confirmed. - fixture supply shutoff or flexible connector
Consider only after a plumber confirms the clean-water leak is on the pressurized fixture supply and identifies the failed component.
Confirm connection size, fixture, material, and local requirements; keep the supply isolated until the repair is inspected.
When checks do not resolve it
Need a professional?
Request a plumber when the drain remains blocked after safe visible checks, the leak continues or returns, the first wet point is concealed, several fixtures are affected, wastewater backs up, or the source cannot be separated from the drain path. Contact a qualified electrician when water reaches electrical equipment or power cannot be isolated safely.
Have this ready
- Provide the first wet point, which shutoff stopped the leak, whether the drain or overflow was being used, one-versus-many fixture pattern, timing after another discharge, odor or debris, photos of staining, lower-level dampness, and every drain product used.
Common questions
FAQ
Why is the bathroom drain blocked while clean water is leaking?
The two symptoms can have separate causes. A blocked drain can make water escape at an overflow, drain seal, or joint, while a pressurized supply hose, valve, faucet, or toilet connection can leak independently. Find the first wet point and close the nearest safe supply before attempting drain work.
Should I keep running water to see whether the drain clears?
No. Stop water use while a leak and no-drain condition are present. Additional water can turn a local blockage into an overflow or drive water into a wall, lower floor, or electrical area. A plumber can test the path after the leak source is isolated.
What if the water is clear but comes from the bathroom wall or ceiling?
Clear water can still come from a concealed supply pipe, a fixture above, or a waterproofing failure. Keep the relevant supply isolated, protect the lower area, and arrange plumbing and moisture assessment. Do not cut into the wall or cover the damp surface before the source is found.
Can I use drain cleaner when the bathroom drain is full?
Do not add or mix drain products, especially when the line may already contain an unknown chemical or a plumber may need to open it. Tell the plumber exactly what was used and when. Chemical residue changes splash and fume hazards during later clearing.
When is this bathroom leak an emergency?
Stop immediately for uncontrolled flow, overflow, sewage or foul odor, water near electrical equipment, sparks or burning odor, hidden structural wetness, unsafe standing water, or a shutoff that cannot be reached safely. Keep people away and contact the relevant emergency, plumbing, or electrical professional.
Read the exact guide
Official sources
- Sanitary Sewer OverflowsAustin Water · Municipal wastewater safety guidance; local utility response and ownership rules vary.
- Sewer Problems in the HomeCity of Minneapolis Public Works · Municipal example for one-versus-many fixture triage; local sewer procedures vary.
- Resolving Septic System MalfunctionsU.S. Environmental Protection Agency · Use when the property has septic or onsite wastewater; municipal sewer users should contact their utility.
- Household Hazardous Waste (HHW)U.S. Environmental Protection Agency · General household hazardous-material guidance; follow the product label and local disposal rules.
- A Brief Guide to Mold, Moisture and Your HomeU.S. Environmental Protection Agency · Residential moisture and mold guidance; professional assessment is appropriate for hidden, extensive, or contaminated damage.
- What to Do to Protect Yourself From Electrical HazardsCenters for Disease Control and Prevention · General household electrical hazard guidance; local emergency procedures may vary.
Community feedback
Share a repair observation
Share a plain-text repair observation. Accepted observations are published automatically; this page may take a moment to update.