
On this page
Start here
Quick answer
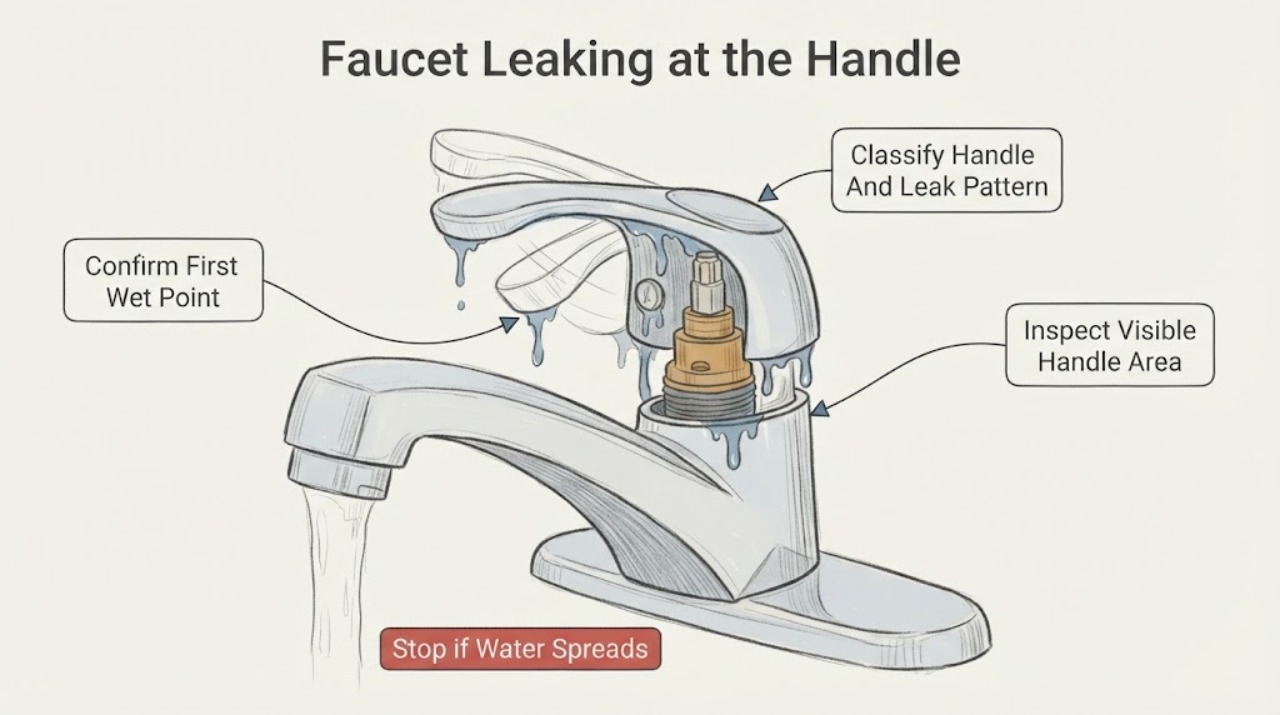
Water that appears around a faucet handle only while the handle moves usually means water is escaping from the control assembly or a seal, but first confirm that it is not running down from the spout, base, supply connection, or under the sink. Dry the faucet, operate the handle normally once, and watch the first wet point without forcing a stiff or loose control. On many single-handle faucets, a cartridge or its seals are a common cause; two-handle faucets may have separate cartridges, stems, seats, or seals, and the exact design matters. If water is pooling, spraying, reaching a cabinet or electrical equipment, the handle is difficult to move, or the faucet cannot be isolated safely, stop using it and arrange prompt plumbing service. Do not remove the handle or cartridge under pressure, guess at a replacement, overtighten a retaining part, or keep operating a worsening leak.
Before you begin
Safety first
- The plumber should determine whether the cause is a cartridge or stem assembly, packing or O-ring, body seal, spout or deck connection, supply hose, shutoff, or concealed plumbing issue before selecting parts.
Work through in order
Diagnostic checks
Use only checks that match the exact appliance or system and its official guide.
-
Check 1
Dry the handle, escutcheon or base plate, spout, and nearby deck, then operate the handle normally once while watching from a safe position; do not force the handle or reach under the sink while water is present.
Expected result: Water first appears under the handle, around the base plate, at the spout base or outlet, under the counter, or the first wet point cannot be localized.
Next step: Photograph the first wet point and continue only with checks appropriate to that location; arrange prompt service for an under-sink leak or an uncertain location.
Stop if: Stop for spray, rapidly pooling water, a wet electrical outlet or appliance, contaminated water, or any need to reach into standing water or an unstable cabinet.
Why this matters
Why: Water first appearing under the handle supports a control-assembly or seal path. Water at the spout, base, supply connection, cabinet, or wall is a different or additional repair path and may cause hidden damage.
-
Check 2
With the faucet controls used normally and without force, note whether water appears only during movement, only when the faucet is on, after shutoff, or continuously, and record whether the faucet has one handle or two.
Expected result: The leak occurs only while moving the handle, appears around one side of a two-handle faucet, continues after shutoff, stops when the handle is still, or becomes a stream as the control moves.
Next step: Record the timing and affected side for model-specific service; use a clearly identified fixture shutoff only if the leak is worsening and the valve operates normally without force.
Stop if: Do not repeatedly cycle the faucet, force a stiff or loose handle, or continue using it after the leak becomes a stream, sprays, or reaches cabinetry or electrical equipment.
Why this matters
Why: A movement-triggered leak keeps the handle control, cartridge or stem, and seals in focus. One affected side narrows the check on a two-handle faucet, while a continuous stream or leak after shutoff may indicate a separate valve-sealing problem.
-
Check 3
From dry, stable access, inspect the handle, trim, base plate, faucet body, and deck for looseness, cracking, mineral trails, corrosion, or a gap that opens as the handle moves; do not remove trim or probe the opening.
Expected result: The handle is loose or stiff, trim is cracked, mineral deposits trace a leak, the body or deck is damaged, or no external defect is visible.
Next step: Photograph the condition and provide it to a plumber; do not tighten an unknown retaining part or use force to close a gap.
Stop if: Do not pry off a cap, remove a set screw, loosen a bonnet or cartridge nut, or use tools while the water supply is pressurized or the correct procedure is unknown.
Why this matters
Why: A loose or stiff control and visible deposits support inspection of the handle, retaining hardware, cartridge or stem, and seals, but a clean exterior does not rule out an internal leak. Body or deck damage can require broader repair.
-
Check 4
Look from a dry, stable position at the supply lines, fixture shutoffs, cabinet floor, wall, and nearby electrical equipment for water, corrosion, swelling, or a connection moving with handle use; do not touch hot, corroded, or wet hardware.
Expected result: Only the handle is wet, a supply or shutoff is wet, water is pooling in the cabinet, the wall or cabinet is swelling, an electrical item is exposed, or the shutoff is inaccessible or corroded.
Next step: Use a clearly identified fixture shutoff only when it is accessible and turns normally; otherwise keep clear and arrange prompt plumbing service, with urgent help for electrical exposure or uncontrolled water.
Stop if: Do not force a shutoff, disconnect a supply line, touch hot or contaminated water, enter standing water near electrical equipment, or wipe inside a wet cabinet.
Why this matters
Why: An isolated handle leak keeps the faucet control assembly in focus. Water at a supply, shutoff, cabinet, wall, or electrical item is a second or different leak and raises the risk of property damage or shock.
-
Check 5
Photograph the full faucet, handle count and arrangement, visible brand or model marking, spout shape, finish, and paperwork from safe access; do not disassemble the handle to identify a part.
Expected result: The exact model is clear, only the brand is known, the faucet has one or two handles but no model marking, or the design is ambiguous.
Next step: Use the manufacturer's product-identification and parts information or send the photos to a qualified plumber before ordering a replacement.
Stop if: Do not order a cartridge, stem, seal, or handle part by appearance alone, mix components across models, or remove a pressurized control assembly as an identification experiment.
Why this matters
Why: Model information lets the manufacturer's parts diagram distinguish a cartridge, stem, packing, O-ring, seat, spring, or retaining component. Brand-only or appearance-based identification cannot establish fit.
-
Check 6
Prepare a service record with the first wet point, movement and shutoff pattern, handle count, model information, photos, fixture-shutoff status, and any cabinet, wall, hot-water, or electrical concern.
Expected result: The record describes a model-specific handle leak, an unidentified faucet, a base or supply leak in addition to the handle leak, or a faucet that cannot be safely isolated.
Next step: Arrange qualified plumbing service for a recurring or worsening handle leak and provide the record before ordering parts; keep the faucet isolated only when the shutoff operates normally.
Stop if: Do not keep using a faucet that sprays, floods, is dangerously hot, sends water toward electrical equipment, or cannot be isolated.
Why this matters
Why: A concise record helps a plumber distinguish a cartridge or stem-seal issue from a body, spout, supply, shutoff, or concealed plumbing problem. It cannot establish part compatibility without model confirmation.
Use your observations
Decision map
Find the observation that best matches what you see, then follow the next safe action.
-
PATH 01Next step
What you see
Water first appears at or beneath the handle only while the faucet is operated, with the spout base, supply connections, and cabinet remaining dry.
Do this next
Stop unnecessary use, record the handle count and model, and obtain model-specific service or qualified plumbing inspection; do not disassemble under pressure.
Why this path and its safety boundary
Why it matters: A handle control, cartridge or stem, packing, or seal issue is more likely than an under-sink supply leak, but the exact repair depends on the faucet design and model.
-
PATH 02Next step
What you see
A two-handle faucet leaks around one handle when that side is moved, while the other handle and supply connections remain dry.
Do this next
Identify the faucet and affected hot or cold side and provide that information to a plumber; do not mix two-handle components or force a stiff control.
Why this path and its safety boundary
Why it matters: The affected side's stem, cartridge, packing, or seal is more plausible than a whole-faucet or under-sink leak, but the component family is model-dependent.
-
PATH 03Next step
What you see
Water appears on the base plate, deck, cabinet, supply connection, shutoff, wall, or electrical area when the handle moves, even if the handle itself also looks wet.
Do this next
Use only a normal accessible fixture shutoff if safe, stop using the faucet, and request prompt plumbing service; treat electrical exposure or uncontrolled water as urgent.
Why this path and its safety boundary
Why it matters: Water may be traveling from a handle leak or may reflect a separate body, supply, shutoff, hose, or concealed plumbing failure. A cartridge-only diagnosis is not sufficient.
-
PATH 04Next step
What you see
The handle leak continues after the handle stops, becomes a stream, or is accompanied by a loose, difficult, or damaged control.
Do this next
Stop operating the faucet and isolate it only with a clearly identified shutoff that turns normally; arrange prompt service and do not remove the cartridge or stem under pressure.
Why this path and its safety boundary
Why it matters: The valve or cartridge may no longer be sealing, or the control assembly may be damaged. The condition is worsening and is not a routine wipe-up issue.
-
PATH 05Next step
What you see
The first wet point cannot be confirmed, the model is unknown, the faucet has visible body or deck damage, or the leak remains after safe observation.
Do this next
Provide photos, handle arrangement, water timing, and shutoff status to a qualified plumber and leave the faucet unused until assessed.
Why this path and its safety boundary
Why it matters: The repair path cannot be safely narrowed. A guessed cartridge, stem, O-ring, or tightening step may worsen the leak or damage the faucet.
Helpful context
Understand the symptom
Confirm that the handle is the first wet point
Water around a handle can travel onto the base plate and look like a base leak, while a leak below the counter can come from a supply hose or shutoff. Dry the visible surfaces, operate the handle normally, and watch where water first appears. The location changes whether the likely path involves a cartridge or stem, a body seal, a spout seal, or plumbing below the sink.
Movement-triggered water points to the control area, but not one universal part
A leak that starts as the handle moves may be related to the cartridge, stem, packing, O-ring, or another model-specific seal. Moen describes a cartridge as a usual cause for a kitchen faucet leaking around the handle, while Delta's parts information separates single- and two-handle leak components. Do not infer the replacement from the faucet's appearance alone.
Use model information and a safe shutoff boundary
Photograph the faucet, handle arrangement, visible brand or model marking, and the first wet point. If the leak is worsening, use only a clearly identified fixture shutoff that turns normally and can be reached without entering standing water; do not force a corroded valve. Any cartridge or stem work requires proper water isolation and pressure relief, so unclear instructions or a difficult handle is a reason to call a qualified plumber.
Safety boundary
Stop conditions
- Stop using the faucet for spray, rapidly pooling water, a stream, a stiff or loose handle, water in a cabinet or wall, or water near electrical equipment.
- Do not remove the handle, cartridge, stem, bonnet, packing, or retaining nut under pressure; do not force a control or corroded shutoff.
- Do not order parts by appearance, mix components from different models, or overtighten a retaining part as a substitute for model-specific diagnosis.
- Arrange qualified plumbing service for a recurring or worsening handle leak, an unknown model, a base or under-sink leak, or any location that cannot be safely confirmed.
Only after diagnosis
Potential parts
- faucet cartridge, stem, or handle-area seal assembly
Consider this part category only after confirming that water first appears around the handle during operation and identifying the exact faucet model, handle design, and affected side; a base, supply, or under-sink leak may require a different component.
Confirm the model-specific parts diagram and manufacturer fit information before ordering; cartridge and stem designs are not universal.
When checks do not resolve it
Need a professional?
Use prompt service when the faucet leaks around the handle during use, continues after movement, or cannot be identified or isolated safely. Treat a stream, spray, cabinet or wall water, hot-water hazard, electrical exposure, or corroded or inaccessible shutoff as urgent.
Safety scope: The plumber should determine whether the cause is a cartridge or stem assembly, packing or O-ring, body seal, spout or deck connection, supply hose, shutoff, or concealed plumbing issue before selecting parts.
Have this ready
- Photos of the full faucet, handle area, first wet point, underside or cabinet if safely visible, and any visible brand or model marking
- Whether the faucet has one or two handles and whether the leak occurs only while moving, only when on, after shutoff, or continuously
- Which hot or cold side is affected, if known, and whether the handle is stiff, loose, cracked, or difficult to control
- The status of the fixture shutoffs and any water at the spout base, supply connections, cabinet, wall, or nearby electrical equipment
- Any prior cartridge, stem, seal, hose, or faucet repair and the manufacturer's documentation if available
Common questions
FAQ
Why does my faucet leak around the handle when I move it?
Water that starts around the handle during movement commonly points to the control assembly or a seal, but the first wet point must be confirmed. Depending on the design, a cartridge, stem, packing, O-ring, body seal, or a separate supply connection may be involved.
How can I tell whether the leak is from the handle or the faucet base?
Dry the visible surfaces, operate the handle normally once, and watch where water first appears. Water from the handle can run onto the base plate and look like a base leak; water under the counter or at a supply connection is a different service path.
Can I tighten the faucet handle to stop the leak?
Do not tighten an unknown retaining part as a guess. A loose handle may coexist with a worn cartridge, stem, packing, or seal, and overtightening can damage the faucet. Identify the model and follow its exact instructions or have a plumber inspect it.
Should I replace the cartridge for a handle-area leak?
A cartridge is a common possibility on some single- and dual-handle designs, but it is not universal and a base, supply, or under-sink leak may need another repair. Confirm the exact model and leak location before ordering or disassembling anything.
When is a faucet handle leak urgent?
Stop using the faucet and request prompt service for a stream, spray, rapidly pooling water, a stiff or loose handle, cabinet or wall water, or a leak near electrical equipment. Use only a clearly identified fixture shutoff that turns normally, and do not force a corroded valve.
Read the exact guide
Official sources
- Bathroom Faucet: Leaking Around the Base of the FaucetMoen Incorporated · Moen explains that a handle leak can wet the base plate and recommends confirming the first leak location before following a base-leak repair path.
- Kitchen Faucet: Leaking Around The HandleMoen Incorporated · Moen describes water appearing around a kitchen faucet handle when the faucet is turned on, identifies the cartridge as a usual cause, distinguishes single- and dual-handle designs, and warns that cartridge types are not interchangeable.
- Bathroom Faucet: Leaking Under The Sink BaseMoen Incorporated · Moen distinguishes intermittent leaks while using a faucet from steady leaks at shutoffs or supply lines and emphasizes frequency and location when choosing the repair path.
- Find Parts and Identify Your ProductDelta Faucet Company · Delta's official product and parts tool requires model information for product detail and lists single- and two-handle cartridge categories for drips from the spout, base, or under the handle.
Community feedback
Share a repair observation
Share a plain-text repair observation. Accepted observations are published automatically; this page may take a moment to update.