
On this page
Start here
Quick answer
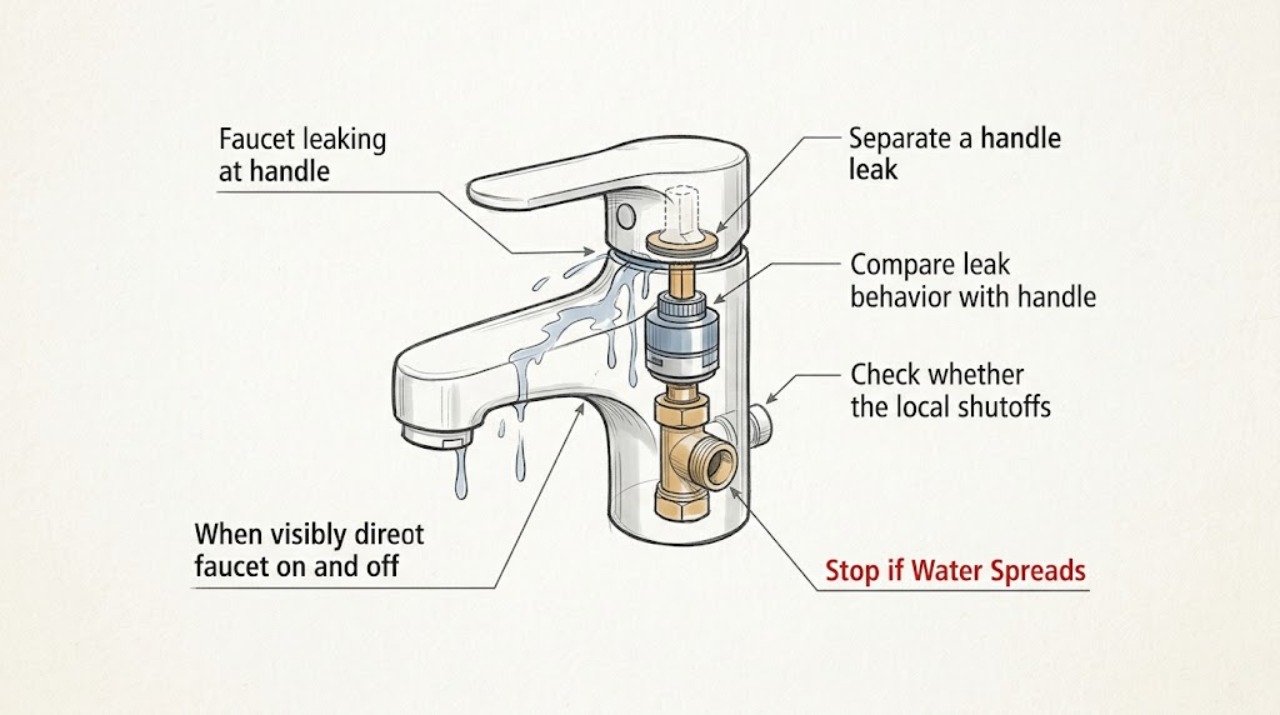
First locate when and where the water appears. A leak that emerges around the handle while the faucet is running or continues when it is off often points to the valve or cartridge area, but water can also travel from the spout, supply connections, or the base and look like a handle leak. From a safe position, observe the handle position, the exact source, and whether the fixture shutoff valves stop the flow. If a shutoff is stiff, inaccessible, spraying, or fails to stop the leak, stop and call a plumber. Do not remove the handle or cartridge while the faucet is pressurized; shutoff and model-specific repair decisions belong to a qualified professional unless the exact manufacturer instructions and safe isolation are clear.
Work through in order
Diagnostic checks
Use only checks that match the exact appliance or system and its official guide.
-
Separate a handle leak from nearby water
With the faucet in its current condition, observe the first place water appears without removing the handle or wiping under pressurized water. Look at the handle joint, spout base, faucet deck, supply hoses, and connections below the sink.
Expected result: Water begins at the handle joint; it begins at the spout or base and travels toward the handle; it appears below the sink; or the first source is unclear.
Next step: Record the first visible source and tell the plumber. Do not tighten or remove a fitting based only on appearance, especially while the line is pressurized.
Stop if: Stop if water is spraying, the source is near an electrical connection, or locating it would require reaching under pressure or moving the faucet.
Why this matters
Why: A handle-area source supports a cartridge, stem, or seal issue, while a base, hose, or connection leak needs a different diagnosis. A wet surface can make the source look closer to the handle than it is.
-
Compare leak behavior with handle position
Observe the faucet without forcing it: note whether the leak appears only while the handle is being moved or the water is running, continues with the handle fully off, or changes when a second handle is used. Do not repeatedly cycle the handle to reproduce the leak.
Expected result: The leak occurs only while running or moving the handle; it continues with the faucet off; it changes by hot/cold handle; or it does not correlate with handle position.
Next step: Give the timing and handle pattern to the plumber. Leave the handle in the least-leaking position and do not remove it or attempt a pressure-loaded repair.
Stop if: Stop if the handle is stiff, loose, hot, or likely to break, or if testing would require repeated opening and closing.
Why this matters
Why: A continuous handle-area leak can be consistent with a cartridge, stem, or seal problem; a leak only while running may also be from a nearby spout or body path. Handle position narrows the branch but does not identify a compatible replacement part.
-
Check whether the local shutoffs stop the water
If the two fixture shutoff valves under the sink are visible, accessible, and turn normally, close them gently according to their valve design without loosening any connection. Observe whether the faucet flow and handle-area leak stop; if a valve will not move normally, leave it alone.
Expected result: Both shutoffs stop the flow; one stops it; neither stops it; a valve drips or sprays; or the shutoffs are inaccessible.
Next step: If the fixture is isolated, leave the valves closed and arrange repair. If a shutoff fails, sprays, or cannot be operated safely, stop and call a plumber; do not loosen faucet parts under pressure.
Stop if: Stop immediately if a valve is stuck, spinning without effect, corroded, spraying, or requires tools or force.
Why this matters
Why: Effective fixture shutoffs isolate the faucet for a controlled service visit. A failed, leaking, or inaccessible shutoff means water pressure may remain and the home's main shutoff or professional response may be needed.
-
Identify the faucet without disassembly
From an accessible label, existing manual, or visible faucet shape, record the brand if known, model if available, and whether the faucet has one handle or two. Do not remove the handle, cartridge, stem, escutcheon, or supply connection to identify a part.
Expected result: A model number is available; only the brand or handle style is known; or no identity information is accessible.
Next step: Give the identity and photos to the plumber or manufacturer support. Let the professional confirm the repair part after water is safely isolated.
Stop if: Stop if identifying the model would require disassembly, turning a pressurized fitting, or moving the faucet.
Why this matters
Why: Cartridges, stems, seals, and o-rings are not universal even when faucets look similar. A partial identity is useful for a professional but cannot establish part compatibility.
Use your observations
Decision map
Find the observation that best matches what you see, then follow the next safe action.
-
PATH 01Next step
What you see
Water visibly begins at the handle joint and continues while the faucet is on or off.
Do this next
Report a likely valve/cartridge/seal-area leak and request model-specific service; do not assume a universal cartridge.
-
PATH 02Next step
What you see
Accessible fixture shutoff valves close normally and stop the faucet flow.
Do this next
Leave them closed and arrange controlled repair without opening the faucet under pressure.
-
PATH 03Next step
What you see
Water is reaching cabinetry, flooring, an electrical outlet, or a ceiling below.
Do this next
Treat the leak as urgent, isolate water only with a safely operating shutoff, and call a plumber promptly.
-
PATH 04Next step
What you see
Model information is unavailable without removing the handle or opening a pressurized connection.
Do this next
Do not disassemble; give the plumber photos, handle style, leak timing, and shutoff result.
Helpful context
Understand the symptom
Contain the leak without opening the faucet
Move items away from the water and place a container under the leak only if you can do so without reaching through a spray or touching a sharp fitting. Do not force the handle, loosen a bonnet or cartridge nut, or open the faucet while water pressure is present. If water is reaching cabinetry, an electrical outlet, or flooring, treat the situation as urgent and use the accessible fixture shutoffs or the home's main shutoff only if they operate normally and safely.
What to tell a plumber
Report whether the faucet is single-handle or two-handle, whether the leak occurs only while running or also while off, whether it emerges above the deck or below the sink, and whether the fixture shutoffs stop it. Provide a model or brand from an accessible label or existing documentation; do not disassemble the faucet just to identify a cartridge.
Only after diagnosis
Potential parts
- faucet cartridge
Only consider this if the leak source and professional diagnosis point to a single-handle or compatible valve cartridge.
Cartridges vary by faucet model and are not interchangeable by appearance; confirm exact fitment. - faucet stem valve
Only consider this if a two-handle faucet diagnosis identifies a stem or valve assembly as the leak source.
Confirm handle side, valve style, model, and thread or interface details before ordering. - faucet o-ring kit
Only consider this if the professional confirms a seal or o-ring failure rather than a cartridge, valve body, hose, or base leak.
O-ring size and material vary; model identification and proper pressure isolation are required.
When checks do not resolve it
Need a professional?
Call promptly when the leak is continuous, fixture shutoffs fail, water is reaching cabinetry or electrical areas, the handle or valve is stuck, or the leak source is uncertain.
Common questions
FAQ
Why does water leak around the faucet handle?
A valve, cartridge, stem, or seal area may be leaking, but water from the spout, base, or supply connection can travel and look like a handle leak. Observe the first source before choosing a part.
Can I remove the handle to see the cartridge?
Only after water is safely isolated and the exact model instructions are clear. Do not remove faucet parts while the fixture is pressurized; call a plumber if the shutoffs are stuck, inaccessible, or ineffective.
How do I know which cartridge or o-ring to order?
Use the exact faucet model and a professional diagnosis. Similar-looking cartridges and seals are not necessarily interchangeable.
What if the leak continues after the faucet is turned off?
A continuous handle-area leak may indicate a valve, cartridge, or seal problem, but verify the source and fixture-shutoff result. Keep the water isolated if safe and arrange plumbing service.
Read the exact guide
Official sources
- Leaking Under the Handle | Bathroom FaucetsKohler Assist · Faucet leaks that appear where the handle attaches, while on or off
- Kitchen Faucet: Leaking Around The HandleMoen Solutions · Single- and dual-handle kitchen faucet leaks observed at the handle area
Community feedback
Share a repair observation
Share a plain-text repair observation. Accepted observations are published automatically; this page may take a moment to update.