
On this page
Start here
Quick answer
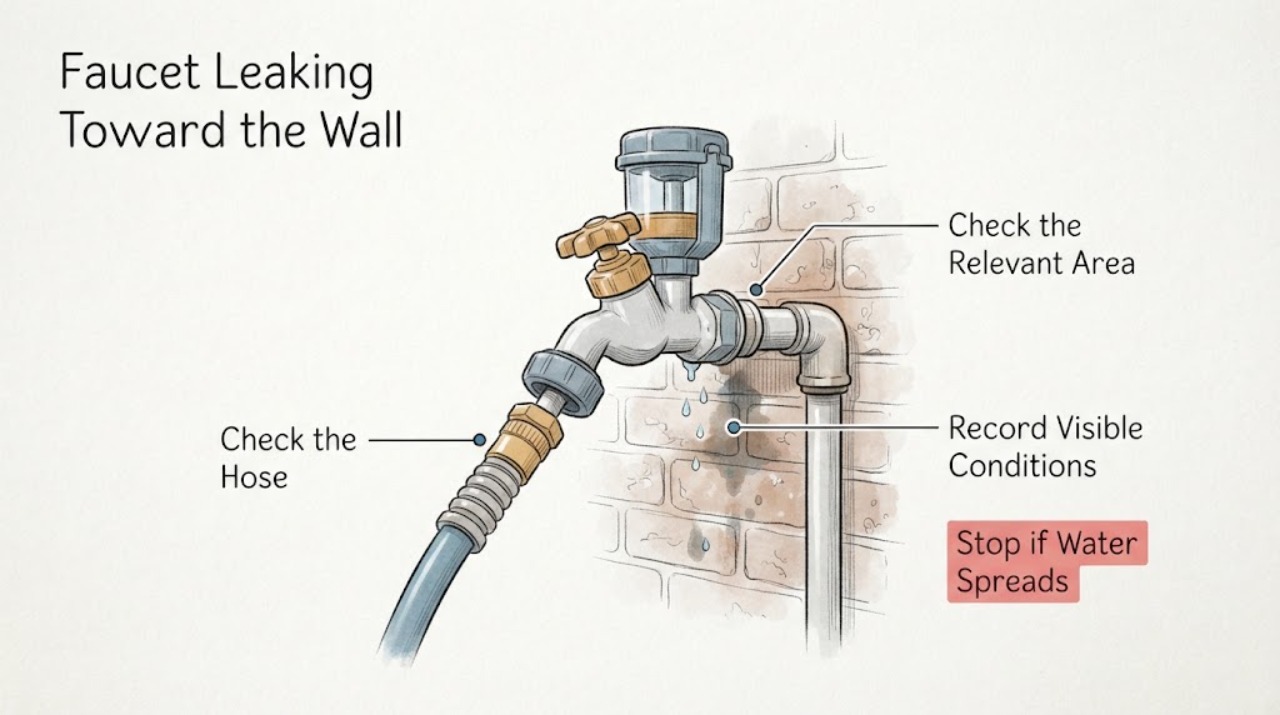
When an outside faucet leaks toward the wall, stop using that faucet and find the indoor shut-off for its branch if one is available. Dry the area and observe only from a safe position to identify whether water starts at the spout, handle, hose connection, anti-siphon device, or where the faucet enters the wall. A leak that appears behind the faucet, inside the wall, only when the faucet is open, or after a freeze may involve the wall-side tube or supply connection; keep the indoor valve closed and call a plumber. Do not open the wall, remove a frost-free valve, or keep testing under pressure just to locate the leak.
Before you begin
Safety first
- Keep the affected branch isolated. If isolation fails, close the main water shut-off from a dry position. Do not operate electrical equipment in standing water, and do not open walls or work on pressurized or hidden plumbing.
Work through in order
Diagnostic checks
Use only checks that match the exact appliance or system and its official guide.
-
Check 1
Stop using the outdoor faucet, disconnect any hose without twisting the wall fitting, and close the indoor shut-off for that faucet if it is clearly identified and reachable from a dry position. If there is no local valve or the leak continues, close the main water shut-off if safe.
Expected result: If flow stops at the local valve, the affected branch is isolated. If water continues, the wrong valve may have been closed or the valve may not seal; if the flow is rapid, treat it as an active supply failure.
Next step: Leave the isolated valve closed and move to a dry visual inspection. If isolation fails, water is entering the wall, or nearby wiring may be wet, stop investigating and request urgent service.
Why this matters
Why: An indoor shut-off is the intended isolation point for many outside hose connections, and a main shut-off is the fallback during flooding or a failed fixture valve.
-
Check 2
Dry the exposed faucet and wall surface, then inspect without reopening the water: look separately at the spout tip, handle or packing area, hose-thread connection, anti-siphon or vacuum-breaker cap, and the circular wall entry. Use a dry tissue only on exposed surfaces; do not push it into a gap.
Expected result: A wet spout or handle area points toward the faucet seal or packing area. A wet hose connection points toward the hose washer or connection. Water at the wall entry, damp siding or masonry, or a wet interior surface behind the faucet points beyond a simple exposed washer.
Next step: Only an exposed hose washer or clearly loose hose connection may be considered for a low-risk repair after the water is isolated. Keep a wall-entry or interior-wall leak isolated for a plumber.
Why this matters
Why: Outdoor faucet leaks commonly appear at the handle or spout, but a frost-free stem or soldered wall-side connection can make an inside-wall leak more difficult to correct.
-
Check 3
Record when the leak occurs without deliberately pressurizing it: faucet closed, faucet open, hose attached, hose nozzle closed, or after a recent freeze. Note whether the wall-side area becomes wet before the exposed spout or only becomes wet while water is flowing.
Expected result: A drip at the spout with the handle closed differs from a leak at the wall only while open. A leak that follows a freeze or appears with a hose nozzle closed raises concern for a split or stressed wall-side assembly.
Next step: Do not repeat the pressure condition to confirm it. Keep the indoor valve closed, remove the hose only if it comes off without force, and give the timing and freeze history to a plumber.
Why this matters
Why: A frost-free faucet places its shut-off point inside the wall; freezing water can damage the assembly or connected line, and a hose or nozzle can leave pressure in the assembly.
-
Check 4
From a dry, accessible location inside the wall, basement, crawlspace, or utility area, look for a shut-off, drain cap, wet insulation, staining, or active dripping along the pipe path. Do not remove wall covering, insulation, trim, or the faucet body to reach a hidden connection.
Expected result: A wet pipe or joint inside confirms that the visible outdoor faucet is not the whole repair. A dry interior does not clear the line if the leak is intermittent or the wall cavity is inaccessible.
Next step: Keep the branch isolated and arrange a plumber for any interior moisture, staining, softened material, or inaccessible pipe. Do not close the wall until the source and drying needs are assessed.
Why this matters
Why: Water from an outside faucet can seep into a basement or foundation wall, and hidden pipe leaks can continue while the outside surface looks dry.
-
Check 5
If the exposed faucet and wall are dry with the branch isolated, inspect the hose washer, exposed threads, and anti-siphon device for cracks or deformation without disassembling the faucet or pipe. Compare the observed part with the exact fixture instructions before considering any replacement.
Expected result: A damaged hose washer or exposed connection may explain a leak that occurred only while the hose was attached. A cracked body, missing anti-siphon component, corroded fitting, or uncertain part identity requires professional diagnosis.
Next step: If the repair is not a clearly accessible hose washer or connection and the source cannot be proven, leave the water off and call a plumber. Never substitute a part or defeat a backflow-protection device just to restore flow.
Why this matters
Why: Washers and gaskets can cause faucet leaks, but replacement parts and anti-siphon assemblies are configuration-specific; the wall-side connection should not be guessed from appearance.
-
Check 6
After professional advice or a clearly completed external repair, restore water slowly while watching the first wet point from a dry position. Check the interior side of the wall and the outdoor connection, then stop the test immediately if moisture returns.
Expected result: No moisture during a brief, controlled restoration supports the repair but does not prove a hidden cavity is dry. Any return at the wall, along the pipe, or inside the building means the repair is not complete.
Next step: Close the branch again and contact the plumber if any leak returns. Keep the area accessible for drying and document the first wet point and duration for the service visit.
Why this matters
Why: Leak detection is based on locating the source and addressing water damage promptly; hidden moisture can continue to damage wall materials even after the outside drip changes.
Use your observations
Decision map
Find the observation that best matches what you see, then follow the next safe action.
-
PATH 01Next step
What you see
Water is visible only at the spout or handle and no wall-side or interior moisture is present.
Do this next
Follow the fixture-specific instructions or have a plumber service the exposed valve; do not overtighten or force corroded parts.
Why this path and its safety boundary
Why it matters: An exposed faucet seal, packing area, or stem is more likely than a hidden pipe, but the branch should still be isolated before repair.
-
PATH 02Next step
What you see
Water appears at the hose connection, anti-siphon device, or exposed threads while the faucet is in use.
Do this next
Isolate water, remove the hose only without force, and inspect the exposed connection. Use only a model-appropriate replacement; escalate if the body is cracked or the device is not identifiable.
Why this path and its safety boundary
Why it matters: A hose washer, connection, or exposed protection device may be involved.
-
PATH 03Next step
What you see
The leak is at the wall entry, inside the wall, or appears only when the faucet is open or a hose nozzle is closed.
Do this next
Keep the indoor shut-off closed, do not pressure-test again, and call a plumber. Use the main shut-off if the branch valve cannot stop flow.
Why this path and its safety boundary
Why it matters: A wall-side connection, frost-free stem, or supply pipe is possible, including freeze damage.
-
PATH 04Next step
What you see
Moisture has reached wall materials, insulation, a basement, crawlspace, or nearby electrical equipment.
Do this next
Keep water isolated, avoid wet electrical equipment, and arrange prompt plumbing and drying assessment. Do not open a wall or energize a wet area to inspect it.
Why this path and its safety boundary
Why it matters: The problem includes water-damage or electrical exposure, not just a dripping fixture.
-
PATH 05Next step
What you see
The source cannot be located safely, the shut-off is seized, or the leak returns after an external repair.
Do this next
Leave the water isolated and use a qualified plumber; do not keep tightening, cutting, opening the wall, or substituting unknown parts.
Why this path and its safety boundary
Why it matters: The repair is outside a safe visual check or may involve hidden plumbing.
Helpful context
Understand the symptom
Why the wall direction matters
The first wet point is more useful than the direction of the spray. Water at the spout or handle may be a fixture seal issue, while wetness at the wall entry, a damp interior wall, or water heard inside the wall suggests a connection or pipe problem. A frost-free faucet can still leak inside the wall after freezing damage. The checks below are limited to safe shut-off, drying, and visual observation; the plumbing inside the wall belongs to a qualified plumber.
Before any check
Keep people away from slippery water and protect nearby electrical equipment. Do not operate an electrical switch while standing in water. If the indoor branch shut-off cannot stop the flow, use the main water shut-off from a dry position and arrange urgent plumbing service. If the wall is swelling, soft, stained, or actively wet, treat the leak as a property-damage risk even if the outside drip looks small.
Safety boundary
Stop conditions
- Stop immediately if water is entering a wall, ceiling, basement, crawlspace, or area with electrical equipment; do not touch wet electrical equipment or switches.
- Stop and use the main water shut-off from a dry position if the local valve cannot stop flow, the leak is rapid, or the wall is actively swelling or softening.
- Do not reopen the valve repeatedly to reproduce a hidden-wall leak, and do not pressure-test a suspected split after freezing.
- Do not cut into a wall, remove insulation or trim, disassemble a frost-free valve, or alter an anti-siphon or backflow device as an ordinary-user check.
- Stop if the faucet, pipe, valve, or wall-side fitting is corroded, cracked, seized, inaccessible, or requires force; arrange qualified plumbing service.
Only after diagnosis
Potential parts
- hose washer or faucet gasket
Consider this category only when the first wet point is a clearly exposed hose connection or seal and water is isolated before the repair.
Confirm the faucet design, connection size, and local plumbing requirements; do not infer fit from the symptom. - anti-siphon or vacuum-breaker assembly
Consider this category only when the exposed protection device is confirmed as the leak source and the exact fixture allows replacement.
Keep required backflow protection in place and verify the exact fixture configuration with a qualified plumber or its instructions. - frost-free hose bib or wall-side supply connection
Consider this category only after a wall-entry, interior, or freeze-related leak is confirmed by inspection or professional diagnosis.
Wall depth, connection method, climate protection, and code requirements vary; do not select a replacement by appearance alone.
When checks do not resolve it
Need a professional?
Call a qualified plumber for any leak at the wall entry, inside the wall, along the supply pipe, after a freeze, or after a hose nozzle or cap leaves pressure in the line. Also call when the shut-off fails, moisture has reached building materials, or an exposed repair does not stop the leak.
Safety scope: Keep the affected branch isolated. If isolation fails, close the main water shut-off from a dry position. Do not operate electrical equipment in standing water, and do not open walls or work on pressurized or hidden plumbing.
Common questions
FAQ
Why does an outside faucet leak toward the wall only when it is turned on?
That timing raises concern for the wall-side stem, connection, or supply pipe rather than only the exposed spout. Keep the indoor shut-off closed and have a plumber inspect it instead of reopening the water to reproduce the leak.
Where is the shut-off for an outside faucet?
Many hose connections have an indoor shut-off near where the pipe enters the building, often in a basement or crawlspace, but locations vary. If a local valve cannot stop an active leak, use the main shut-off from a dry position and arrange service.
Can freezing cause an outdoor faucet to leak inside the wall?
Yes. Freezing water can damage an outside faucet assembly or connected pipe. Keep the indoor valve closed after a freeze-related leak and have the wall-side plumbing checked before restoring use.
Read the exact guide
Official sources
- Home MaintenanceU.S. Environmental Protection Agency WaterSense · General home leak detection and water-maintenance guidance, not a substitute for hidden-pipe diagnosis.
- Fix a Leak Week At Home ActivityU.S. Environmental Protection Agency WaterSense · General low-risk observation guidance for exposed hose and faucet connections; hidden wall plumbing is outside its scope.
- How to fix a faucet leakCity of Portland Water Bureau · General faucet guidance; its detailed steps are for accessible fixture construction and are not a guide to hidden outdoor wall plumbing.
- Outside Faucet (Hose Bib)Canada Mortgage and Housing Corporation · General homeowner guidance for an outside hose connection; exact valve arrangement and local code vary.
- Outdoor Faucet LeaksSaving Water Partnership and Seattle Public Utilities · General outdoor faucet guidance; exposed construction, wall connection, and repair method vary by fixture.
Community feedback
Share a repair observation
Share a plain-text repair observation. Accepted observations are published automatically; this page may take a moment to update.