
On this page
Start here
Quick answer
A Kohler faucet that leaks at the handle needs the leak path identified before a part is chosen. Dry the area, operate the faucet, and watch whether water appears under the handle only while the faucet is on, while it is off, or from a nearby supply or deck connection. Kohler says an on-only handle leak can come from seals or O-rings, while a leak that continues with the faucet off points to the valve or cartridge and, on some kitchen models, a spacer or check-valve assembly. Identify the exact faucet model before ordering anything. Shut off the water before removing a handle or valve, and stop for a pressurized line, a stuck shutoff, corrosion, water damage, or a leak that cannot be isolated safely.
Before you begin
Safety first
- This article supports drying and locating the first wet point, observing on/off timing, recording model identity, and water isolation when the installed shutoffs work normally. Internal valve work, corroded connections, concealed leaks, and uncontrolled water require qualified plumbing service.
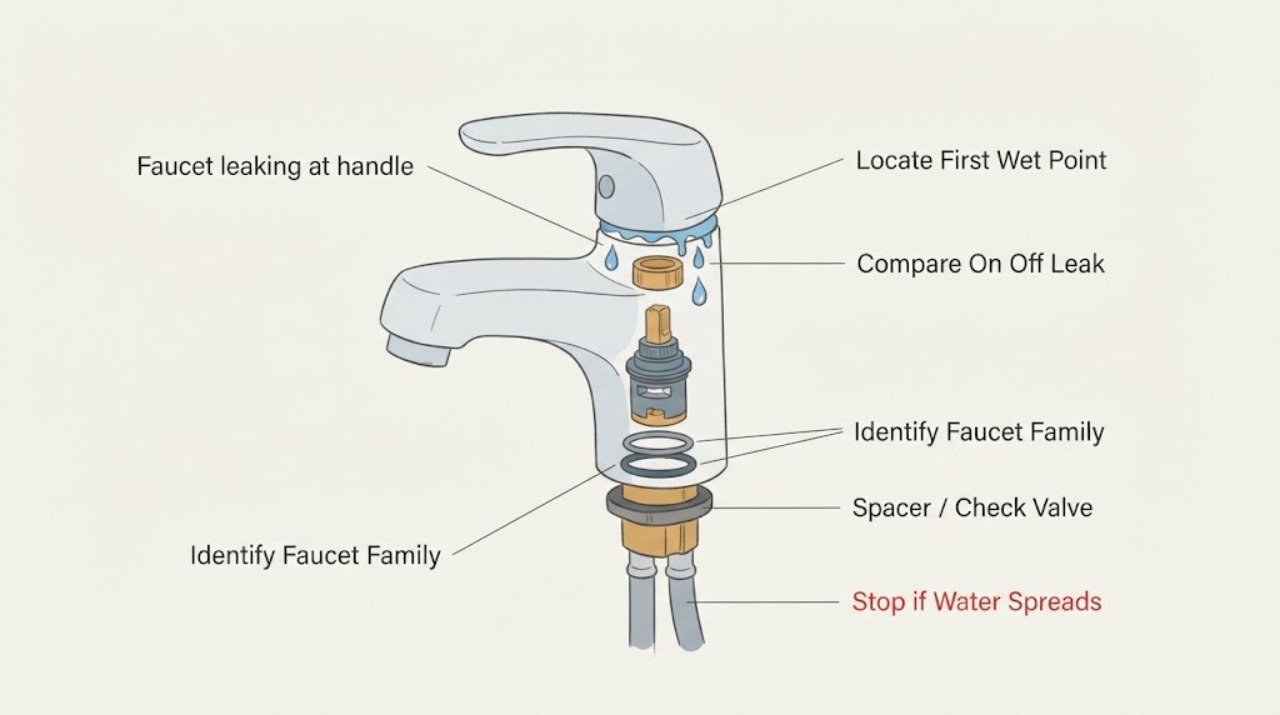
Work through in order
Diagnostic checks
Use only checks that match the exact appliance or system and its official guide.
-
Check 1
Dry the handle, bonnet, faucet body, deck, and nearby supply connections, then run the Kohler faucet briefly and watch the first wet point from a safe position; repeat after turning the faucet off.
Expected result: Record water under the handle, at a spout swivel or body joint, below the deck, at a supply hose, or no fresh leak; note whether the first wet point appears only while on or continues while off.
Next step: Photograph the first wet point and select the matching branch below before removing trim or ordering a part.
Stop if: Stop for a spray, rapid leak, water entering a cabinet or wall, a wet electrical device, or any leak that cannot be contained with the faucet shut off.
Why this matters
Why: A first wet point under the handle supports a valve, cartridge, seal, or bonnet path. A hose, deck, or spout wet point is a different repair path even if water later reaches the handle. On/off timing further separates a flow-only seal leak from a valve that leaks while closed.
-
Check 2
With the area dry, operate the faucet through a normal short open-and-close cycle and observe the handle area without loosening the handle or bonnet.
Expected result: Classify the leak as on-only, off-only or continuous, intermittent during handle movement, or absent after drying; note a loose handle, stiff movement, or water from the rear weep opening on a kitchen model if visible.
Next step: Use the timing and location to narrow the part category, then identify the exact Kohler model before any internal work.
Stop if: Do not keep operating a faucet that sprays, becomes hot at the handle, binds suddenly, or leaks faster with each cycle.
Why this matters
Why: Kohler associates on-only kitchen handle leakage with seals or O-rings and off or continuous handle leakage with the valve or cartridge; some kitchen models also point to a worn spacer or check-valve assembly, sometimes visible at a rear weep hole. A loose or stiff handle can change the seal but does not identify the failed component.
-
Check 3
Record the Kohler model marking, faucet location, single- or two-handle layout, handle shape, and any visible bonnet or valve-family detail from ordinary access; do not disassemble just to guess a model.
Expected result: Record a confirmed model, a partial marking, a single-control or two-handle faucet, a kitchen pull-out or pull-down design, or an unidentified faucet.
Next step: Use Kohler's model-specific parts diagram or repair guide after the model is confirmed. If it cannot be identified, provide photos and the leak timing to a plumber or Kohler support channel.
Stop if: Do not order from a generic photo, substitute a visually similar valve, or remove a retaining nut before water is isolated and the exact guide is known.
Why this matters
Why: Kohler says replacement valve, cartridge, seals, spacer, and check-valve parts vary by faucet model. A single-control bathroom faucet and a kitchen pull-down faucet can have different internal components even when the leak appears in the same place.
-
Check 4
If the exact guide supports handle or valve service, close the hot and cold faucet shutoffs, open the handle to relieve pressure, and verify that flow has stopped before touching a setscrew, bonnet, cartridge, or valve.
Expected result: Record both supplies closed and dry, continued flow after closing, a missing shutoff, a leaking or seized shutoff, or a need to close the main supply.
Next step: Proceed only with the exact Kohler instructions when isolation is confirmed; otherwise stop and arrange qualified plumbing service.
Stop if: Do not remove the handle or valve with pressure present, a shutoff stuck open, a corroded connection, or an inaccessible main valve.
Why this matters
Why: A dry, depressurized faucet is a prerequisite for internal service. Continued flow means the faucet cannot be safely serviced at that location; forcing a stuck shutoff or working under pressure can cause flooding or injury.
-
Check 5
With water isolated and the model-specific Kohler guide in hand, inspect only the named valve, cartridge, bonnet, seals, or O-rings for debris, flattening, cracks, corrosion, or incorrect seating; do not force parts or alter the faucet body.
Expected result: Record a damaged seal or O-ring, a worn or contaminated valve or cartridge, a loose retaining nut, a worn spacer or check-valve assembly, corrosion, or an internal arrangement that does not match the guide.
Next step: Use only the replacement category and alignment described for the exact model, or stop and have a plumber handle a stuck, corroded, or mismatched assembly.
Stop if: Do not substitute a seal, valve, spacer, or check valve, sand a sealing surface, force a cartridge, or discard a retaining clip or small part.
Why this matters
Why: A confirmed seal defect supports a seal replacement only when the model guide specifies it. A valve or cartridge defect supports that model's replacement. A loose nut may be correctable only if the guide permits it; corrosion, mismatched parts, or an unknown arrangement raises the risk of a larger leak.
-
Check 6
After the exact model-specific repair is complete, reinstall the bonnet and handle, place the handle in the off position, reopen the supplies slowly, and test on and off while watching the handle area and nearby connections.
Expected result: Record a dry handle area, a leak only while on, a leak that continues while off, a leak at the deck or supply, abnormal handle travel, or a sudden uncontrolled flow.
Next step: Close the supplies if any leak returns and arrange service with the model, leak timing, first wet point, parts inspected, and work performed.
Stop if: Stop immediately for an active leak, uncontrolled flow, scalding water, a handle that binds, or a retainer or bonnet that will not seat without force.
Why this matters
Why: A dry result after correct reassembly supports the identified repair. A recurring handle leak suggests the wrong component, poor seating, valve-body damage, or another model-specific fault; a leak elsewhere means the first wet point was not resolved.
Use your observations
Decision map
Find the observation that best matches what you see, then follow the next safe action.
-
PATH 01Safety boundary
What you see
The first wet point is under the handle and water appears only while the faucet is running.
Do this next
Isolate water, identify the exact faucet, and use the model guide to inspect or replace the specified seals; call a plumber if the bonnet or valve will not release safely.
Why this path and its safety boundary
Why it matters: Kohler identifies seals or O-rings as a likely category for this kitchen-faucet timing; a bathroom faucet may require a model-specific valve or seal diagnosis.
Safety stop: Do not tighten the handle as a substitute for a failed seal or continue if water reaches the cabinet or wall.
-
PATH 02Safety boundary
What you see
Water appears under the handle while on and continues after the faucet is off, or a continuous leak is present with normal handle position.
Do this next
Identify the model and use its interactive parts diagram or repair guide; replace only the diagnosed valve, cartridge, spacer, or check-valve category and test after safe reassembly.
Why this path and its safety boundary
Why it matters: A valve or cartridge that is not controlling water is more likely; on some Kohler kitchen designs, a spacer or check-valve assembly may also be involved.
Safety stop: Do not install a generic cartridge, force the retaining hardware, or work without closing the water supply.
-
PATH 03Safety boundary
What you see
The handle looks wet, but the first wet point is a supply hose, deck, spout swivel, spray hose, or rear body opening.
Do this next
Keep the faucet off, photograph the first wet point, and use the Kohler guide for that location; arrange plumbing service for a pressurized hose, under-deck leak, or concealed connection.
Why this path and its safety boundary
Why it matters: The visible handle may only be receiving runoff. A supply, hose, body, spacer, check-valve, or spout repair path is more likely than a handle seal.
Safety stop: Do not remove the handle just because it is wet, and stop for water damage or a leak that continues with the local supplies closed.
-
PATH 04Safety boundary
What you see
A shutoff will not close, flow continues during attempted service, the bonnet or cartridge is corroded or stuck, or the faucet body or connection is damaged.
Do this next
Stop, close the main supply only if it can be done safely, protect the cabinet or floor, and arrange a qualified plumber.
Why this path and its safety boundary
Why it matters: The faucet cannot be safely isolated or the repair may damage the body and create a larger leak; this is beyond a low-risk handle check.
Safety stop: Do not force a valve, cut a supply line, pry a corroded cartridge, or open a wall to chase the leak without proper control.
-
PATH 05Safety boundary
What you see
The faucet is reassembled but the handle leak returns, the handle binds, or a new leak appears at the deck or supply.
Do this next
Close the supplies and request model-specific diagnosis with before-and-after photos and the exact part or work used.
Why this path and its safety boundary
Why it matters: The part may be wrong for the model, incorrectly seated, damaged by corrosion, or not the true source; repeated tightening can worsen the body or seal.
Safety stop: Do not keep cycling or overtightening the handle, bonnet, nut, or supply fitting.
Helpful context
Understand the symptom
Find the leak path before touching the handle
Water can run down from the handle and make a supply connection, spout joint, or faucet-body opening look guilty. Dry the faucet, place a towel below it, and watch the first place that becomes wet while the faucet is on and again after it is shut off. Kohler describes a handle-area leak as water appearing where the handle attaches to the faucet body; that pattern is different from a leak under the deck or at a hose.
The on/off timing changes the likely repair
If water appears under the handle only while water is flowing, seals or O-rings may no longer seal the moving valve area. If water continues from under the handle after the faucet is off, the valve or cartridge may not be controlling water, and some kitchen designs also use a spacer or check-valve assembly below it. These are diagnostic categories, not permission to order a universal seal or cartridge.
Isolate water before internal service
Kohler handle-removal instructions begin by turning the water supply off and opening the handle to relieve pressure. The exact handle, bonnet, retainer, and valve arrangement varies by faucet family. If the local shutoffs cannot stop flow, or if a part will not move without force, leave the faucet intact and use a qualified plumber.
Safety boundary
Stop conditions
- Turn off the hot and cold faucet supplies before removing a handle, bonnet, valve, cartridge, seal, or supply line; open the handle to relieve pressure.
- Stop for rapid flow, a shutoff that will not close, a corroded or stuck part, water damage, a leak near electrical equipment, or any repair that requires opening a wall.
- Do not force a handle, bonnet, cartridge, retaining nut, or supply fitting, and do not disconnect a pressurized line.
- Do not select a Kohler replacement from the brand name or a photograph alone; use the exact model guide and do not substitute a visually similar valve, cartridge, seal, spacer, or check valve.
Only after diagnosis
Potential parts
- faucet seal or O-ring set
Consider this category only when the leak is confirmed under the handle while water is flowing and model-specific inspection identifies a worn, flattened, cracked, or contaminated seal.
Confirm the exact Kohler model, seal location, material, size, lubricant guidance, and installation orientation; do not use a generic ring to compensate for a damaged valve body. - faucet valve or cartridge
Consider this category only when a continuous under-handle leak remains with the faucet off and model-specific inspection or testing supports a worn or contaminated valve or cartridge.
Confirm the exact Kohler model, faucet family, valve type, retainer, orientation, and manufacturer repair guide before ordering; visually similar parts may not fit. - spacer or check-valve assembly
Consider this category only on a Kohler kitchen model whose guide identifies a spacer or check-valve assembly and whose leak path or inspection supports that component.
Confirm the exact faucet model, assembly location, hose or body layout, and model-specific installation procedure; do not substitute a generic check valve or bypass it. - bonnet, handle retainer, or supply connection component
Consider this category only if the model guide and inspection show a damaged bonnet, retainer, handle fastener, or supply connection is the actual first wet point or prevents correct sealing.
Confirm the exact faucet family, thread or connection design, sealing method, and access constraints; do not overtighten a damaged body or pressurized fitting.
When checks do not resolve it
Need a professional?
Arrange qualified plumbing service when the first wet point is not clearly under the handle, the leak continues while the faucet is off, the local supplies cannot isolate water, a part is stuck or corroded, a kitchen spacer or check-valve may be involved, the model is unknown, or leakage returns after a model-specific repair. A persistent leak under the handle can require valve, cartridge, seal, faucet-body, or connection diagnosis.
Safety scope: This article supports drying and locating the first wet point, observing on/off timing, recording model identity, and water isolation when the installed shutoffs work normally. Internal valve work, corroded connections, concealed leaks, and uncontrolled water require qualified plumbing service.
Common questions
FAQ
Why is my Kohler faucet leaking under the handle?
Kohler says the likely category changes with timing. A kitchen faucet that leaks under the handle only while on may need seals or O-rings; a leak that continues while off may involve the valve or cartridge and, on some models, a spacer or check-valve assembly. Confirm the first wet point and exact model before selecting a part.
Can tightening the Kohler handle stop the leak?
A loose handle can affect operation, but tightening it is not a universal fix for water under the handle. If water continues while on or off, the valve, cartridge, seals, bonnet, or another nearby path may be involved. Do not overtighten the handle or bonnet; use the exact Kohler guide after shutting off water.
Do I need to turn off the water before removing a Kohler faucet handle?
Yes. Kohler's handle and valve instructions begin with the water supply off and the handle opened to relieve pressure. Verify that flow has stopped before touching a setscrew, bonnet, cartridge, valve, or supply connection.
How do I know whether the leak is really from the Kohler handle?
Dry the faucet and watch the first wet point while it is running and again after it is off. Water may travel from a supply hose, spout joint, deck, spray hose, or rear body opening to the handle. The first wet point determines which Kohler troubleshooting path to use.
When should I call a plumber for a Kohler faucet handle leak?
Call when a shutoff will not isolate water, a connection or cartridge is stuck or corroded, the model is unknown, the leak is under the deck or in a wall, water damage is present, or leakage returns after a model-specific repair. Stop immediately for rapid flow, uncontrolled water, or a damaged connection.
Read the exact guide
Official sources
- TroubleshootingKohler Co. · Official Kohler one-page troubleshooting diagram for specified Avatar models; used for leak-location logic, not as a universal faucet procedure.
- Leaking Under the Handle | Bathroom FaucetsKohler Assist · Official Kohler troubleshooting guidance for centerset, single-hole, wall-mount, and widespread bathroom sink faucets.
- Replace Valvet Service Kit InstructionsKohler Assist · Official Kohler service instructions for specified valvet families; they are not a universal procedure for every faucet.
- Removing the Avid™ Single-Control Bonnet and HandleKohler Assist · Official Kohler instructions for the Avid single-control bathroom faucet family; other families require their own guide.
- Leaking Under the Handle | Kitchen FaucetsKohler Assist · Official Kohler troubleshooting guidance for kitchen faucets; exact faucet model controls the part and repair procedure.
Community feedback
Share a repair observation
Share a plain-text repair observation. Accepted observations are published automatically; this page may take a moment to update.