
On this page
Start here
Quick answer
A dripping Moen faucet is diagnosed first by where the water appears and when it appears. A drip from the spout with the handle off commonly points to the cartridge or its seals; water around the handle or spout base can also travel from a cartridge, O-ring, or handle assembly. Water under the sink may instead come from a supply hose or shutoff valve, and a leak that occurs only while the faucet runs is different from a continuous leak. Dry and observe the first wet point, identify the exact faucet model, and close an accessible hot and cold stop only if it turns normally before any disassembly. Do not force a corroded stop, overtighten fittings, use abrasive cleaners, or order a cartridge by appearance alone: Moen says its cartridges are not interchangeable across models. Arrange qualified plumbing service when the leak is under a cabinet, the stop will not isolate the faucet, the source is hidden, the faucet is damaged, or a model-specific cartridge or seal cannot be identified.
Before you begin
Safety first
- This article supports drying, observing, model identification, and safe operation of accessible isolation valves only. Do not work on a pressurized faucet, force fittings, open walls, alter the valve body, or improvise cartridge or hose repairs.
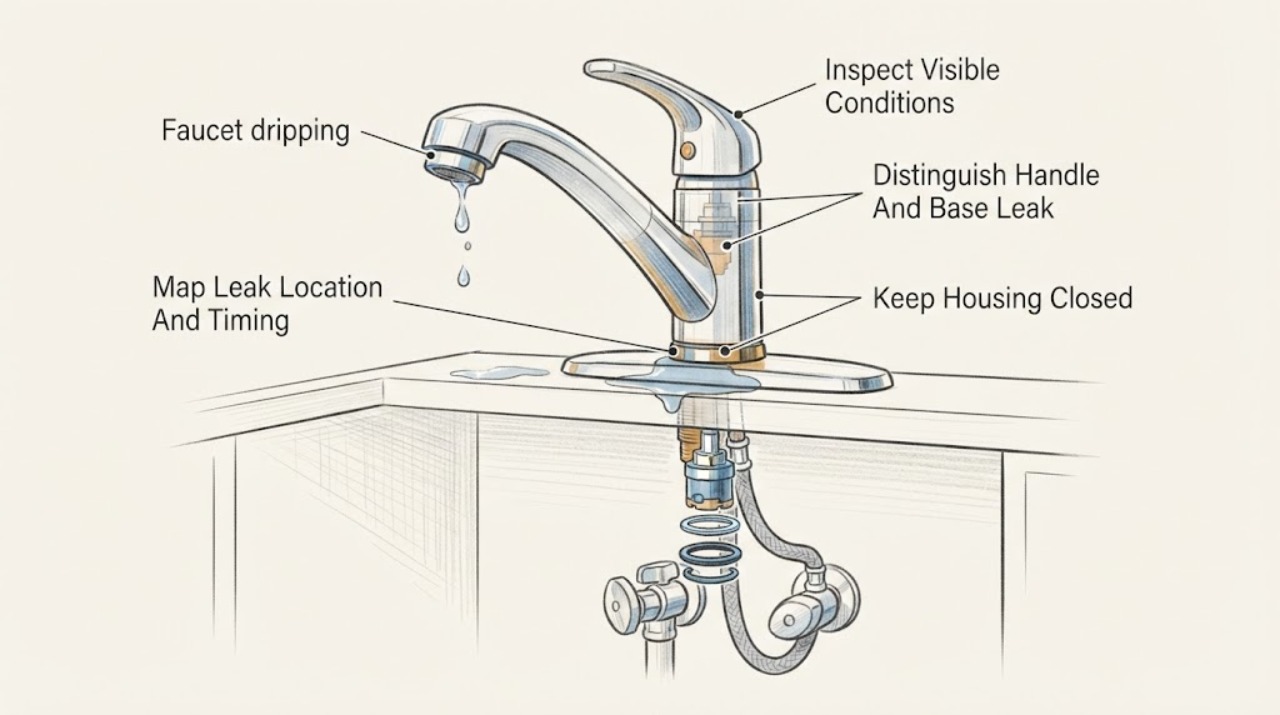
Work through in order
Diagnostic checks
Use only checks that match the exact appliance or system and its official guide.
-
Check 1
Dry the faucet, deck, cabinet floor, and visible connections with a towel, then watch without touching fittings. Note whether water starts at the spout end with the handle off, around the handle or spout base while running, under the sink, briefly after use, or continuously.
Expected result: The first wet point is the spout, handle, spout base, supply connection, shutoff valve, faucet body under the sink, or cannot be localized safely.
Next step: Photograph the first wet point and follow the matching branch below. If water is under the cabinet or the source is hidden, place a container without blocking plumbing and arrange plumbing service.
Stop if: Stop for water near electrical equipment, a soaked cabinet or wall, a burst hose, a corroded fitting, or any need to open the wall or force a connection.
Why this matters
Why: Spout and handle drips make the cartridge or handle mechanism more likely; a base leak can involve spout O-rings or a cartridge; a continuous under-sink leak points toward a shutoff or supply hose. Water that cannot be localized may be traveling from a concealed connection.
-
Check 2
With the faucet handles fully off, observe the spout end for a continuing drip. If the faucet has accessible hot and cold stop valves and they turn freely, close them before any cartridge or handle disassembly; do not force a stop or reach into a wet cabinet.
Expected result: The spout continues to drip with the supplies isolated, the drip stops when the supplies are closed, or the spout remains dry while water appears elsewhere.
Next step: Record the handle count, faucet type, model markings, and whether isolation stopped the drip. Use the exact Moen model instructions for a cartridge decision, or have a plumber perform the replacement when the model or shutoffs are uncertain.
Stop if: Do not remove the handle or cartridge without isolating both supplies, do not force the stop valves, and do not leave the faucet pressurized while a retaining part is removed.
Why this matters
Why: A spout drip with the handle off is consistent with a cartridge or cartridge-seal problem. If isolation stops the drip, the faucet has been separated from the supply; if the faucet remains dry, follow the handle, base, or under-sink path instead.
-
Check 3
For a leak above the counter, wrap a dry paper towel around the handle and separately around the spout base, then briefly operate the faucet normally and turn it off. Keep the towel away from the opening and do not tighten decorative parts while wet.
Expected result: The towel first becomes wet at the handle, around the spout hub or base, at the spout end, or nowhere above the counter.
Next step: Identify the exact Moen model and handle arrangement before selecting a cartridge, O-ring, or spout seal kit. Request plumbing service if the faucet has no model information, the leak reaches the deck or wall, or a part will not separate without force.
Stop if: Do not pry the handle, force a retaining nut, substitute an unknown cartridge, or continue operating a faucet that sprays or leaks into the cabinet or wall.
Why this matters
Why: Water at the handle commonly points to the cartridge or handle mechanism. Water at the spout base can point to model-specific spout O-rings or a cartridge, while water at the spout end with the handle off points to the cartridge or its seals. No water above the counter shifts the check under the sink.
-
Check 4
With the cabinet dry and the faucet off, use separate dry towels to touch only the accessible supply hoses, shutoff-valve bodies, and faucet connections. Observe whether moisture returns at a hose, valve handle, threaded connection, or the faucet supply between the handles and spout.
Expected result: Water returns continuously at a shutoff valve, continuously at a split or torn supply line, intermittently only while the faucet runs, or not at any accessible connection.
Next step: If a shutoff operates normally, isolate the faucet by closing both stops and arrange the matching supply-line, shutoff, or faucet repair. If a stop is seized, the hose is bulged or split, or water continues after isolation, shut off the home's main water only if safe and call a plumber.
Stop if: Do not force a shutoff, bend or twist a hose, overtighten a wet connection, or leave a cabinet leak running while searching for a part.
Why this matters
Why: Moen associates continuous under-sink leaks with failed shutoff-valve seals or split supply lines and intermittent use-related leaks with the faucet's internal supply connection. A dry accessible area does not rule out a concealed leak above or behind the cabinet.
-
Check 5
Record the Moen model if visible on the faucet, packaging, or installation paperwork, along with one or two handles, pullout or pulldown style, leak location, and whether the leak is continuous or use-related. Compare the model-specific repair instructions before ordering any cartridge, O-ring, spout seal, hose, or shutoff valve.
Expected result: The model and leak location identify a specific repair family, or the faucet arrangement and required part remain uncertain.
Next step: Use the model record to request the correct manufacturer instructions or give it to a qualified plumber. Keep the faucet isolated if the leak can damage the cabinet, countertop, or wall.
Stop if: Do not order by color or silhouette alone, alter the valve body, drill or ream a cartridge opening, or continue if the faucet cannot be isolated safely.
Why this matters
Why: A confirmed model allows the manufacturer's matching repair path. Uncertain model information matters because Moen cartridges and seals vary and are not automatically interchangeable; an apparent part match is not proof of fit.
Use your observations
Decision map
Find the observation that best matches what you see, then follow the next safe action.
-
PATH 01Safety boundary
What you see
The spout drips with the handle off and the first wet point is the spout opening, with no under-sink leak.
Do this next
Isolate both supplies only if the stops operate freely, identify the model, and follow the matching cartridge instructions or request qualified plumbing service.
Why this path and its safety boundary
Why it matters: A cartridge or cartridge-seal problem is the leading Moen-specific path; the exact cartridge depends on the faucet model and handle arrangement.
Safety stop: Do not use an unverified cartridge, remove the retaining parts while pressurized, or force a stuck stop or cartridge.
-
PATH 02Safety boundary
What you see
Water appears around the handle or spout base while the faucet runs, while the spout itself may be dry when off.
Do this next
Use the model and handle style to select the correct diagnostic instructions and part category; request a plumber when the handle or spout will not separate without force.
Why this path and its safety boundary
Why it matters: A cartridge, handle mechanism, spout O-ring, or model-specific seal is more likely than a simple aerator issue. Water can travel across the deck, so the first wet point matters.
Safety stop: Do not overtighten the handle, pry the spout, substitute a seal, or keep using a leak that reaches the counter or wall.
-
PATH 03Safety boundary
What you see
Water appears under the sink continuously at a shutoff valve, split supply line, or faucet connection, even when the faucet is not being used.
Do this next
Close the accessible stop only if it turns normally and safely; otherwise use the home's main shutoff if appropriate and arrange prompt plumbing repair.
Why this path and its safety boundary
Why it matters: The supply hose or shutoff-valve seal is more likely than the faucet cartridge. A continuous cabinet leak can damage the cabinet, floor, or wall quickly.
Safety stop: Do not force the stop, bend or replace a pressurized hose, or leave a container covering a growing leak while the water remains on.
-
PATH 04Safety boundary
What you see
Water appears under the sink only while the faucet is used or briefly afterward, with the shutoff valves and external hoses dry.
Do this next
Isolate the faucet if possible and provide the model, connection layout, and timing to a qualified plumber; do not pull or twist the internal hose to inspect it.
Why this path and its safety boundary
Why it matters: Moen identifies the faucet's internal supply connection between handle valves and spout as a possible use-related leak; the hose style and repair depend on model and installation era.
Safety stop: Do not disconnect internal quick-connects or supply connections while pressurized, force an unknown connector, or continue if water reaches electrical equipment.
-
PATH 05Safety boundary
What you see
The faucet looks dry but water reappears in the cabinet, wall, deck, or nearby plumbing, or the leak cannot be isolated without removing trim or opening a surface.
Do this next
Keep the cabinet accessible, isolate the faucet or main water supply if safe, document the moisture path, and arrange qualified plumbing diagnosis.
Why this path and its safety boundary
Why it matters: Water may be traveling from a concealed supply, faucet body, valve, or wall connection. Replacing a cartridge without locating the first wet point can leave the actual leak active.
Safety stop: Do not open the wall, remove the faucet body, or continue using the fixture when water damage is spreading.
Helpful context
Understand the symptom
Leak location changes the likely repair
Moen's own troubleshooting separates a faucet leak above the counter from a leak under the sink and asks whether it happens while the faucet is used, briefly afterward, or continuously. A spout that drips with the handle off is a valve-cartridge symptom; a handle or base leak may involve the cartridge, a handle assembly, or spout O-rings. A wet supply connection or shutoff valve under the sink is a plumbing connection problem. Find the first wet point before buying a part.
Use the model to choose a part, not the faucet's appearance
Moen has multiple cartridge, O-ring, spout-seal, handle, and hose arrangements. The manufacturer says cartridges are not interchangeable, and its instruction sheets direct the reader to shut off both supplies and relieve pressure before cartridge work. For a stuck stop, seized cartridge, corroded connection, hidden leak, or uncertain model, stop at identification and hand the faucet to a qualified plumber rather than forcing the repair.
Safety boundary
Stop conditions
- Do not continue for a burst or bulged supply hose, water near electrical equipment, spreading cabinet or wall damage, a seized shutoff, or a leak that cannot be isolated safely.
- Before any cartridge or handle disassembly, isolate both hot and cold supplies and relieve pressure only as the exact model instructions direct; do not work on a pressurized faucet.
- Do not force shutoff valves, retaining nuts, handles, spouts, cartridges, or quick-connects, and do not overtighten fittings to hide a drip.
- Do not select a Moen cartridge, O-ring, hose, or seal by appearance alone; model-specific parts are not automatically interchangeable.
- Do not use abrasive pads, harsh chemicals, petroleum lubricant, or improvised drilling or reaming on the faucet; arrange qualified plumbing service when the source or repair path is uncertain.
Only after diagnosis
Potential parts
- Moen faucet cartridge
Consider this category only when a spout or handle drip with the faucet off and the exact model identify a worn or damaged cartridge or cartridge seal.
Confirm the exact Moen model, handle arrangement, cartridge family, installation instructions, and supply isolation before ordering; Moen cartridges are not automatically interchangeable. - spout O-ring or seal kit
Consider this category only when the first wet point is the spout hub or base and the exact faucet design uses replaceable spout seals or O-rings.
Match the exact model and seal arrangement; do not compensate for a mismatch by forcing the spout or using petroleum-based lubricant. - faucet supply hose or internal connection hose
Consider this category only when a qualified inspection finds a split external hose or a use-related leak in the faucet's internal supply connection.
Confirm the exact model, connector style, routing, and pressure-rated replacement with the manufacturer or plumber before ordering. - under-sink shutoff valve
Consider this category only when the leak begins at the shutoff valve body or handle and qualified isolation confirms the valve seal is failing.
Confirm pipe material, connection, potable-water suitability, access, and local plumbing requirements; do not force a seized valve.
When checks do not resolve it
Need a professional?
Arrange qualified plumbing service for a continuous under-sink leak, split or bulged supply hose, leaking shutoff, seized isolation valve, hidden or wall leak, damaged faucet body, corroded connection, faucet that cannot be isolated, or any cartridge, O-ring, spout seal, or internal hose repair that cannot be identified and performed from the exact Moen model instructions. Stop using the faucet for spreading water damage or water near electrical equipment, and use the home's main shutoff only if safe.
Safety scope: This article supports drying, observing, model identification, and safe operation of accessible isolation valves only. Do not work on a pressurized faucet, force fittings, open walls, alter the valve body, or improvise cartridge or hose repairs.
Common questions
FAQ
Why does my Moen faucet drip from the spout when it is turned off?
Moen identifies a scratched cartridge O-ring or grommet, a cartridge, or a handle mechanism as common causes. Identify the exact model and handle arrangement before selecting a cartridge, and isolate both supplies before any model-specific disassembly.
Why is water leaking around the handle or faucet base?
Water around the base may have traveled from the handle. A cartridge or handle mechanism can cause a handle leak, while model-specific spout O-rings or seals can cause a base leak. Dry the area and use a towel to find the first wet point before choosing a part.
Can I use any Moen cartridge that looks similar?
No. Moen says its faucets use different cartridges and that they are not interchangeable by appearance alone. Use the exact model and manufacturer instructions, or ask a plumber to identify the cartridge.
What if the leak is under the sink instead of at the spout?
A continuous leak may come from a shutoff valve or split supply line; a leak only while using the faucet may come from an internal faucet supply connection. Close an accessible stop only if it operates normally, avoid forcing hoses or fittings, and arrange plumbing service when isolation is uncertain.
When should I stop troubleshooting a dripping Moen faucet?
Stop for a burst or bulged hose, a seized shutoff, water near electrical equipment, spreading cabinet or wall damage, a hidden source, or a faucet that cannot be isolated safely. Do not work on a pressurized faucet or force the cartridge, handle, spout, or connections; arrange qualified plumbing service.
Read the exact guide
Official sources
- Bathroom Faucet: Leaking Around the Base of the FaucetMoen Solutions · Manufacturer support article used for separating handle water from spout-base water and for model-dependent cartridge or O-ring decisions.
- MT016BMoen Incorporated · Manufacturer instruction sheet used for isolating hot and cold supplies, relieving pressure, replacing a cartridge for the covered faucet family, and cleaning an aerator for irregular flow.
- Bathroom Faucet: Leaking Under The Sink BaseMoen Solutions · Manufacturer support article used for continuous versus use-related leaks under the sink and for identifying supply hoses, shutoff valves, and internal faucet connections.
- untitledMoen Incorporated · Manufacturer instruction sheet used as a model-family example for spout or handle drips, spout seals, and non-abrasive cleaning boundaries.
- Fixture leaks from the end of the spoutMoen Solutions · Manufacturer support article used for spout drips with the faucet off, cartridge or O-ring causes, model identification, and non-interchangeable cartridge warning.
- Kitchen Faucet: Leaking Around The HandleMoen Solutions · Manufacturer support article used for handle-area drips, cartridge identification, and the requirement to use model-specific parts.
Community feedback
Share a repair observation
Share a plain-text repair observation. Accepted observations are published automatically; this page may take a moment to update.