
On this page
Start here
Quick answer
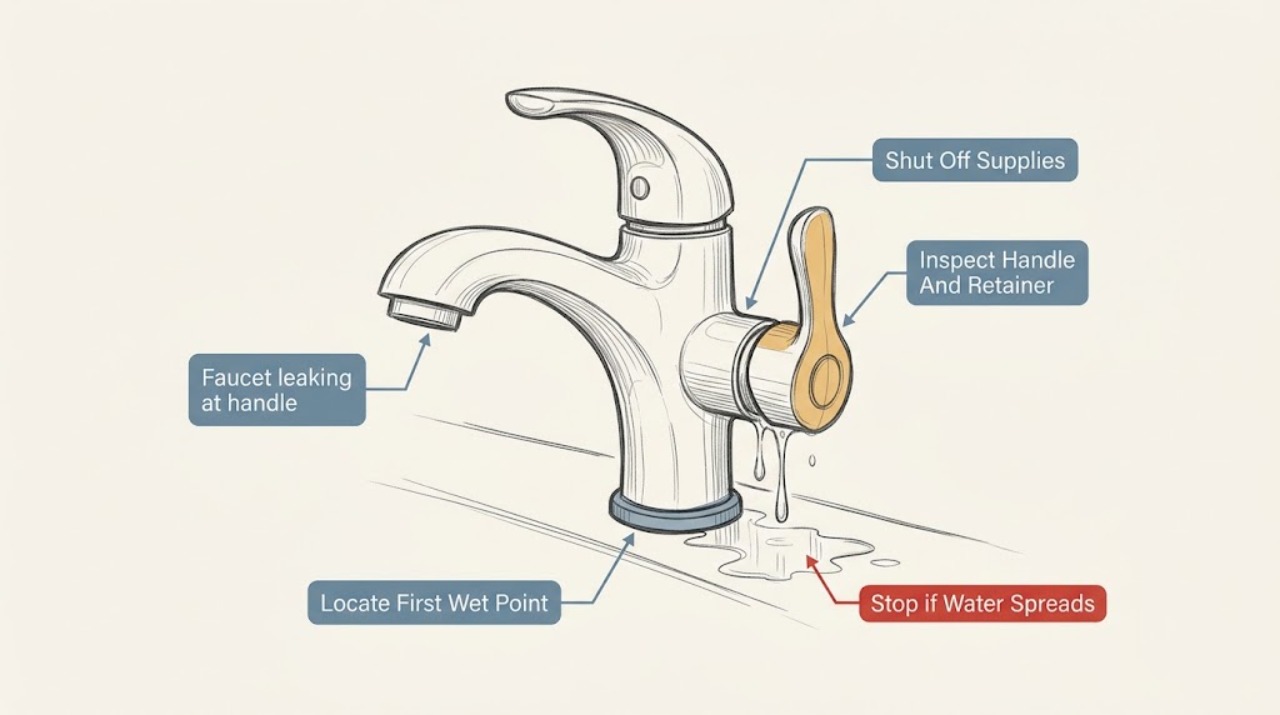
A Pfister faucet leaking under or around the handle usually needs the leak location separated from a leak at the spout, hose, supply line, or underbody. Dry the faucet and connections, run water briefly, and watch the first place that becomes wet. If the leak starts at the handle, Pfister's guidance points to the handle, dome cap, retainer ring, cartridge, or cartridge seals. Turn off the faucet's hot and cold supplies before any handle or cartridge service, and use the exact model's maintenance guide because handle fasteners and cartridges differ. A loose retainer ring may be the cause on some designs; if a permitted adjustment does not stop the leak, the cartridge or seal may need model-specific replacement. Do not force a seized handle, overtighten a nut, remove a pressurized cartridge, or work when the shutoffs do not close. Stop and call a plumber for an active spray, cabinet or wall leakage, damaged supply line, seized valve, uncertain model, or a leak that returns after reassembly.
Work through in order
Diagnostic checks
Use only checks that match the exact appliance or system and its official guide.
-
Check 1
Dry the handle, faucet body, spout, underside, supply connections, and nearby sink area, then run water briefly and turn it off while watching for the first new wet point.
Expected result: Record leakage at the handle, spout, faucet base or underbody, supply line or angle stop, hose, drain, or a hidden wall/cabinet area; note whether it occurs only while flowing or also when off.
Next step: Photograph the location and continue only with the matching model-specific check; call a plumber for an active spray, hidden leak, or water reaching cabinetry or a wall.
Stop if: Stop if water is spraying, the leak is fast, the sink cabinet is flooding, or the source cannot be localized without moving pressurized plumbing.
Why this matters
Why: A first wet point at the handle keeps the retainer, cartridge, and handle seals in focus. A spout leak points toward cartridge sealing, while a supply, hose, underbody, wall, or drain leak needs a different repair path and may cause cabinet damage.
-
Check 2
Before touching a handle, dome cap, retainer, or cartridge, close the faucet's hot and cold angle stops using the normal hand-operated motion and open the faucet briefly to confirm pressure has released.
Expected result: Record both supplies fully off, one stop that will not close, continued flow after shutoff, a leaking stop, or no accessible local shutoff.
Next step: Do not disassemble; arrange plumbing service when either stop will not close, leaks at the stop, or the home supply must be shut off.
Stop if: Do not force an angle stop, disconnect a hose under pressure, or continue if water cannot be controlled.
Why this matters
Why: A complete shutoff makes a documented handle or cartridge check possible. Continued flow, a stuck stop, or an inaccessible valve means the faucet remains pressurized and disassembly could release uncontrolled water.
-
Check 3
With supplies off and only if the model guide identifies the procedure, inspect the handle fastener, dome cap, and retainer ring for looseness, cross-threading, damaged finish, or a displaced seal; do not force a cap or handle.
Expected result: Record a loose fastener or retainer, a securely seated ring, visible cracking or seal damage, corrosion, or a handle that will not release using the documented method.
Next step: If the manual permits it, snug the correct retainer without overtightening, reinstall the handle, and test for leaks; call a plumber for damage, seized parts, or uncertain construction.
Stop if: Do not pry decorative parts, use excessive force, over-tighten the retainer, or remove a cartridge while the supplies are on.
Why this matters
Why: A loose retainer can allow leakage around the handle on some Pfister faucets. A secure ring with continued leakage makes the cartridge, O-ring, gasket, or faucet body more likely. A seized or damaged assembly requires service rather than force.
-
Check 4
Read the faucet model marking and consult Pfister's product page, maintenance guide, or parts diagram to identify the handle style and cartridge or seal assembly before ordering anything.
Expected result: Record the model identity, single- or two-handle design, cartridge or stem type shown by the guide, whether hot and cold parts differ, and whether the guide authorizes user service.
Next step: Use the exact parts diagram or ask Pfister or a plumber to identify the assembly; do not order from appearance or force a nonmatching part.
Stop if: Do not disassemble when the model guide is unavailable, the valve is behind a wall, or the cartridge cannot be isolated safely.
Why this matters
Why: Model-specific identification determines the correct cartridge, O-ring, gasket, retainer, and removal method. An unknown model or discontinued faucet leaves fit and reassembly questions unresolved; a generic cartridge can leak or damage the body.
-
Check 5
After a permitted retainer adjustment or model-specific seal/cartridge service, return every part to its documented position, turn the supplies on slowly, and observe the handle and underside for leakage with the faucet on and off.
Expected result: Record no leak, a leak that appears only while flowing, a leak that appears while off, leakage at a supply connection, or a leak immediately after reassembly.
Next step: Close the supplies and arrange qualified service for any persistent or new leak, uncertain part orientation, or water under the counter.
Stop if: Stop if water sprays, the handle binds, a seal extrudes, a fitting leaks, or the assembly cannot be returned to its documented position.
Why this matters
Why: No leak after a correct reassembly supports a loose retainer or displaced seal as the cause. A persistent or new leak can indicate a damaged cartridge, O-ring, body, supply connection, or incorrect assembly and is not a reason to tighten harder.
-
Check 6
Prepare the faucet model, handle style, first wet point, whether the leak occurs on or off, supply-shutoff result, photos, and any parts or adjustments already attempted for a qualified plumber.
Expected result: Confirm that the handoff separates handle, spout, underbody, hose, angle-stop, and hidden leaks and states whether water is controlled at the local stops.
Next step: Request diagnosis and exact-part confirmation before replacement; leave the supplies off if the leak continues or water damage is possible.
Stop if: Do not continue testing when the source is hidden, the local stops fail, or service would require opening a wall or pressurized connection.
Why this matters
Why: A precise leak location and timeline helps distinguish retainer, cartridge, seal, supply-line, hose, body, and drain problems. It also prevents a technician from assuming a generic handle repair or an incompatible cartridge.
Use your observations
Decision map
Find the observation that best matches what you see, then follow the next safe action.
-
PATH 01Next step
What you see
The first wet point is under the handle, the model procedure identifies a retainer ring, and the leak stops after a careful documented adjustment and leak test.
Do this next
A loose retainer or displaced seal is more likely than a failed cartridge. Monitor the area and stop if the leak returns; do not tighten farther than the model procedure allows.
-
PATH 02Next step
What you see
The handle-area leak continues with the retainer secure, or a documented cartridge/seal is visibly damaged or incorrectly seated.
Do this next
A cartridge, O-ring, gasket, or faucet-body problem becomes more likely. Keep both supplies off and use the exact model parts guide or qualified plumbing service for replacement.
-
PATH 03Next step
What you see
Drying the faucet shows the first water at an angle stop, supply-line connection, hose, or underbody rather than under the handle.
Do this next
The leak is outside the handle assembly. Close the local supplies, protect the cabinet, and have the supply line, hose, connector, or faucet body diagnosed instead of replacing the handle cartridge.
-
PATH 04Next step
What you see
The model is unknown, the handle or retainer is seized, the local shutoffs will not close, or the valve is behind a wall.
Do this next
Safe disassembly and part compatibility cannot be established. Leave the water controlled if possible and call a qualified plumber rather than forcing the assembly.
-
PATH 05Next step
What you see
The leak returns after reassembly, appears at a new location, or cannot be localized while the faucet is on and off.
Do this next
The part may be damaged, misassembled, or the leak may originate elsewhere in the faucet or plumbing. Close the supplies and arrange plumbing service; do not keep tightening or cycling the faucet.
Helpful context
Understand the symptom
Find the first wet point before removing the handle
Water can run along the handle or faucet body, making a leak at the base look like a handle leak. Dry the handle, spout, faucet base, supply connections, and area beneath the sink. Run the faucet briefly, turn it off, and watch where moisture first appears. Water from the spout while the faucet is off suggests a valve or cartridge sealing problem; water under the handle during use keeps the retainer, cartridge seal, body, and supply path in consideration.
Pfister handle designs are not interchangeable
Pfister describes set-screw handles, top-screw handles, and fixed-hub handles, with different removal methods. A kitchen pull-out or pull-down faucet may also have a dome cap and retainer ring. Identify the model and use its maintenance guide before choosing a tool or part. If the fastener or cap is not obvious, or the finish may be damaged by force, stop rather than guessing.
A retainer adjustment is different from a cartridge replacement
A loose retainer ring can allow movement or leakage around the handle on some Pfister designs. Tightening it only makes sense after both water supplies are off and the model procedure confirms the correct part. If the leak continues, the cartridge, O-rings, gasket, faucet body, or another connection may be involved. Do not overtighten: a cracked cartridge or distorted seal can create a larger leak.
Keep supply-line leaks separate from handle leaks
Water below the counter can originate at an angle stop, supply-line connection, hose lining, faucet underbody, or drain rather than the handle. Dry all connection points and observe with the water on only long enough to locate the first wet point. A hose or valve leak may need a different part and procedure, and water inside a cabinet can cause damage even when the handle itself appears dry.
Use the model number for every replacement decision
Pfister directs owners to find the faucet and its full parts diagram or maintenance guide before ordering a cartridge. Older and discontinued faucets may require a different lookup path, and hot and cold cartridges can differ on two-handle designs. A similar-looking cartridge, retainer, or O-ring is not proof of compatibility. Give the technician the model, handle style, leak location, and whether the leak occurs with the faucet on, off, or both.
Safety boundary
Stop conditions
- An active spray, rapid leak, water damage, or water entering cabinetry, flooring, or an electrical area.
- A hot or cold angle stop will not close, a pressurized connection must be disconnected, or the source is behind a wall.
- The handle, dome cap, retainer, cartridge, seal, or faucet body is seized, cracked, corroded, or cannot be reassembled without force.
- The model-specific maintenance guide is unavailable or part compatibility is uncertain.
- Any need to over-tighten, use heat or harsh chemicals, force a cartridge, or continue after a leak returns.
Only after diagnosis
Potential parts
- Match the exact Pfister faucet model and do not over-tighten against a plastic or ceramic component.
- Use the exact model parts diagram; hot and cold cartridges can differ on two-handle designs.
- A seal must match the groove, material, and faucet model; do not substitute by diameter alone.
- Confirm both connection ends and routing; keep the local supplies off until leak-free reassembly is verified.
When checks do not resolve it
Need a professional?
Call a qualified plumber when a Pfister faucet still leaks around the handle after the documented retainer check, when a cartridge or seal needs replacement, the model or part is uncertain, the leak is under the counter or behind a wall, a shutoff will not close, or water damage is occurring. Leave the local supplies off when safe to do so and seek urgent help for a rapid leak that cannot be controlled.
Common questions
FAQ
Why is my Pfister faucet leaking under the handle?
A loose retainer, cartridge or seal, faucet body, or a nearby connection can all make water appear under the handle. Dry the area and identify the first wet point before shutting off both supplies and following the exact model guide.
Can tightening the Pfister handle stop the leak?
The handle fastener and the cartridge retainer are different parts. A retainer may need a careful model-documented adjustment, but tightening the handle alone may not seal a cartridge leak. Do not over-tighten or force the assembly.
Do I need a new Pfister cartridge for a handle leak?
Not always. Pfister's troubleshooting path checks the retainer first and treats continued leaking as a possible cartridge issue. Identify the exact model and use its parts diagram before ordering a cartridge; hot and cold parts can differ.
When should I call a plumber for a Pfister handle leak?
Call when the leak continues after the documented check, the shutoffs will not close, a line or body leaks, the handle is seized, the model is unknown, the valve is behind a wall, or water damage is occurring. Leave the supplies off when safe.
Read the exact guide
Official sources
- Bathroom - Faucet is Leaking or Dripping (support article)Pfister · Pfister bathroom faucet handle and under-counter leak service guidance
- Bathroom - Faucet is Leaking or DrippingPfister · Pfister widespread bathroom faucet leak diagnosis and cartridge identification
- I Have a Leak (kitchen)Pfister · Pfister kitchen faucet leak-at-handle troubleshooting
Community feedback
Share a repair observation
Share a plain-text repair observation. Accepted observations are published automatically; this page may take a moment to update.