
On this page
Start here
Quick answer
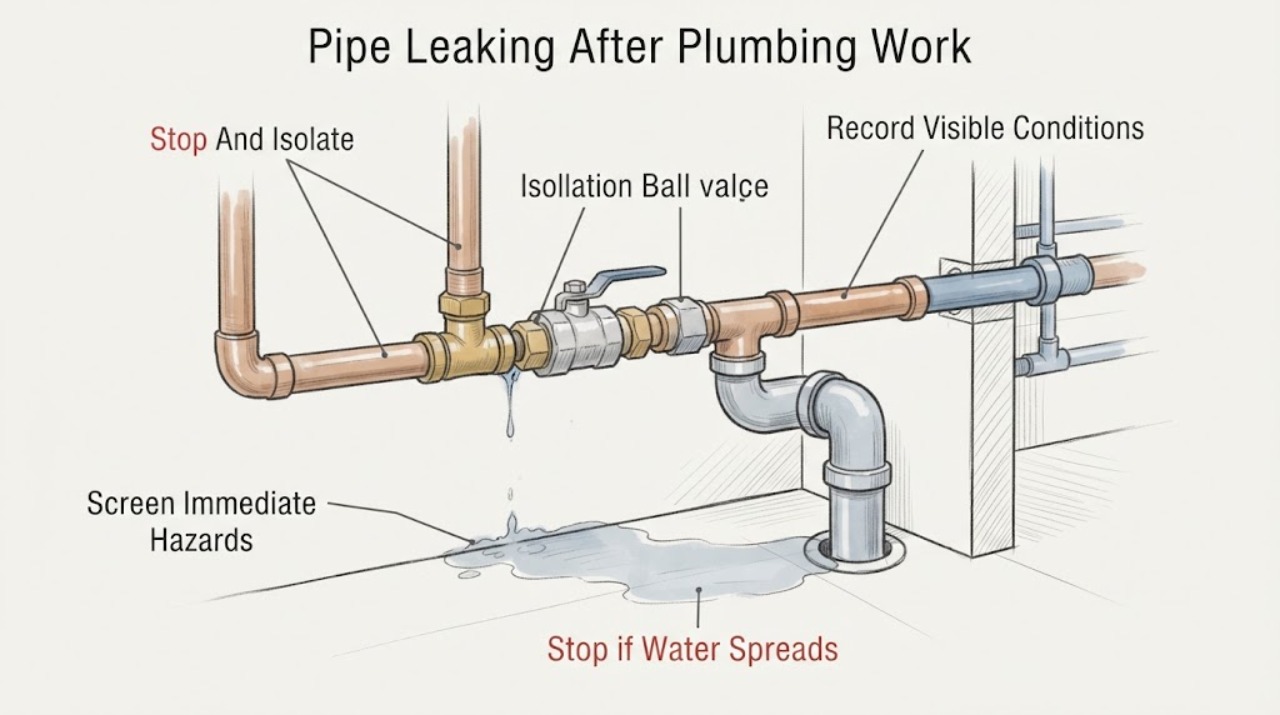
A pipe that leaks after plumbing work should be treated as an active repair-site leak until the water source is isolated. Stop using the affected fixture, close the nearest safe shut-off or the main house valve if needed, and keep water away from electrical equipment. Do not tighten a pressurized joint, reopen a sealed wall, or guess whether the water is supply, drain, condensation, or a hidden line. From a dry safe position, note when the leak appears, the first wet point, the work that was performed, and whether the leak continues with all fixtures idle. Contact the original plumbing contractor for a repair-related leak; use emergency plumbing help for rapid flow, ceiling or wall damage, hot water, or a valve that will not isolate.
Work through in order
Diagnostic checks
Use only checks that match the exact appliance or system and its official guide.
-
Check 1
Stop using the repaired fixture and, from a dry safe position, close its local shut-off valve if one is clearly identified; if flow continues or the source is not local, close the house main valve. In a multi-unit property, use the building manager's isolation route when the valve is not accessible.
Expected result: Flow stops at the local valve, continues until the main valve is closed, the valve will not turn or does not isolate, or the leak is too rapid to approach safely.
Next step: Keep the isolated section out of use and contact the original plumber for a post-work leak. Use emergency plumbing service for rapid flow, structural water damage, or an unavailable isolation valve.
Stop if: Do not force a stuck valve, enter standing water near electrical equipment, or reopen the water to see whether the leak worsens.
Why this matters
Why: A local isolation points toward the repaired branch; a continuing flow indicates another supply path, a failed valve, or a line that needs emergency plumbing attention. A valve that will not isolate is itself a service issue.
-
Check 2
From a safe position, look for water reaching outlets, wiring, appliances, a water heater, a ceiling, or a wall; also note hot water, sewage or contaminated water, bulging material, a slippery floor, smoke, or a burning odor.
Expected result: Water is near electrical equipment, a ceiling or wall is swelling, the water is hot or contaminated, or there is smoke or a burning odor; alternatively the leak is contained in a dry accessible area.
Next step: Keep clear and call the appropriate emergency or qualified service. If power can be isolated from a dry safe location without touching water or damaged equipment, do so; otherwise wait for qualified help. Do not clean contaminated water as a routine spill.
Stop if: Do not touch wet plugs, panels, wiring, heaters, ceiling material, or unknown water, and do not use water on an energized electrical fire.
Why this matters
Why: The immediate risk may be electrical shock, fire, scalding, contamination, or structural damage rather than a simple fitting leak. The water's appearance alone does not prove it is safe.
-
Check 3
Write down what was repaired, the date, the rooms and fixtures affected, which valves were closed, when the leak first appeared, and a photo of each visible wet point without disturbing the joint or covering evidence.
Expected result: The leak is at or below the repaired fitting, appears only after a fixture is used, starts without water use, or appears far from the work area.
Next step: Send the record to the original contractor and request a return inspection within the repair scope. Keep the affected branch isolated while waiting.
Stop if: Do not dismantle the work, scrape sealant, remove access panels, or make a second repair that could hide the original cause.
Why this matters
Why: Timing and location help distinguish a pressurized supply connection, drain-side connection, traveling water, or a separate concealed leak. The lowest puddle may not be the source.
-
Check 4
When the area is dry and safe, use a clean, dry tissue or visual check along the exposed pipe, valve body, connection, floor, cabinet, and underside of the repaired area; start at the highest wet point and work outward without loosening anything.
Expected result: The first wet point is a supply-side joint or valve, a drain connection that wets only during discharge, a hose or appliance connection, or no exposed source is visible.
Next step: Leave the correct branch isolated and give the location and timing to the original plumber. Arrange leak detection when the first wet point is hidden or the water travels through a wall or floor.
Stop if: Do not use a flame, drill, probe, compressed air, or a tool on the fitting to locate or test a leak.
Why this matters
Why: A supply joint that wets while idle needs pressure-side service; a drain connection that wets only during discharge needs drain-side service; no visible source raises the possibility of a concealed line or water traveling from elsewhere.
-
Check 5
Only after the area is dry, the leak is contained, and no electrical or structural hazard exists, observe whether a small amount of water use at the affected fixture changes the leak; do not run a full appliance or fixture cycle. Keep the main valve closed if any water use makes the leak substantial.
Expected result: Water appears while all fixtures are idle, appears only when the fixture drains, appears only when hot water runs, or does not recur during the limited observation.
Next step: Report the exact trigger to the plumber and keep the branch out of service until inspected. Do not repeat the test if water travels, pressure changes, or damage begins.
Stop if: Do not test a pressurized joint by hand, use hot water that could scald, or operate an appliance in a wet area.
Why this matters
Why: Idle leakage supports a pressurized supply or valve path; use-triggered leakage supports a drain or fixture outlet path; hot-only leakage points toward the hot-water branch. A quiet interval does not prove the repair is sound.
-
Check 6
With every faucet, toilet, appliance, and outdoor use stopped, observe the water-meter leak indicator or reading only if it can be accessed safely; note damp walls, ceilings, floors, unexplained pressure loss, or wet ground without opening the structure.
Expected result: The meter continues to move, stops after the house valve is closed, or the meter is quiet while a localized wet area remains.
Next step: Give the meter result and suspected location to a licensed plumber or leak-detection professional. Keep the water isolated when the leak is active.
Stop if: Do not enter a flooded meter area, lift heavy covers, excavate, or treat a hidden leak as a DIY access job.
Why this matters
Why: A moving meter with no intended use confirms ongoing flow. If it stops after the house valve closes, the leak is likely within the property; continued movement can indicate a line between the meter and house valve or another unisolated path. A quiet meter does not rule out a drain leak.
-
Check 7
After the original plumber or qualified professional has inspected the work, restore water only under their direction and watch the repaired area from a dry safe position while opening the supply gradually as the system instructions require.
Expected result: The joint stays dry, a small seep returns, flow appears immediately, or the leak starts only when the fixture discharges or hot water runs.
Next step: Close the safe valve again if any leak returns and contact the original contractor for corrective work. Record the timing instead of tightening the fitting yourself.
Stop if: Do not stand under a wet ceiling, use a tool on a live joint, or leave the property while a repaired connection is being observed.
Why this matters
Why: A returning seep is evidence that the repair or an adjacent connection still needs correction; the trigger can help the plumber distinguish supply, drain, or hot-water behavior. A dry short observation is not a guarantee against a concealed or intermittent leak.
-
Check 8
Prepare a service handoff with the repair invoice or scope, pipe material if known, photos, first wet point, idle-versus-use timing, valve behavior, meter result, water temperature, and any ceiling, wall, floor, electrical, or contamination impact.
Expected result: The original repair is within a contractor's warranty or scope, the source is hidden, the leak is rapid, or a separate branch appears responsible.
Next step: Keep the affected water path isolated until qualified service confirms the repair and the surrounding area is dry and safe. Escalate structural or electrical damage to the appropriate qualified professional.
Stop if: Do not conceal staining, discard wet materials before documenting them, or resume normal use because the visible puddle dried.
Why this matters
Why: A precise handoff lets the original contractor assess workmanship and lets a new plumber or leak-detection professional avoid repeating unsafe access or confusing a traveling leak with the source.
Use your observations
Decision map
Find the observation that best matches what you see, then follow the next safe action.
-
PATH 01Next step
What you see
Water is flowing rapidly, a ceiling or wall is bulging, water reaches electrical equipment, hot or contaminated water is present, or smoke or a burning odor appears.
Do this next
Keep clear, isolate water only from a safe dry position, and use emergency plumbing, electrical, fire, or building services as appropriate. Do not reopen or retest the repair.
-
PATH 02Next step
What you see
The local valve clearly stops the leak and the surrounding area is dry and safe.
Do this next
Leave that branch isolated, document the first wet point and repair scope, and contact the original plumber for a post-work inspection.
-
PATH 03Next step
What you see
The local valve does not isolate the leak, the leak is at a main branch, or the source is unclear.
Do this next
Close the house main valve only if safely accessible, keep people away from the wet area, and arrange qualified plumbing service. A failed shut-off valve should not be forced.
-
PATH 04Next step
What you see
The leak continues while all fixtures are idle.
Do this next
Treat it as a pressurized supply, valve, connector, or unisolated branch until a plumber confirms otherwise. Keep the water off and do not tighten the joint under pressure.
-
PATH 05Next step
What you see
The wet point appears only when a fixture discharges or an appliance uses water.
Do this next
Stop using that fixture, keep the branch isolated, and report the discharge trigger and first wet point to the original plumber; a drain or appliance connection may be involved.
-
PATH 06Next step
What you see
Leakage appears only when hot water runs or the water is hot enough to burn.
Do this next
Stop hot-water use, avoid the area, and arrange qualified plumbing or water-heater service. Do not handle the hot connection or drain a hot system.
-
PATH 07Next step
What you see
No exposed joint is wet, the meter shows ongoing flow, or staining appears away from the repair.
Do this next
Do not open the wall, floor, or ceiling. Keep water isolated and arrange professional leak detection; the visible puddle may not be the source.
-
PATH 08Next step
What you see
A qualified professional confirms the repair, the area stays dry during controlled restoration, and no structural, electrical, or contamination warning remains.
Do this next
Resume use gradually as directed, retain the repair record, and monitor for a delayed or intermittent return. Stop again if any leak or hazard reappears.
Helpful context
Understand the symptom
Why a post-repair leak needs a different first step
The condition matters: a leak that began after a valve, fitting, pipe, appliance connection, or drain was disturbed may be at the repaired area, but water can travel along a pipe, cabinet, wall, or floor before it becomes visible. The first wet point and the timing are more useful than the lowest puddle. Preserve the work area and the contractor's scope so the original repair can be checked without adding a second uncontrolled repair.
Supply pressure and drain water behave differently
A pressurized supply leak can continue while every fixture is idle. A drain leak may appear only when a fixture discharges, and a condensation or spill can mimic either one. Compare the leak with all water use stopped, then with one fixture used only if the area is dry and safe. Never loosen or retighten a fitting while it is pressurized.
Protect the building while arranging service
Use towels or a container only when doing so does not require entering a wet electrical area. Keep people away from a sagging ceiling, swollen wall, contaminated water, or a slippery floor. Do not open walls, ceilings, or floors to search for a hidden line; document the visible evidence and let a qualified plumber or the original contractor choose the access method.
Only after diagnosis
Potential parts
- pipe joint seal or connector
Consider only when qualified diagnosis confirms that the post-work leak is at a specific joint or connector and identifies the correct repair method.
Pipe material, joining method, pressure, temperature, and local code affect fit; do not order or install a generic connector from a puddle location. - branch shut-off valve
Consider only when the existing valve cannot isolate the repaired branch or qualified service identifies valve failure.
Confirm pipe size, material, connection type, access, and code requirements with the plumber; never force a stuck valve. - pressure regulator or water service valve
Consider only after qualified diagnosis finds a pressure or service-line cause rather than a local post-repair fitting leak.
Pressure work and service-line components require site-specific assessment and qualified installation; no compatibility is established by high flow alone.
When checks do not resolve it
Need a professional?
Contact the original plumbing contractor promptly for any leak that began after their work, especially when it is at or near the repaired area. Use emergency plumbing service for rapid flow, a valve that will not isolate, a hidden line, a ceiling or wall impact, or water that threatens a lower level. Use qualified electrical, building, or remediation help when water reaches electrical equipment, structural materials, or contaminated areas.
Have this ready
- Provide the repair scope or invoice, date, pipe and fixture identity, photos, first wet point, idle-versus-use timing, local and main valve behavior, meter result, hot-water trigger, amount and spread of water, and any wall, floor, ceiling, electrical, or contamination signs.
Common questions
FAQ
Should I tighten the fitting that started leaking after the plumber left?
No. Keep the affected water path isolated and contact the original plumber. Tightening a pressurized or incorrectly joined fitting can worsen the leak, hide the work evidence, or create a new failure.
How can I tell whether the leak is from a supply pipe or a drain?
After isolation and a safe dry check, note whether water appears while all fixtures are idle or only when one fixture discharges. Do not repeat a use test if water spreads, reaches electrical equipment, or the area is unsafe.
What if the puddle is away from the repaired pipe?
Water can travel along a pipe, wall, floor, or cabinet. Document the lowest puddle but look for the highest first wet point from a safe accessible position. If none is visible, use professional leak detection rather than opening the structure.
Can I leave the main water on if the leak is only a drip?
Not without a qualified assessment. A drip can worsen or damage hidden materials. Isolate the affected branch when safe, or use the main valve if necessary, and arrange a prompt post-work inspection.
Who should come back when a pipe leaks after plumbing work?
Start with the original plumbing contractor and provide the repair scope, timing, and photos. A different licensed plumber or leak-detection professional may be needed for a concealed line, a failed isolation valve, a service-line issue, or damage outside the original scope.
Read the exact guide
Official sources
- How to check for leaksCity of Portland Water Bureau · General residential water-leak guidance; local valve locations and plumbing rules vary.
- Finding and Fixing Water LeaksCity of San José Environmental Services · General residential leak guidance; local water-retailer and permit arrangements differ.
- Home MaintenanceU.S. Environmental Protection Agency WaterSense · General household maintenance guidance; local emergency and plumbing requirements control.
- Water LeaksAustin Water · General leak-location principles; local ownership and response routes are specific to Austin.
- What to do if water pipes freeze, leak, or burst as temperatures riseCity of Portland Water Bureau · Emergency-response principles for residential pipe leaks; follow local utility and emergency procedures.
- Checking for Water Leaks on Your PropertyCity of San Diego Public Utilities · General residential leak-detection guidance; do not infer local service responsibility or valve design.
Community feedback
Share a repair observation
Share a plain-text repair observation. Accepted observations are published automatically; this page may take a moment to update.