
On this page
Start here
Quick answer
Stop the downstairs washer immediately and do not run another drain test. Close the washer's water supply valves if they are dry and safely reachable, and keep people away from wet electrical areas. From a safe, dry position, photograph the first visible wet point and note whether water appears only during washer discharge, whether it is clean or dirty, and whether the wall, ceiling, or floor is swelling. The pattern most often narrows to a loose or split washer drain hose, a standpipe or drain connection that overflows, or a leaking drain branch inside the wall; a separate supply leak or an upstairs source can look similar. Do not open the wall, enter standing water, use electricity in a wet area, or pour chemicals into the drain. A plumber should inspect the concealed drain path and any wall or ceiling damage, while an electrician should assess wet electrical equipment before it is returned to service.
Before you begin
Safety first
- Keep the washer and affected fixtures off. Do not enter standing water, energize wet equipment, open the wall, handle sewage or chemicals, or disturb structural, concealed, or electrical materials.
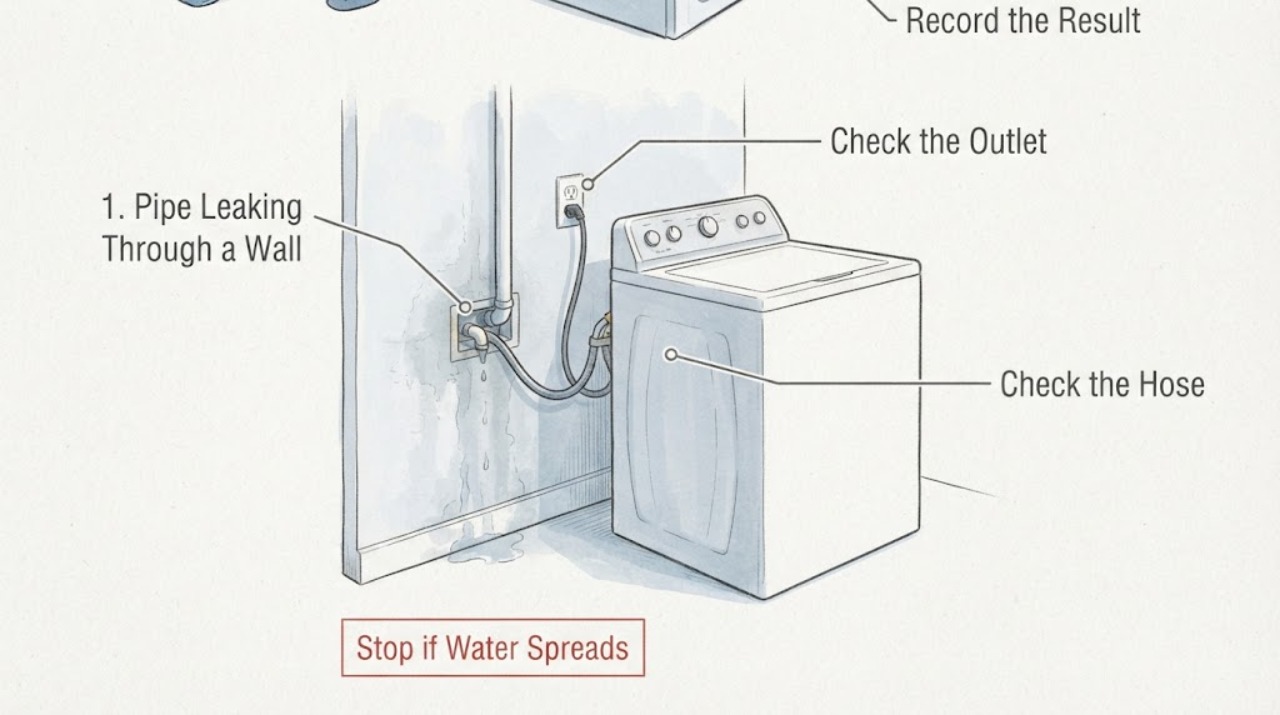
Work through in order
Diagnostic checks
Use only checks that match the exact appliance or system and its official guide.
-
Check 1
Stop the washer and cancel the cycle without starting another drain or spin. From a dry location, close the washer's hot and cold supply valves if the valves are easy to reach; keep clear of any water near an outlet, cord, appliance, ceiling fixture, or panel.
Expected result: Water continues after the washer stops, the water supply valves stop the flow, dirty water remains, or water is near electrical equipment or a ceiling.
Next step: Keep the washer off. If safe and dry to reach, isolate the relevant water supply; if standing water blocks access to power, do not enter it or operate electrical equipment. Contact a plumber urgently and have an electrician assess affected electrical equipment before reuse.
Stop if: Stop immediately for rising water, sewage, a wet electrical panel or outlet, a sagging ceiling or wall, smoke, arcing, or any need to stand in water to reach a shutoff.
Why this matters
Why: Continued flow may be a pressurized supply leak or a building drain leak rather than a one-time washer discharge. Water near electrical parts is an electrical hazard, not a routine plumbing check.
-
Check 2
From safe, dry areas above and below the washer, photograph and mark the first visible wet point. Note the exact timing, whether the water is clear or dirty, whether it enters through the wall, ceiling, baseboard, floor, washer cabinet, drain hose, or standpipe, and whether another fixture was being used.
Expected result: The first wet point is at the washer or its exposed hose, at the standpipe opening, at a wall or ceiling penetration, or away from the washer with no visible discharge path.
Next step: Keep the washer and nearby fixtures unused, preserve the photos, and give the timing and water character to the plumber. Do not cut the wall or pull trim to chase the leak.
Stop if: Stop if the wall, ceiling, flooring, or cabinet is swollen, sagging, soft, visibly contaminated, or unsafe to approach.
Why this matters
Why: The first wet point is more useful than the largest puddle. A washer or standpipe origin suggests an appliance connection or local drain issue; a wall or ceiling origin suggests a concealed branch, overflow, or another source.
-
Check 3
With the washer still off, inspect only the visible rear drain hose, its connection at the washer, the standpipe opening, and any accessible laundry drain fitting. Look for a split, kink, loose connection, hose pulled out of the standpipe, water marks, or discharge that could not enter the drain fast enough; do not push the hose deeper or seal the opening.
Expected result: The hose or fitting is visibly wet or damaged, the hose has moved, water marks surround the standpipe, or all exposed parts are dry while the wall becomes wet during discharge events.
Next step: Do not operate the washer. Have a plumber correct the exposed connection or evaluate the standpipe, trap, and branch drain against local requirements and the appliance installation instructions.
Stop if: Stop for sewage backup, a chemical odor or previously added drain cleaner, a cracked fitting, active pressurized spray, or any need to remove a concealed or glued pipe connection.
Why this matters
Why: A visible hose or standpipe issue can release water at the wall or floor without a failed concealed pipe. If exposed parts are dry but the wall responds to discharge, the restriction or leak may be downstream in the drain branch.
-
Check 4
Compare the reported event with other safe observations: whether a nearby sink, shower, toilet, or another appliance makes the downstairs area wet; whether the leak follows washer discharge only; and whether the washer's supply valves are closed. Do not operate another fixture to provoke a leak if water is already entering the wall or ceiling.
Expected result: Only the washer discharge correlates with the leak, several fixtures cause it, water appears even when the washer is idle, or rainfall changes the symptom.
Next step: Report the correlation to the plumber and keep the relevant fixtures out of use. If the source is not plumbing-related, arrange the appropriate building-envelope or roof inspection without reopening the wall yourself.
Stop if: Stop if water is spreading, the ceiling or wall is deforming, sewage is present, or an electrical or structural hazard appears.
Why this matters
Why: Washer-only timing favors the washer drain branch. Multiple fixtures suggest a shared branch or building drain. Water while idle suggests a supply or unrelated plumbing source; a rain correlation suggests an exterior or roof source instead.
-
Check 5
Check the drain event history and visible water character without touching contaminated water: clear water may fit a supply or rinse source, while gray, soapy, or foul water points toward washer discharge or a backed-up waste line. Record detergent use, the cycle stage, and whether the downstairs leak stopped when the washer stopped.
Expected result: The water is gray or soapy and arrives at discharge, foul or sewage-like water backs up, or clear water continues with the washer off.
Next step: Treat suspected sewage or contaminated water as a professional cleanup and plumbing matter. Keep the washer and affected fixtures off, prevent contact, and tell the plumber the water character and timing.
Stop if: Stop for sewage, unknown chemicals in the water, skin or eye exposure, strong odor, or any cleanup that would require entering contaminated or electrical standing water.
Why this matters
Why: Water character and timing help separate a waste-drain overflow from a pressurized supply leak, but appearance alone cannot certify that water is sanitary.
-
Check 6
From a dry location, check whether the affected room or lower level has standing water and whether the wall or ceiling shows staining, bubbling, soft drywall, sagging, or a musty odor. Take dated photos and move belongings only if the path is dry and stable; do not drill, cut, pry, or remove wall finishes to release hidden water.
Expected result: The affected material is dry and intact, damp but stable, visibly swollen or sagging, or shows mold or a persistent musty odor.
Next step: Ask the plumber to locate and repair the source. Arrange water-damage or restoration assessment for persistent hidden moisture, damaged drywall, or suspected mold; EPA advises prompt drying and professional help for substantial or contaminated damage.
Stop if: Stop and leave the area if the ceiling or wall is sagging, cracking, unstable, or near electrical fixtures; do not enter standing water.
Why this matters
Why: A concealed leak can continue after the appliance stops and can damage wall materials or support mold. Sagging or damaged finishes can also fall and should not be disturbed casually.
-
Check 7
Prepare a plumber service report rather than performing a hidden-pipe test: include the washer location, the downstairs and upstairs rooms, first wet point, drain-only timing, water character, exposed hose and standpipe observations, supply-valve result, fixture and rain correlations, photos, and any prior repair or drain chemical use.
Expected result: The evidence points to an exposed washer connection, a standpipe or shared drain restriction, a concealed wall branch, a pressurized supply source, or an unrelated building source.
Next step: Keep the washer off until the plumber confirms the drain path and connections are safe. Have wet electrical equipment evaluated by an electrician before it is energized or used.
Stop if: Stop all DIY investigation when locating the source would require opening the wall, entering a ceiling or crawl space, handling sewage or chemicals, or disturbing electrical or structural materials.
Why this matters
Why: A concise evidence trail lets the professional choose a safe access and inspection plan without repeated discharge tests that can increase wall and ceiling damage.
Use your observations
Decision map
Find the observation that best matches what you see, then follow the next safe action.
-
PATH 01Next step
What you see
Water begins at the visible washer drain hose, standpipe, or laundry connection during discharge.
Do this next
Keep the washer off and have a plumber correct and verify the visible connection and downstream drain path using the appliance instructions and local plumbing requirements.
Why this path and its safety boundary
Why it matters: The immediate failure may be an exposed hose, connection, drain opening, or local capacity/installation problem rather than a pipe hidden in the wall.
-
PATH 02Next step
What you see
The hose and standpipe remain dry, but the wall or ceiling becomes wet only when the washer discharges.
Do this next
Do not repeat the drain cycle or open the wall. Keep the washer and connected fixtures off and arrange urgent plumber inspection of the concealed route.
Why this path and its safety boundary
Why it matters: A concealed drain branch, trap, joint, or shared waste line may be leaking or backing up under the washer's discharge flow.
-
PATH 03Next step
What you see
Water continues while the washer is off, or closing the washer supply valves changes the flow.
Do this next
Keep the supply isolated if safely reachable and call a plumber. Do not assume that a drain-only timeline rules out a supply leak without checking whether flow stops.
Why this path and its safety boundary
Why it matters: A pressurized washer supply, valve, or another plumbing source is more likely than a discharge-only overflow.
-
PATH 04Next step
What you see
Several fixtures reproduce or correlate with the downstairs leak, or the leak follows rain rather than washer discharge.
Do this next
Keep affected fixtures out of use and give the plumber the correlation. Arrange building-envelope or roof assessment when the timing follows rain.
Why this path and its safety boundary
Why it matters: A shared building drain, another plumbing branch, or an exterior source may be involved.
-
PATH 05Next step
What you see
The leak includes sewage, chemical-contaminated water, standing water near electricity, or swollen or sagging wall or ceiling materials.
Do this next
Keep people away, do not enter or energize the affected area, and contact the appropriate plumber, electrician, water-damage professional, or emergency service from a safe location.
Why this path and its safety boundary
Why it matters: This is a contamination, electrical, or structural safety event in addition to a plumbing leak.
Helpful context
Understand the symptom
The timing is the strongest clue
Water that appears downstairs only while an upstairs or nearby washer discharges points toward the discharge route, but it does not prove that the pipe inside the wall is the failed part. The washer drain hose, standpipe, trap, branch drain, and a separate supply line can leave water at different first wet points. Treat dirty or soapy water as potentially contaminated and keep the washer out of service until the source is identified.
Protect the building while the cause is being located
Contain drips from a safe, dry position and document the wall, ceiling, baseboard, flooring, and the washer area before moving finishes. Hidden moisture can remain around pipes and inside wall cavities. EPA recommends fixing the moisture source promptly and drying wet materials quickly; a wall that is swollen, sagging, soft, or persistently damp needs a plumber and, when building materials are affected, a water-damage or restoration professional.
Safety boundary
Stop conditions
- Stop the washer and do not run another drain test when water appears through the wall, ceiling, or floor, or when the source is not visible. Keep connected fixtures off until a plumber evaluates the drain path.
- Do not enter standing water or touch wet electrical equipment, outlets, cords, fixtures, or panels. Isolate power only from a safe dry location; have an electrician inspect affected equipment before reuse.
- Stop for sewage, unknown chemicals, a strong odor, rising water, a sagging or cracked wall or ceiling, visible mold, or any need to open the wall or disturb structural, concealed, or electrical materials.
- Do not use chemical drain cleaners, mix chemicals, probe a concealed pipe, or attempt a repair that requires cutting finishes or disassembling a drain connection without the appropriate professional.
Only after diagnosis
Potential parts
- washer drain hose or connection hardware
Only consider this class if the first wet point is a visibly damaged or loose exposed washer drain connection and the model and installation guidance identify the correct replacement.
Confirm the appliance model and connection arrangement; do not select a hose or fitting from a symptom alone. - drain pipe or trap repair material
Only consider pipe or trap materials after a plumber identifies a specific accessible drain component and the applicable local requirements.
Concealed or waste-line repairs require appropriate materials, access, and code-compliant installation; do not infer a part from the wall stain.
When checks do not resolve it
Need a professional?
Request urgent plumbing service for any repeatable washer-drain leak through a wall, an inaccessible first wet point, a standpipe or shared-drain overflow, continued flow after the washer stops, or a suspected concealed branch leak.
Safety scope: Keep the washer and affected fixtures off. Do not enter standing water, energize wet equipment, open the wall, handle sewage or chemicals, or disturb structural, concealed, or electrical materials.
Common questions
FAQ
Why does water come through the wall only when the washer drains?
The timing points toward the discharge route, but the failure may be an exposed drain hose or standpipe, an overwhelmed or restricted branch drain, or a leaking connection inside the wall. Stop the washer and have the drain path inspected instead of repeating the cycle.
Should I run the washer again to find the leak?
No. A repeat drain test can increase damage inside a wall or ceiling and can spread contaminated water. Record the first wet point and timing from a safe dry location and let a plumber choose the inspection method.
What if the exposed washer hose looks dry?
A dry hose does not clear the drain branch. If the wall or ceiling becomes wet only during discharge, keep the washer off and have the standpipe, trap, shared drain, and concealed branch evaluated by a plumber.
Can I use electricity to dry the downstairs area?
Do not touch or operate electrical equipment while standing in water or when the equipment is wet. Isolate power only from a safe dry location and have an electrician inspect affected equipment before it is returned to service.
When is a leaking wall an emergency?
Treat rising water, sewage or unknown chemicals, a sagging or cracked wall or ceiling, water near electrical equipment, smoke or arcing, and any need to enter standing water as urgent safety conditions. Keep clear and contact the appropriate plumber, electrician, restoration professional, or emergency service.
Read the exact guide
Official sources
- Why is My Washing Machine Not Draining?Whirlpool · Whirlpool front-load and top-load washer guidance; filter access and controls vary by model.
- Continuously Fills / Fills and Drains - WasherWhirlpool Product Help · Whirlpool washer guidance; exact installation requirements must be confirmed for the model and local plumbing.
- Leak Detection and Flow Monitoring DevicesU.S. Environmental Protection Agency WaterSense · General residential leak-detection information; it does not replace a plumbing inspection.
- A Brief Guide to Mold, Moisture and Your HomeU.S. Environmental Protection Agency · General residential moisture and mold guidance; substantial or contaminated damage may require experienced professionals.
- Safety Guidelines: Reentering Your Flooded HomeCenters for Disease Control and Prevention · Flood and water-intrusion safety guidance applicable to indoor standing water; local emergency instructions take priority.
- Reasons why your washing machine is leakingWhirlpool · Whirlpool washer guidance; exact washer design and service access vary by model.
Community feedback
Share a repair observation
Share a plain-text repair observation. Accepted observations are published automatically; this page may take a moment to update.