
On this page
Start here
Quick answer
A leaking Rinnai water heater should be treated as a water-damage and, for gas or powered models, an electrical or combustion safety problem until the source is known. From a dry position, stop using hot water at the unit and identify whether the water is coming from an external pipe connection, relief discharge, condensate or drain path, the bottom pan, or inside the cabinet. If water can reach wiring or controls, the leak is active, there is a gas odor, steam, scorching, or a hot vent, keep clear and arrange urgent qualified service; do not remove the cover. Rinnai's tankless guidance for a water-leak indication calls for checking internal piping, the heat exchanger, cabinet pooling, and the leak detector, but those are service tasks. A loose-looking connection, leak that appears only during operation, or any water inside the cabinet needs a Rinnai-trained plumber or qualified water-heater technician rather than sealant, overtightening, or repeated resets.
Before you begin
Safety first
- This article covers dry-position external observation and evidence collection only. Internal piping, heat exchanger, gas, combustion, venting, electrical, leak-sensor, relief, and control work belongs to a qualified Rinnai-trained professional.
Work through in order
Diagnostic checks
Use only checks that match the exact appliance or system and its official guide.
-
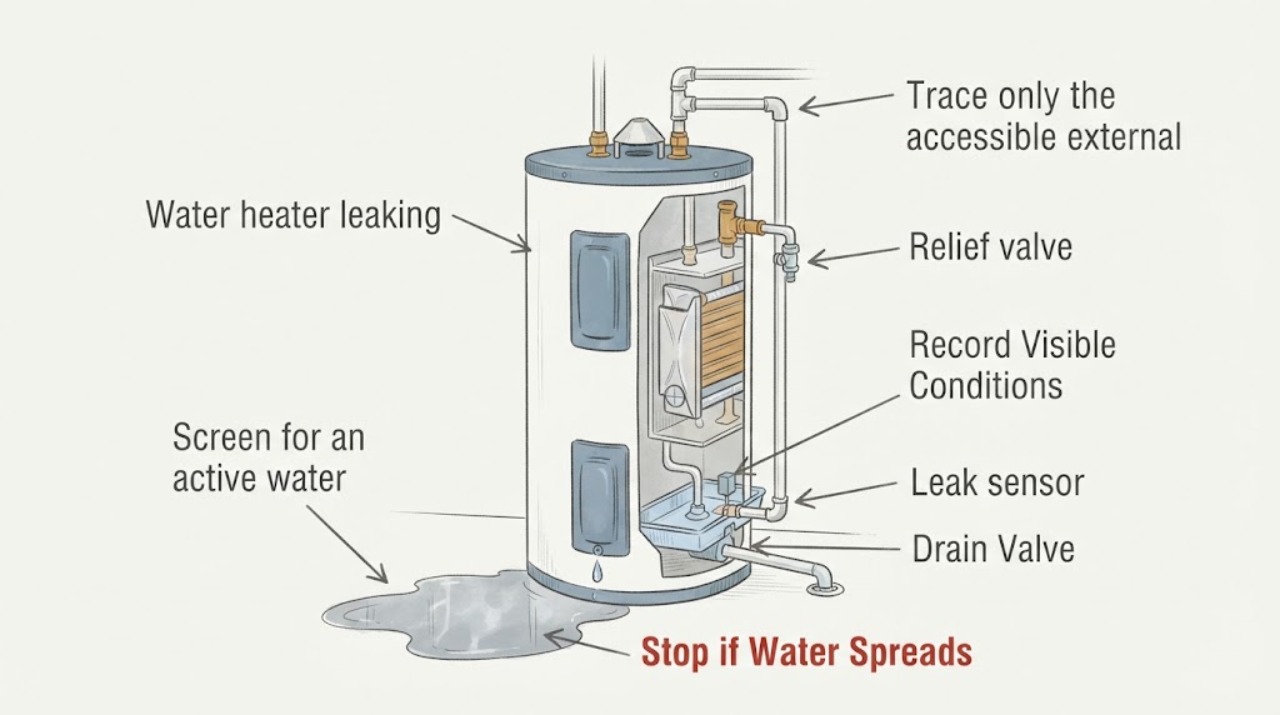
Screen for an active water, gas, or electrical hazard
From a dry position, look for spreading water, water reaching the electrical controls or outlet, gas odor, hissing, steam, scorching, a hot exhaust path, or a unit that has been flooded. Keep people away and do not touch wet controls, plugs, wiring, venting, or hot surfaces.
Expected result: The leak is small and clearly away from controls, with no gas odor, steam, scorching, flooding, or hot vent; or a safety hazard is present or the source cannot be seen safely.
Next step: For an active or hazardous leak, stop using the heater, leave the area for gas or fire danger when appropriate, and contact qualified plumbing, gas, or emergency service from a safe location. Otherwise continue only with external observation.
Stop if: Stop immediately for gas odor, hissing, smoke, steam, scorching, water on controls or wiring, flooding, suspected carbon-monoxide symptoms, or a hot vent or surface that cannot be approached safely.
Why this matters
Why: A dry external drip may permit limited source documentation, but a gas, electrical, hot-water, combustion, or flooding condition is not a routine plumbing adjustment.
-
Record the Rinnai unit and visible leak location
Photograph the rating plate, display, piping, drain or condensate tubing, relief discharge, bottom area, and surrounding wall or floor from ordinary safe access. Record whether the unit is a wall-mounted tankless model or another Rinnai design, and whether water is visible outside the cabinet or only below it.
Expected result: The leak is at an external connection, discharge tube, condensate or drain path, lower cabinet area, wall or floor, or the source remains hidden inside the enclosure.
Next step: Keep the photos and model information; do not remove the cover, disconnect pipes, or move the unit to improve visibility. Arrange service if the source is not plainly external and accessible.
Stop if: Do not step on wet flooring near electricity, reach behind the unit, remove insulation or panels, or handle hot piping to locate the drip.
Why this matters
Why: An external location focuses the handoff on a connection, drain, relief path, installation, or condensation question. Water below the unit does not prove the pan or tankless leak sensor is the source, and a hidden source requires the cover and internal piping to be assessed by a professional.
-
Trace only the accessible external water path
With hot-water use stopped and the unit cool enough to approach, visually follow the first wet point on accessible cold-water, hot-water, relief, condensate, drain, and vent-adjacent piping without turning fittings, removing caps, or applying sealant. Use a dry paper towel only on a cool exposed surface if it can be done without contact with wiring or hot parts.
Expected result: The first wet point is a threaded or compression connection, a relief discharge, a condensate or drain tube, a vent-adjacent area, or water appears to originate behind the cover.
Next step: Photograph the first wet point and leave the heater out of service if the leak continues. Have a qualified plumber or Rinnai technician inspect and repair the identified path; do not tighten or cap a relief or condensate outlet.
Stop if: Do not touch hot pipes, gas piping, venting, relief outlets, electrical parts, or internal tubing, and do not block or redirect a safety discharge as a test.
Why this matters
Why: The location changes the likely service scope: a connection or drain path differs from relief discharge, vent condensation, or internal heat-exchanger or piping leakage. Water that starts behind the cover is not an external tightening job.
-
Read the display without opening the unit
From the normal controller or display, record any water-leak, service, or other diagnostic indication and whether it appears only when hot water is flowing. Do not clear a fault repeatedly, unplug a leak sensor, or remove the front cover to reach wiring.
Expected result: A leak indication appears, the display is normal despite visible water, the code returns after a reset, or the display is blank or abnormal.
Next step: Give the exact display wording, model, timing, and leak photos to a Rinnai-trained professional. Keep the unit off when the leak is active or reaches the cabinet; do not bypass the detection circuit.
Stop if: Do not disconnect sensors, bridge wires, dry internal components with a heat source, or energize a wet cabinet to see whether the code clears.
Why this matters
Why: Rinnai's tankless diagnostic material associates a water-leak indication with checks of the leak detector, cabinet pooling, internal piping, and heat exchanger. A normal display does not rule out an external leak, and a returning or abnormal indication needs service rather than repeated resets.
-
Note whether water appears during operation
Without restarting a leaking or wet unit, record whether the drip is continuous while the heater is idle, appears only when a hot-water fixture runs, follows burner operation, or follows cooling or weather changes. Do not create a demand just to reproduce a leak if water could reach controls.
Expected result: The leak is continuous, occurs only with hot-water flow, follows combustion or heating, appears after cooling, or cannot be correlated safely.
Next step: Stop use and arrange service for any operation-linked or unexplained leak. Provide the timing, water temperature if known without touching hot parts, and photos of the source area.
Stop if: Do not relight, run hot water, open the gas or water enclosure, or continue operation when water is inside the unit or near electrical, gas, burner, or vent components.
Why this matters
Why: Operation-linked water may involve a heat exchanger, internal piping, relief response, condensate or vent path, while an idle drip may be an external connection or water-supply issue. Timing narrows diagnosis but does not identify a part for a homeowner to replace.
-
Preserve evidence and set the service boundary
Collect the model and serial information, display wording, first wet point, leak timing, whether the leak reaches the bottom pan or cabinet, recent installation or maintenance history, and whether water or gas has been shut off by a qualified person. Keep loose parts and photos together; do not attempt internal testing.
Expected result: The evidence points to an external connection or drain, a relief or condensate path, an internal cabinet leak, or an unresolved source.
Next step: Arrange qualified Rinnai or plumbing service, urgently when the leak is active or affects controls, walls, flooring, gas, or electrical parts. Keep the heater out of service until the source and safe operating condition are verified.
Stop if: Do not return the heater to service just because the visible drip stops, and do not patch, cap, bypass, or replace an internal component without model-specific professional diagnosis.
Why this matters
Why: A clear handoff lets the technician distinguish plumbing installation, drainage or condensation, relief protection, leak detection, heat exchanger, and internal piping issues without repeated unsafe operation.
Use your observations
Decision map
Find the observation that best matches what you see, then follow the next safe action.
-
PATH 01Next step
What you see
The first wet point is an accessible cold-water, hot-water, or drain connection outside the cabinet, with no water near controls or hot surfaces.
Do this next
Leave the heater unused if the drip continues and have a qualified plumber verify the fitting, seal, pressure, and compatible repair. Do not overtighten or apply improvised sealant.
Why this path and its safety boundary
Why it matters: A plumbing connection, washer, fitting, or drain installation issue is more likely than an internal heater failure, but the fitting may still be hot, pressurized, or part of a safety path.
-
PATH 02Next step
What you see
Water is coming from or collecting below a relief discharge, safety valve, or other labeled outlet.
Do this next
Keep clear of hot discharge and arrange qualified plumbing service. Do not block, plug, clamp, or redirect the outlet as a test.
Why this path and its safety boundary
Why it matters: A relief or safety discharge must not be capped or treated as an ordinary pipe leak; it may indicate pressure, temperature, installation, or valve trouble.
-
PATH 03Next step
What you see
Water appears around a condensate drain, drain trap, vent-adjacent area, or only after heating and cooling conditions change.
Do this next
Stop operation if water can reach the unit or wall and have a qualified Rinnai technician inspect the condensate and vent arrangement. Do not alter venting or block a drain.
Why this path and its safety boundary
Why it matters: Condensate routing, a blocked or poorly draining line, vent-related condensation, or installation slope is more likely than a simple water-supply fitting.
-
PATH 04Next step
What you see
Water pools inside the cabinet or bottom pan, the display reports a leak, or the first wet point is behind the cover or at internal piping.
Do this next
Keep the water heater out of service and arrange qualified Rinnai or gas-appliance service. Do not remove the cover, dry or bypass the sensor, or operate the unit to locate the internal source.
Why this path and its safety boundary
Why it matters: Rinnai's diagnostic guidance makes internal piping, heat exchanger, leak detector, and cabinet pooling relevant; this is beyond ordinary user access.
-
PATH 05Next step
What you see
Water reaches the electrical controls, wiring, outlet, wall cavity, gas controls, burner area, or flooring, or the unit has been flooded.
Do this next
Keep clear, do not touch wet equipment, leave for gas or fire danger when appropriate, and contact emergency, gas, electrical, or qualified plumbing service from a safe location.
Why this path and its safety boundary
Why it matters: The leak has become a property and safety event; energizing or firing a wet appliance can create electrical, gas, combustion, or water-damage risk.
-
PATH 06Next step
What you see
The leak stops before its source can be identified, the display is normal despite water, or several possible paths are wet.
Do this next
Keep the evidence, leave the heater out of service if recurrence could reach the unit or structure, and have a qualified technician inspect before returning it to operation.
Why this path and its safety boundary
Why it matters: A stopped drip does not prove the heater is repaired; intermittent leaks can be pressure-, temperature-, condensate-, or operation-dependent.
Helpful context
Understand the symptom
Find the source before assuming a failed heater
Water can appear under a Rinnai unit even when it started at a fitting, relief outlet, condensate drain, vent-related condensation path, or a component inside the cabinet. The useful first distinction is whether the water is outside the enclosure and traceable to a connection, or whether it is pooling in the cabinet or bottom pan. Wipe only an accessible dry surface from a safe position; do not open the front cover to chase a hidden leak.
Rinnai leak detection is not a complete leak diagnosis
Rinnai documents leak-detection accessories for some tankless models and notes that the sensor may detect water directly above the drain pan. A clear sensor or a missing alarm does not prove that the heater is dry, and an alarm does not identify the failed part. Model, series, installation, and the exact leak location determine the next service step.
Do not trade a small leak for a larger safety problem
Do not compensate for a leak by tightening every fitting, applying sealant, blocking a drain, bypassing a sensor, or continuing to run a gas or powered heater with water inside. A leak near controls, wiring, the burner, vent, or heat exchanger requires qualified isolation and inspection. Keep the model and photos ready for the technician so the unit can be assessed without improvising a repair.
Safety boundary
Stop conditions
- Stop immediately for gas odor, hissing, smoke, steam, scorching, suspected carbon-monoxide symptoms, flooding, water on controls or wiring, or a hot vent or surface that cannot be approached safely.
- Do not remove the front cover, open the combustion chamber, disconnect or bypass a leak sensor, handle internal wiring, test energized parts, or inspect gas pressure as an ordinary user check.
- Do not overtighten fittings, cap a relief or condensate outlet, block a drain, modify venting, apply improvised sealant, or run the heater to reproduce an internal leak.
- Do not return the unit to service merely because the visible water stops; an intermittent or hidden leak still needs qualified diagnosis.
- Keep the heater out of service after flooding, fire, physical damage, or water reaching electrical, gas, burner, vent, wall, or floor areas until a qualified professional verifies safe operation.
Only after diagnosis
Potential parts
- water connection seal or O-ring
Consider this category only if inspection confirms that an accessible connection seal is damaged or displaced and the exact model's plumbing configuration supports replacement.
Confirm the exact Rinnai model, connection type, seal material, and manufacturer fit information; do not compensate for a mismatch by overtightening. - Rinnai leak detection sensor
Consider this category only if the exact model has the accessory and a qualified diagnosis confirms sensor or harness failure after the actual water source is addressed.
Confirm model and accessory compatibility with Rinnai; never unplug, bypass, or substitute the sensor to keep a leaking unit operating. - pressure relief valve
Consider this category only when water is confirmed at the relief path and a qualified plumber diagnoses the valve or pressure condition rather than a blocked or misrouted discharge.
Confirm exact model, approved valve specification, discharge arrangement, and local plumbing requirements; never cap or block a relief outlet. - Rinnai heat exchanger or internal piping assembly
Consider this category only when internal cabinet pooling or diagnostic evidence leads a qualified technician to confirm a heat-exchanger or internal-piping leak.
Confirm the exact model, series, fuel type, and manufacturer repair procedure; internal gas, water, and combustion work is professional service.
When checks do not resolve it
Need a professional?
Arrange qualified Rinnai or plumbing service for any recurring, active, operation-linked, unexplained, internal, relief-path, condensate, vent-adjacent, heat-exchanger, or cabinet leak. Use urgent emergency, gas, or electrical help from a safe location for gas odor, hissing, smoke, flooding, water on controls or wiring, suspected carbon monoxide, or fire risk. Do not remove the cover, bypass the leak detector, cap a relief outlet, or replace an internal part based only on the visible drip.
Safety scope: This article covers dry-position external observation and evidence collection only. Internal piping, heat exchanger, gas, combustion, venting, electrical, leak-sensor, relief, and control work belongs to a qualified Rinnai-trained professional.
Common questions
FAQ
Why is my Rinnai water heater leaking?
The water may come from an external connection, relief discharge, condensate or vent path, internal piping, heat exchanger, leak detector, or installation condition. Trace the first wet point from a dry position and arrange qualified service for any recurring, operation-linked, or hidden leak.
Does a Rinnai water-leak indication identify the failed part?
No. Rinnai's tankless diagnostic guidance directs checks toward the leak-detector harness, internal piping, heat exchanger, and cabinet pooling. The indication narrows the service path but does not authorize opening the cover, bypassing the sensor, or replacing a part without model-specific diagnosis.
Can I tighten a leaking Rinnai connection myself?
Do not tighten fittings by guesswork, especially near hot, pressurized, relief, gas, vent, or electrical components. Photograph the first wet point and have a qualified plumber verify the seal, connection, pressure, and compatible repair.
What if the leak stops before a technician arrives?
A stopped drip does not prove the problem is repaired. It may depend on water flow, heating, pressure, condensation, or a safety event. Keep the heater out of service when recurrence could reach the cabinet or structure, preserve photos, and report the timing and source clues.
When is a Rinnai water-heater leak an emergency?
Treat gas odor, hissing, smoke, steam, scorching, flooding, suspected carbon monoxide, water on electrical or gas controls, or a hot vent as an immediate stop-use condition. Leave the area for gas or fire danger when appropriate and contact the appropriate emergency, gas, electrical, or plumbing service from a safe location.
Read the exact guide
Official sources
- Troubleshooting Tankless Water Heater Diagnostic CodesRinnai America Corporation · Rinnai diagnostic-code guidance, including the water-leak indication, used for tankless models; exact model, series, and professional service control the repair.
- Non-Condensing Leak Detection Kit Installation InstructionsRinnai America Corporation · Rinnai accessory instructions for specified non-condensing indoor tankless models only; not a universal leak-diagnosis or homeowner wiring procedure.
- Tankless Water HeatersRinnai · Rinnai product information used to identify the common tankless form and its water connections; model-specific installation and service instructions control.
- Contact Us | RinnaiRinnai America Corporation · Rinnai support page used to establish the manufacturer's professional service route; it does not replace local emergency, gas, electrical, or plumbing response.
Community feedback
Share a repair observation
Share a plain-text repair observation. Accepted observations are published automatically; this page may take a moment to update.