
On this page
Start here
Quick answer
Use the accessible water shutoff first, then determine where and when the shower leaks. Close the supply stop without forcing it, briefly open the shower control to release residual pressure, and confirm whether the water stops or only slows. A short drip from the showerhead or spout that fades after the valve is closed can be residual water; a drip or stream that continues points toward a valve cartridge, seal, diverter, or another pressurized connection. Water around the handle or escutcheon while the shower runs can come from the cartridge area, while water behind the trim, from the wall, or on the ceiling below indicates a concealed valve or pipe leak. Keep the shutoff closed for a continuing or hidden leak, avoid removing trim or opening the wall, and arrange qualified plumbing service. Reopen the stop only for one cautious verification after the visible problem is repaired or a professional has directed the test.
Before you begin
Safety first
- This article covers closing an accessible shutoff, drying and observing visible areas, identifying the valve, and one controlled verification after a repair or professional direction. It does not authorize pressurized disassembly, cartridge or diverter removal, wall access, supply fitting work, or concealed leak repair.
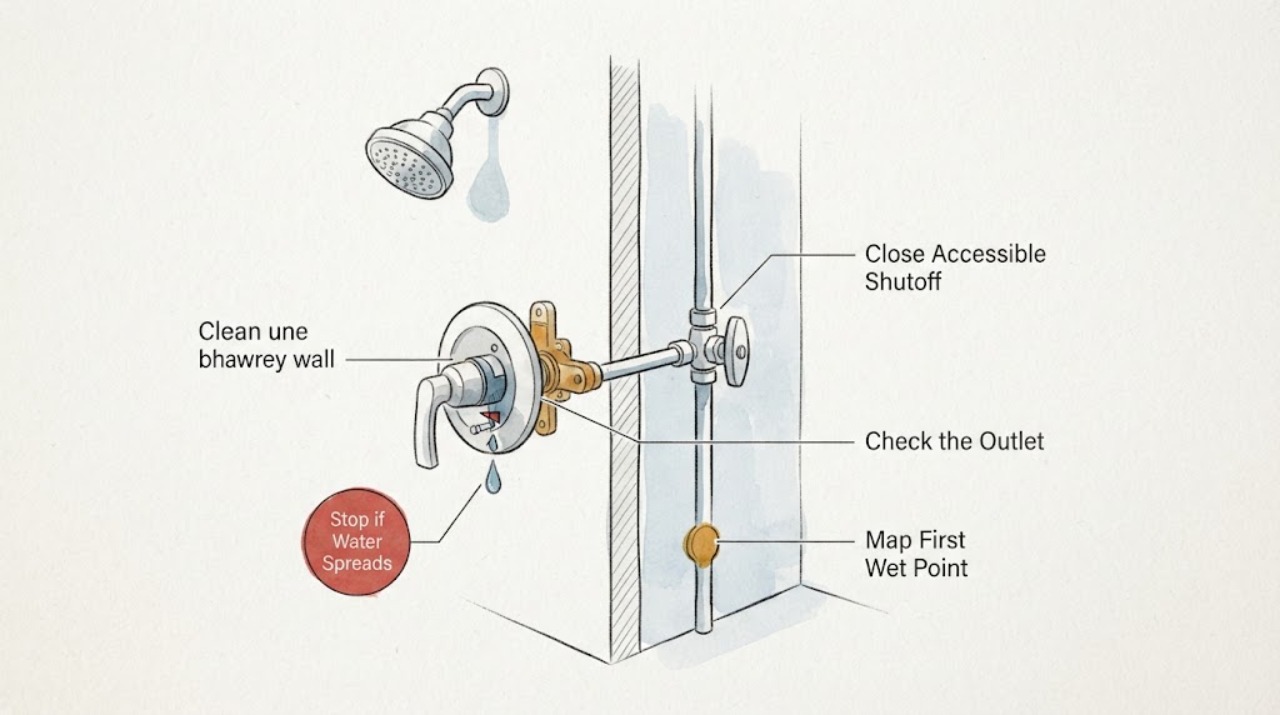
Work through in order
Diagnostic checks
Use only checks that match the exact appliance or system and its official guide.
-
Check 1
Close the accessible shower supply shutoff or the designated house water shutoff gently, then briefly open the shower control to relieve remaining pressure before closing it again; do not force a stuck valve or remove any fitting.
Expected result: Watch whether the leak stops, slows to residual drips, or continues as a steady flow after the shutoff is closed. Note whether the stop handle itself leaks or cannot be turned fully.
Next step: Leave the shutoff closed for a continuing leak, contain accessible water, and arrange plumbing service. If flow stops, dry the shower and continue with location and timing checks without reopening the supply yet.
Stop if: Stop for a stuck or damaged shutoff, rapid flow, water entering the wall or ceiling, or any need to loosen a pressurized connection.
Why this matters
Why: A stopped or quickly fading drip indicates that the shutoff is isolating the shower and the remaining water may be residual. A continuing stream suggests a failed or incomplete shutoff, another water source, or a leak on the supply side; it is not safe to proceed with trim or cartridge work.
-
Check 2
With the shower supply isolated, dry the showerhead, spout, handle, escutcheon, tub or shower surface, and any accessible area below or beside the valve; use separate dry tissues or towels to identify the first area that becomes wet without removing trim.
Expected result: Classify the wet point as showerhead or spout outlet, handle or escutcheon, exposed supply or valve connection, wall or ceiling below, or an uncertain path. Record whether the wetness is only leftover water or keeps returning while the shutoff remains closed.
Next step: Use the first-wet location and leak timing to choose a branch below. Keep the shutoff closed whenever water returns without a new test or when the wall, ceiling, or cabinet is involved.
Stop if: Do not pry the escutcheon, drill the wall, remove tile, or use a moisture path as permission to open concealed plumbing.
Why this matters
Why: An outlet that only drips briefly supports residual water. Wetness at the handle or escutcheon points toward cartridge, seal, or retaining hardware; wetness behind trim or below the wall makes a concealed valve or pipe leak more likely. An uncertain path requires containment and service rather than repeated opening.
-
Check 3
If the only remaining water is at the showerhead or tub spout and the supply is isolated, observe the outlet without reopening the valve; do not shake, unscrew, or clean the showerhead as a way to force the water out.
Expected result: Record whether the drip fades and stops, continues steadily, or is accompanied by water at the handle, trim, wall, or ceiling below. If a tub spout and showerhead are both installed, note whether water appears from the unintended outlet during a prior use.
Next step: For a brief isolated drip, dry and monitor after the system remains off. For a continuing drip, unintended outlet flow, or any hidden wetness, keep the shutoff closed and arrange model-specific valve service.
Stop if: Do not remove the valve cartridge, pressure-balancing unit, diverter, or shower trim merely to stop a drip; do not reopen the supply for repeated comparison.
Why this matters
Why: A brief fading drip can be residual water held in the outlet or riser. A continuing drip with the supply isolated is less consistent with simple residual water and may indicate an internal valve seal or cartridge; unintended flow from another outlet can involve a diverter or installation condition.
-
Check 4
After the visible area is dry and the water remains isolated, inspect the handle, escutcheon perimeter, and any accessible cartridge or retaining-nut area only from the outside; identify the valve brand or model from safe markings or documentation.
Expected result: Note whether water previously appeared only while the shower was running, whether it seeped from the handle or escutcheon with the control off, whether seals or trim are visibly damaged, and whether the valve identity is known.
Next step: Use the model documentation to determine whether a qualified or specifically permitted service procedure applies; otherwise leave the shutoff closed and give the valve identity and leak timing to a plumber.
Stop if: Do not remove the handle, escutcheon, retaining nut, cartridge, or pressure-balancing parts without the shutoff confirmed and exact model procedure; stop for corrosion, stuck hardware, or water behind trim.
Why this matters
Why: A leak only during operation can be associated with a seal or retaining area under flow; a leak that continues with the handle off makes the cartridge or internal valve component more likely. A leak behind the escutcheon or an unknown valve model prevents a safe generic repair choice.
-
Check 5
Reopen the accessible shutoff only after a visible repair or professional instruction, and do so slowly while watching the exposed shower outlet, handle, trim, shutoff, and any accessible connection; do not run a full shower to prove a hidden repair.
Expected result: Record no leak, an immediate drip or stream at the repaired area, water behind trim, a wet shutoff, or a leak that returns only when the control is operated. Stop the supply again if any new water appears.
Next step: Close the shutoff again for any leak or hidden wetness and arrange qualified service. If the check stays dry, monitor the area after use and retain the model and repair information for future service.
Stop if: Do not increase pressure, overtighten a fitting, run the shower over a suspected hidden leak, or keep testing after water reaches the wall, ceiling, or floor structure.
Why this matters
Why: A dry, stable connection during a short controlled check supports a successful visible repair, but it does not clear concealed plumbing. Immediate wetness indicates an incomplete seal, wrong component, or continuing valve or supply fault.
Use your observations
Decision map
Find the observation that best matches what you see, then follow the next safe action.
-
PATH 01Safety boundary
What you see
The shutoff isolates the shower, only the showerhead or spout drips, and the drip fades and stops with no wet handle, trim, wall, or ceiling.
Do this next
Leave the valve off, dry the outlet, and monitor. If the drip becomes continuous, returns after the residual water should have cleared, or appears elsewhere, keep the shutoff closed and arrange valve service.
Why this path and its safety boundary
Why it matters: Residual water in the outlet or riser is more likely than a continuously supplied valve leak.
Safety stop: Do not reopen the valve repeatedly or remove the showerhead to force a diagnosis.
-
PATH 02Safety boundary
What you see
The supply shutoff isolates the shower but a steady drip or flow continues from the showerhead or spout after the handle is off and residual water has been excluded.
Do this next
Keep the shutoff closed, identify the valve model and handle configuration, and arrange model-specific cartridge or valve service.
Why this path and its safety boundary
Why it matters: An internal cartridge, mixer cap, pressure-balancing component, or other valve seal is more likely than a simple outlet residue.
Safety stop: Do not remove internal valve parts, use generic seals, or reopen the supply to see whether the leak worsens.
-
PATH 03Safety boundary
What you see
The outlet may be dry, but water appears around the handle or escutcheon during use or returns from behind the trim after the supply is opened.
Do this next
Keep the shutoff closed, document the model and first-wet point, and follow only the exact manufacturer procedure or arrange a plumber for valve and seal diagnosis.
Why this path and its safety boundary
Why it matters: A cartridge seal, retaining nut, O-ring, valve installation issue, or concealed connection may be involved; the trim surface is not proof of the exact source.
Safety stop: Do not pry trim, loosen a retaining nut, or reopen a wall when water is entering the structure.
-
PATH 04Safety boundary
What you see
Water appears behind the escutcheon, through the wall, below the shower, or on a ceiling or floor; the accessible shutoff stops or reduces it.
Do this next
Leave the shutoff closed, protect the area from further water, and arrange prompt qualified plumbing inspection. Do not use the shower until the leak path is repaired and verified.
Why this path and its safety boundary
Why it matters: A concealed valve, pipe, drain, or body connection may be leaking and could damage the building even when the visible shower outlet looks normal.
Safety stop: Do not remove wall finishes, run a larger test, or rely on caulk around the escutcheon to contain a concealed leak.
-
PATH 05Safety boundary
What you see
Water continues as a steady flow after the accessible shutoff is closed, the shutoff itself leaks, or the handle cannot be turned safely.
Do this next
Use the designated whole-house shutoff only if it is safely known and operable; otherwise contact emergency or qualified plumbing help and keep clear of the leak.
Why this path and its safety boundary
Why it matters: The shower may still be pressurized, the wrong stop may have been closed, or the stop or supply line may have failed. Opening trim or a valve under these conditions can release uncontrolled water.
Safety stop: Do not force, disassemble, or bypass the shutoff, and do not loosen any shower fitting while water continues.
-
PATH 06Safety boundary
What you see
A tub spout and showerhead are both present and water appears from the unintended outlet during use, or the leak changes with the diverter position.
Do this next
Keep the shutoff closed for ongoing leakage, document which outlet flows in each control position, and arrange manufacturer-specific or qualified valve and diverter diagnosis.
Why this path and its safety boundary
Why it matters: A diverter, valve outlet, restriction, or installation condition may be causing back-pressure or cross-flow; this is not established as a cartridge-only leak.
Safety stop: Do not block an outlet, drill a diverter, or continue operating the shower to balance the flow.
Helpful context
Understand the symptom
Make the accessible shutoff do the safety work
A local stop or main shutoff is useful because it lets you control a leak before investigating. Close it gently according to its design; do not force a stuck handle or assume a partially closed stop is isolating the shower. Once flow is controlled, dry the area and separate residual water at the showerhead from water that is still entering the valve or a concealed space.
The first wet point matters more than the largest puddle
Water can travel from the handle or escutcheon and appear at the floor, tub, or ceiling below. Check the showerhead, tub spout if present, handle, trim perimeter, accessible supply connections, and the area beneath the valve without removing the wall covering. The location that wets first, and whether it changes when the shutoff is closed, narrows the likely repair path.
Shower cartridges and seals are model-specific
Manufacturers use different cartridges, pressure-balancing units, O-rings, retaining nuts, and valve bodies. A continuous drip with the handle off may need a cartridge or internal seal, while a leak behind the wall may be an installation or valve-body problem. Identify the valve and use its instructions; do not order a part from the handle appearance alone.
Safety boundary
Stop conditions
- Close the accessible shutoff and stop use for a continuing stream, water behind the wall, a wet ceiling or floor below, structural swelling, or a leak that the stop does not isolate.
- Do not loosen fittings, remove a cartridge or pressure-balancing part, pry trim, open a wall, or alter a diverter while the shower is pressurized or the valve model is unknown.
- Do not force a stuck shutoff, use caulk as a repair for a concealed leak, or reopen the supply repeatedly to compare leak rates.
- Do not order a cartridge, seal, or valve body from handle appearance alone; confirm the exact valve and installation configuration first.
- Arrange qualified plumbing service for any leak behind trim, a failed shutoff, persistent outlet drip, damaged valve body, inaccessible connection, or water damage.
Only after diagnosis
Potential parts
- shower valve cartridge or mixer component
Consider this category only when a qualified diagnosis confirms a continuous outlet leak or valve leak after residual water is excluded and the exact valve model is identified.
Confirm the valve series, handle configuration, cartridge or mixer design, and manufacturer fit information; do not substitute a visually similar cartridge. - shower valve seal or O-ring kit
Consider this category only when the identified valve procedure confirms a damaged or displaced seal at the first-wet handle, escutcheon, or valve-body location.
Match the exact valve, seal location, material, and installation procedure; do not add generic sealant to compensate for a missing or wrong seal. - shower diverter or valve-body component
Consider this category only when unintended outlet flow, a concealed valve-body leak, or a qualified inspection confirms the diverter or body component as the cause.
Confirm the exact valve and outlet arrangement, access method, and waterproofing requirements with the manufacturer or qualified plumber before replacement. - shower supply shutoff valve
Consider this category only when the accessible stop itself leaks, fails to isolate the shower, or is confirmed by a qualified person as the failed component.
Confirm the pipe connection, valve location, system isolation, and applicable plumbing requirements; do not force or disassemble a pressurized stop.
When checks do not resolve it
Need a professional?
Arrange qualified plumbing service promptly when the leak continues after the accessible shutoff is closed, the shutoff itself leaks or will not operate, water appears behind the wall or below the shower, an outlet drips continuously after residual water is excluded, the valve model or internal parts are unknown, or any repair would require trim, wall, cartridge, pressure-balancing, diverter, or supply-connection work. Stop using the shower until the leak is controlled.
Safety scope: This article covers closing an accessible shutoff, drying and observing visible areas, identifying the valve, and one controlled verification after a repair or professional direction. It does not authorize pressurized disassembly, cartridge or diverter removal, wall access, supply fitting work, or concealed leak repair.
Common questions
FAQ
What should I do first if my shower is leaking and the shutoff is accessible?
Close the accessible shower supply shutoff gently, relieve only residual pressure through the control, and confirm whether the leak stops. Keep it closed for a continuing leak, water behind the wall, or a failed stop; do not begin cartridge work while the shower remains pressurized.
How can I tell residual showerhead dripping from a valve leak?
With the supply isolated, a small drip from the showerhead or spout that fades and stops is more consistent with residual water. A steady or recurring drip, or water at the handle, trim, wall, or ceiling, needs valve or plumbing diagnosis.
Why does water leak around the shower handle or escutcheon?
The cartridge seal, retaining area, O-ring, valve installation, or a concealed connection may be involved. Dry the trim, document the first-wet point and timing, and use the exact valve instructions or qualified service rather than assuming the escutcheon itself is the source.
Can I replace the shower cartridge myself after shutting off the water?
The shutoff is necessary but not sufficient. Cartridge and pressure-balancing arrangements vary by valve series, and trim or retaining hardware can be stuck or conceal a leak. Proceed only under the exact model procedure if it is within your experience; otherwise use a qualified plumber.
What if the shower keeps leaking after I close the accessible shutoff?
Do not remove trim or loosen fittings. The wrong stop, a failed stop, a supply-side leak, or another water source may be involved. Use the designated whole-house shutoff only if safely known and operable, and get qualified plumbing help for a continuing flow.
When should a shower leak be treated as urgent plumbing service?
Keep the shutoff closed and arrange prompt service for water behind the wall, below the shower, or on a ceiling, a leak the stop does not isolate, a damaged valve body, a continuous outlet drip, an inaccessible connection, or any repair requiring wall or pressurized valve access.
Read the exact guide
Official sources
- Shower Faucet: Leaking-M-Core 4 Series ValveMoen Solutions · Moen M-Core 4 Series guidance; it is not a generic procedure for another shower valve or installation.
- Rite-Temp Valve Dripping from Showerhead or SpoutKohler Assist · Kohler Rite-Temp single-control valve guidance; other valves and shower configurations can differ.
- Shower Faucet: Leaking-M-Core ValveMoen Solutions · Moen M-Core shower valve troubleshooting; other valve families and models use different components and procedures.
- What do I do about water dripping from the spout of my two-handle (or three-handle) tub/shower faucet?Delta Faucet · Delta multi-handle tub and shower faucet guidance; single-control and other valve designs require their own instructions.
Community feedback
Share a repair observation
Share a plain-text repair observation. Accepted observations are published automatically; this page may take a moment to update.