
On this page
Start here
Quick answer
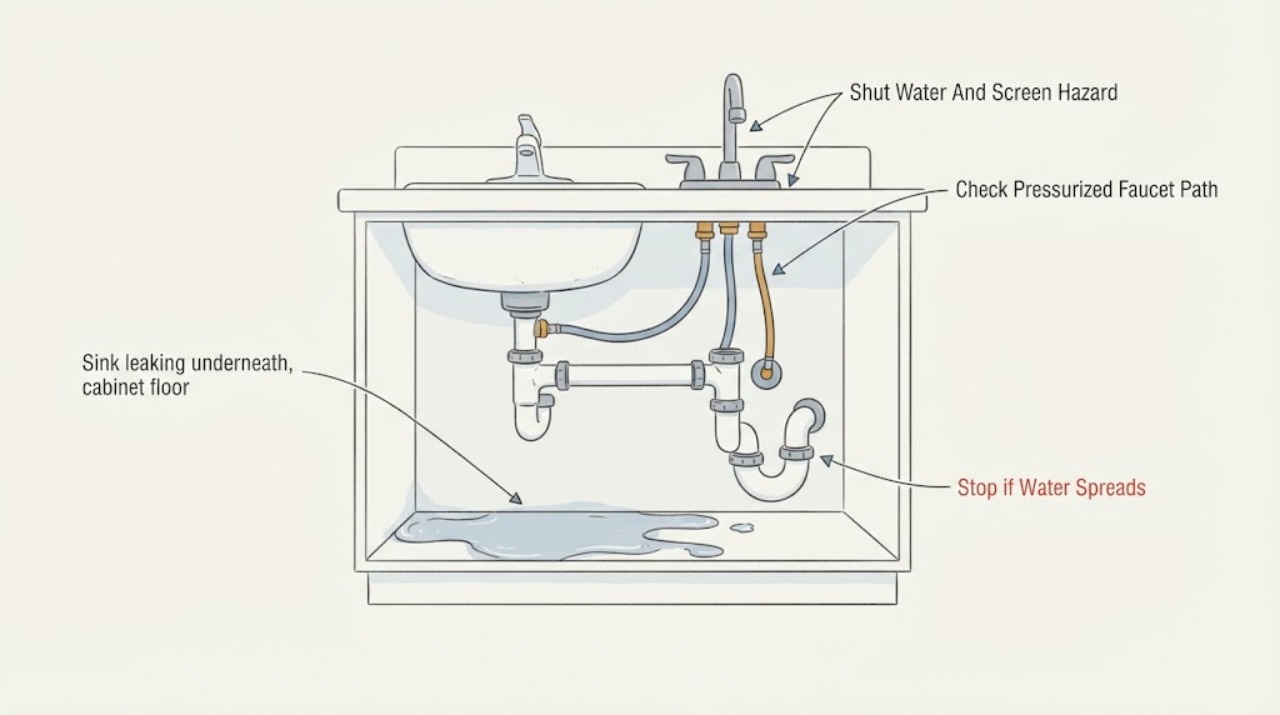
Remove items from under the sink, close the hot and cold stop valves, and dry the cabinet floor and every visible connection. Do not run a garbage disposal or touch a wet electrical outlet. Use separate dry paper towels to trace the first wet point at the faucet supply hoses and shutoffs, faucet base, sink drain flange, tailpiece or trap, dishwasher hose, and disposal connections. A leak while the faucet is unused points to a pressurized supply or faucet connection; a leak only while water drains points to the sink flange, drain, trap, disposal, or dishwasher connection. If the first wet point is behind a wall, in a valve body, at a damaged hose, or near electrical equipment, keep the water off and call a qualified plumber or electrician. Repair cabinet damage only after the water source is stopped.
Before you begin
Safety first
- This article covers closing accessible water stops, drying and tracing visible plumbing, and a small controlled sink drain test when the area is dry and appliances are off. It does not authorize wet electrical handling, disposal access, pressurized hose disassembly, wall or cabinet cutting, appliance removal, or concealed plumbing repair.
Work through in order
Diagnostic checks
Use only checks that match the exact appliance or system and its official guide.
-
Check 1
Remove stored items, close both accessible faucet stop valves, and place a container or towels under the plumbing. If there is water near a disposal cord, outlet, appliance wiring, or a hot or damaged electrical component, do not touch it; leave electrical isolation to a qualified person.
Expected result: Record whether the flow stops after the stop valves close, whether water is a slow drip or spray, how far the cabinet floor is wet, and whether any electrical equipment or outlet is wet.
Next step: Keep the stops closed and arrange urgent plumbing or electrical help for a spray, unclosable valve, wet electrical equipment, or unsafe access. If the cabinet is dry enough to work safely, continue with a paper-towel trace.
Stop if: Do not touch wet electrical parts, run the disposal, repeatedly open a leaking stop, or work in standing water.
Why this matters
Why: A leak that stops when the stops close is on the faucet supply side or residual fixture path; continued flow can be stored water, a valve that is not shutting, or another supply. Water near electrical equipment changes this from a routine plumbing trace to a safety boundary.
-
Check 2
With water isolated, wipe the faucet supply hoses and stop valves, faucet shank or base, sink drain flange, tailpiece, trap, disposal mounting and discharge connections, and dishwasher hose connection completely dry. Use separate paper towels at each joint.
Expected result: Identify the first wet towel at a hot or cold supply, stop valve, faucet base or hose, drain flange, tailpiece or trap, disposal, dishwasher hose, cabinet wall, or nowhere visible.
Next step: Photograph the first wet point and choose the matching branch below. Do not disconnect hoses or loosen a drain nut merely to prove the source.
Stop if: Do not use a heat source to dry the cabinet, probe seals with a sharp tool, or pressurize a visibly cracked hose.
Why this matters
Why: The first wet point is more reliable than the wettest section of floor. A supply or faucet-base leak is pressurized; a drain, disposal, or dishwasher connection usually depends on water use. A dry visible assembly with a wet wall or floor indicates a concealed or adjacent leak.
-
Check 3
Only when the cabinet, outlet, and visible plumbing are dry, open one stop valve slightly and observe the dry paper towels with the faucet off. If the connection is an accessible quick-connect or threaded fitting, verify only that it is seated as the exact faucet instructions show; do not overtighten.
Expected result: Record a leak with the faucet unused, a wet stop valve, a wet faucet supply hose or quick-connect, water at the faucet shank or base, or no wetness until the faucet is operated.
Next step: Close the stops again for any leak, damaged hose, loose valve body, or leak at the faucet base and arrange model-specific plumbing service. If the pressurized path stays dry, proceed to a controlled drain test.
Stop if: Do not force a stop valve, overtighten a fitting, disassemble the faucet under pressure, or continue if water reaches an outlet or appliance cord.
Why this matters
Why: A leak while the faucet is off points to a continuously pressurized stop, supply hose, faucet connection, valve, or seal. A leak only when the faucet is used points toward the faucet body, spray hose, or a connection that moves under flow.
-
Check 4
With the disposal off and the cabinet area dry, place a container under the drain assembly and add a small amount of water to the sink, then release it while watching the dry towels. If a disposal or dishwasher is connected, do not run the appliance; inspect its accessible flange, tailpipe, and hose connections during the drain event.
Expected result: Record water at the sink flange, drain gasket, tailpiece, trap joint, disposal mounting or discharge, dishwasher hose or air-gap connection, or no leak during sink drainage.
Next step: Stop the drain test for a spray, fast drip, or cabinet-floor overflow. Keep the disposal and dishwasher off and arrange plumbing service for a wet flange, trap, disposal, dishwasher hose, or inaccessible drain connection.
Stop if: Do not put hands into a disposal, energize a wet disposal, remove the trap over electrical equipment, or loosen drain connections while water is flowing.
Why this matters
Why: A leak that appears only while the sink drains is a drain-side seal or connection problem, not usually a faucet supply problem. InSinkErator identifies sink flange, dishwasher, tailpipe, and mounting connections as leak-test points; a dry drain path shifts attention back to the faucet or a concealed source.
-
Check 5
Dry the cabinet floor and adjacent wall, then inspect from the cabinet opening for swelling, discoloration, a wet back wall, or water entering from the countertop, dishwasher side, or neighboring plumbing. Check only the sink drain flange and accessible faucet base from below; do not remove the sink, countertop, wall, or cabinet floor.
Expected result: Record a sound but wet cabinet floor, softened or swollen particleboard, water entering from outside the cabinet, a wet wall with dry plumbing, or a recurring leak whose first point cannot be seen.
Next step: Keep all sink water use to a minimum and arrange a plumber for a hidden or adjacent leak. Document the cabinet damage after drying and repair or replace damaged materials only after the plumbing is verified dry.
Stop if: Do not cut the cabinet or wall, remove the sink, drill for inspection, apply sealant over an active leak, or conceal wet wood before the source is repaired.
Why this matters
Why: Cabinet damage is a consequence until the source is stopped. Water entering from the wall, countertop, adjacent dishwasher, or a hidden pipe is outside a safe under-sink adjustment; a dry visible assembly with recurring wetness needs controlled professional tracing.
Use your observations
Decision map
Find the observation that best matches what you see, then follow the next safe action.
-
PATH 01Safety boundary
What you see
The cabinet becomes wet while the faucet is unused, and the first wet point is a stop valve, supply hose, faucet shank, or faucet base.
Do this next
Close both stops, photograph the wet connection, and arrange plumbing service for a damaged hose, stop valve, faucet supply, base seal, or valve body. Reopen water only after the connection is repaired and checked.
Why this path and its safety boundary
Why it matters: This is a pressurized supply or faucet-connection branch. Moen distinguishes steady leaks at household shutoffs and supply lines from intermittent leaks that occur when the faucet is used; the puddle location does not identify which fitting failed.
Safety stop: Do not overtighten a compression or quick-connect fitting, disassemble a pressurized faucet, or leave a continuous leak running into the cabinet.
-
PATH 02Safety boundary
What you see
Supply connections stay dry with the faucet off, but water appears at the faucet base, spray hose, or under-counter connection only while the faucet or sprayer is used.
Do this next
Stop using the faucet, close the stops, and arrange model-specific plumbing service. Provide the timing and the first wet point; do not remove the faucet or hose while pressurized.
Why this path and its safety boundary
Why it matters: Flow-dependent faucet seals, hose connections, quick-connects, or the faucet body are more likely than the household stop valve. A faucet can send water down the shank and make the cabinet floor look like a drain leak.
Safety stop: Do not keep cycling the sprayer, pull a quick-connect apart under pressure, or seal over a faucet-base leak with caulk.
-
PATH 03Safety boundary
What you see
The supply path stays dry, but water appears at the sink flange, drain gasket, tailpiece, trap joint, or stopper linkage only while the sink drains.
Do this next
Stop using the sink, place a container under the drain, and arrange plumbing service for the identified flange, gasket, tailpiece, or trap connection. Keep the drain area accessible and photograph the first wet joint.
Why this path and its safety boundary
Why it matters: The leak is on the drain side. A flange seal, drain connection, or trap joint can pass water directly onto the cabinet floor; the faucet and stop valves are not the first repair target.
Safety stop: Do not loosen a trap over stored items or electrical equipment, use chemical drain cleaner to address a leak, or continue draining a fast leak into swollen cabinetry.
-
PATH 04Safety boundary
What you see
Water appears during draining or appliance use at the disposal mounting or discharge, dishwasher hose or air-gap connection, or tailpipe while faucet supply joints stay dry.
Do this next
Turn off and unplug the disposal only if the plug and outlet are dry and safely reachable; otherwise leave it alone. Keep the disposal and dishwasher off and arrange plumbing or appliance service for the specific connection.
Why this path and its safety boundary
Why it matters: The appliance-to-sink drain path is more likely than the faucet or stop valve. InSinkErator lists the sink flange, dishwasher, tailpipe, and mounting assembly as separate leak-test points.
Safety stop: Do not put hands into a disposal, energize wet equipment, remove its mounting assembly, or continue an appliance cycle to reproduce the leak.
-
PATH 05Safety boundary
What you see
All visible faucet and drain joints remain dry, but the cabinet floor or back wall becomes wet, or the floor is swollen or discolored.
Do this next
Keep the sink and nearby appliances out of use, close accessible stops, and arrange professional leak tracing. Document the wet path and dry the cabinet after the water source is isolated.
Why this path and its safety boundary
Why it matters: The water may be entering from a wall pipe, countertop or sink edge, adjacent dishwasher, cabinet penetration, or another concealed path. Cabinet damage is evidence of duration or volume, not the source.
Safety stop: Do not cut open the wall or cabinet, apply caulk over the wet area, or restore normal water use before the hidden path is verified.
-
PATH 06Safety boundary
What you see
Water sprays or will not stop, a stop valve cannot close, water reaches an outlet or appliance wiring, or the leak cannot be reached without moving wet equipment.
Do this next
Leave wet electrical equipment untouched, close the main water supply if that is the only safe way to stop flow, and arrange urgent plumbing and electrical help. Use emergency help for active electrical or fire danger.
Why this path and its safety boundary
Why it matters: This is an urgent water-damage and electrical-safety branch. Further testing can increase flooding or expose energized parts.
Safety stop: Do not touch a wet outlet or plug, reset a wet circuit, move a disposal through water, or remain in the cabinet to locate the valve.
Helpful context
Understand the symptom
The puddle is not necessarily the source
Water can run along the underside of a sink, drain pipe, hose, or cabinet floor before dripping. Dry the area and trace the first wet point. A faucet supply or stop valve can leak even when the sink is unused; a drain flange, trap, disposal tailpipe, or dishwasher connection generally becomes wet when water is put into or drained from the sink.
Use timing as a diagnostic branch
Watch whether the cabinet gets wet continuously, immediately after turning on the faucet, only while the sink drains, or after the dishwasher or disposal operates. Faucet and supply connections are pressurized; drain connections are tested by sending water through the sink. This timing prevents replacing a faucet when a drain flange or hose is the actual source.
Protect the cabinet and electrical equipment
Standing water can swell a cabinet floor and can reach a disposal cord, outlet, or appliance wiring. Keep the water isolated and remove only accessible water. Do not reach into an outlet area, energize a wet disposal, or remove a disposal or drain assembly to investigate an active leak; use qualified service when access is unsafe.
Safety boundary
Stop conditions
- Close the faucet stops and arrange urgent plumbing or electrical help for a spray, uncontrolled flow, an unclosable stop valve, water near an outlet or appliance wiring, or a hot or damaged electrical component.
- Do not run or reach into a garbage disposal when the cabinet or outlet is wet, and do not remove appliance or drain components to chase an active leak.
- Do not overtighten supply or drain fittings, disconnect pressurized hoses, use chemical drain cleaner, or seal over a leak before its first wet point is identified.
- Do not cut the cabinet or wall, remove the sink or countertop, or conceal swollen cabinet material until the plumbing source is repaired and verified dry.
- Keep the sink and connected appliances out of use and arrange service when visible connections are dry but the cabinet floor continues to wet or the source is behind a wall or panel.
Only after diagnosis
Potential parts
- faucet supply hose or stop-valve connection
Consider this only when the first wet point is a cracked supply hose, leaking stop valve, loose connection, or faucet inlet connection while the sink is not draining.
Confirm hot/cold routing, connection type, hose length, valve configuration, and local plumbing requirements before replacement. - faucet base seal or faucet hose connection
Consider this only when the supply path is dry but water appears at the faucet base, shank, spray hose, or quick-connect during faucet use.
Identify the exact faucet model and connection style; do not assume seals or hoses from another faucet fit. - sink drain flange or drain seal
Consider this only when the first wet point is the sink flange or drain seal during a controlled sink drain test and faucet supply joints stay dry.
Match sink opening, drain assembly, gasket or seal material, and sink-surface requirements; a professional may be needed for flange removal. - sink trap or tailpiece connection
Consider this only when a trap, tailpiece, or drain-joint leak is confirmed during drainage and the connection cannot be safely reseated under the applicable plumbing instructions.
Confirm drain diameter, configuration, material, slip-joint or glued connection, and required clearances before replacement. - garbage-disposal mounting or dishwasher drain connection
Consider this only when water appears at a disposal mounting, discharge, tailpipe, dishwasher hose, or air-gap connection during drainage or appliance use.
Match the disposal or dishwasher model, sink flange, hose diameter, clamp, and installation instructions; electrical isolation is required before disposal work.
When checks do not resolve it
Need a professional?
Arrange qualified plumbing service for a leaking supply hose, stop valve, faucet base, drain flange, trap, disposal, dishwasher connection, hidden pipe, or any leak that returns after a safe external check. Arrange urgent plumbing and electrical help for spray or uncontrolled flow, a valve that will not close, water near an outlet or appliance wiring, a wet or damaged cord, or unsafe access. Repair swollen or discolored cabinetry only after the water source is confirmed stopped.
Safety scope: This article covers closing accessible water stops, drying and tracing visible plumbing, and a small controlled sink drain test when the area is dry and appliances are off. It does not authorize wet electrical handling, disposal access, pressurized hose disassembly, wall or cabinet cutting, appliance removal, or concealed plumbing repair.
Common questions
FAQ
How do I find where a sink is leaking underneath the cabinet?
Close the hot and cold stops, dry every visible joint, and place separate dry paper towels at the faucet supplies, faucet base, drain flange, trap, disposal, and dishwasher hose. The first towel to become wet, and whether it happens with the faucet off or while draining, is more useful than the puddle location.
Why does the cabinet floor get wet only when I use the sink?
A leak only during faucet use can come from the faucet base, spray hose, or a connection that moves under flow. A leak only while the sink drains points more toward the sink flange, tailpiece, trap, disposal, or dishwasher connection. Test one event at a time with the cabinet dry and the disposal off.
Can a loose faucet supply connection leak continuously under the sink?
Yes. A stop valve, house supply line, faucet supply hose, or quick-connect can leak while the faucet is unused because that path remains pressurized. Close the stops, avoid overtightening, and arrange plumbing service for a damaged hose, valve, or connection.
How can I tell if the sink drain flange or trap is leaking?
Keep the supply path dry, add a small amount of water to the sink, and release it while watching paper towels below. Water appearing at the flange, tailpiece, or trap only during drainage identifies a drain-side path; stop the test for a fast leak and arrange plumbing service.
What should I do if a garbage disposal or dishwasher connection is leaking?
Keep the disposal and dishwasher off. If the disposal plug and outlet are dry and safely reachable, disconnect power; otherwise do not touch wet equipment. Arrange service for the sink flange, disposal mounting or tailpipe, dishwasher hose, or air-gap connection identified by the leak trace.
When is a wet cabinet floor an emergency?
Treat spray or uncontrolled flow, an unclosable stop valve, water near an outlet or appliance wiring, a wet or damaged cord, or unsafe access as urgent. Leave wet electrical equipment untouched, isolate water only if safe, and arrange plumbing or electrical help before continuing.
Read the exact guide
Official sources
- How to fix a refrigerator that is leaking waterWhirlpool · Whirlpool appliance guidance used only for general water-leak containment and source-tracing safety in a wet cabinet; sink plumbing rules vary.
- Kitchen Faucet: Leaking Under The Sink BaseMoen Solutions · Moen kitchen-faucet guidance used for general leak-timing logic; fixture connection details vary by faucet model.
- Check for Leaks/OperationInSinkErator · Official InSinkErator installation manual; the test points apply to a sink with a disposal, while exact assembly varies by model.
- Widespread Faucet - Quick Connect Supply TeeKohler Assist · Kohler widespread-faucet connection guidance used for the general principle that quick-connects must be seated and sealed; exact kitchen faucet connectors vary.
- Why doesn't my pop-up sink stopper stop the water from draining?Delta Faucet · Delta pop-up drain guidance; the flange and stopper design differs by sink, but the drain-versus-supply distinction is transferable.
- Leaking Under the Handle | Kitchen FaucetsKohler Assist · Kohler kitchen-faucet guidance used to distinguish faucet-body leaks from supply and drain leaks; exact faucet model controls the repair.
- My two-handle widespread lavatory faucet is dripping underneath the counter. How can I fix it?Delta Faucet · Delta faucet support guidance used for general under-counter connection principles; kitchen and bathroom configurations vary.
- Installing a Replacement Garbage DisposalInSinkErator Support · Official InSinkErator disposal installation guidance; only applicable when a disposal is installed under the sink.
Community feedback
Share a repair observation
Share a plain-text repair observation. Accepted observations are published automatically; this page may take a moment to update.