
On this page
Start here
Quick answer
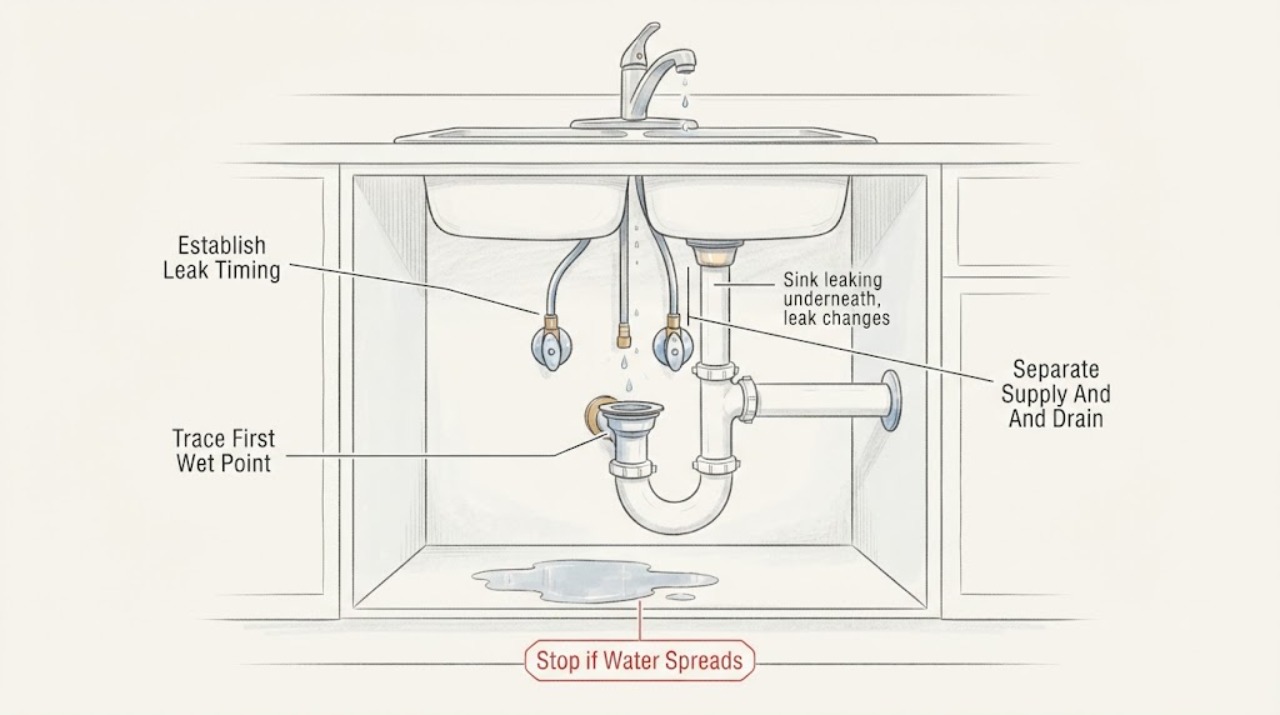
A leak under a sink that changes when the faucet runs is usually separated by timing and location. Dry the cabinet, place paper towels under the faucet supply connections, shut-off valves, drain flange, trap, and nearby dishwasher or disposal connections, then run a small amount of water while watching from a safe position. Water that appears only while the faucet is on or just after it stops points toward a pressurized faucet hose or a drain connection; water that continues with the faucet off points more toward a shut-off valve, supply line, or stored leak. If water runs into the cabinet, the source is near electrical equipment, a hose is split, a valve will not close, or the cabinet is swelling, stop using the sink and shut off the affected supplies if they operate normally. Do not overtighten fittings, disconnect a pressurized line, use a disposal, or open a wall or ceiling.
Work through in order
Diagnostic checks
Use only checks that match the exact appliance or system and its official guide.
-
Check 1
Dry the cabinet and observe from a safe position with the faucet off, then open it briefly and close it; record whether the first moisture appears while filling, after shutoff, during draining, or with no use.
Expected result: Record a leak only during faucet use, only while the basin drains, a continuous leak with the faucet off, or no new moisture during one controlled test.
Next step: Repeat only once with a dry towel at likely joints, then inspect the first wet point. Stop using the sink if water reaches the cabinet floor or electrical equipment.
Stop if: Stop for a fast stream, a split hose, a valve that will not close, water near electrical equipment, cabinet swelling, or a ceiling or wall stain below the sink.
Why this matters
Why: Use-related timing favors a faucet hose or drain path; drain-only timing favors the drain assembly; a continuous leak favors a valve or supply line. No new moisture means the source may be intermittent or elsewhere.
-
Check 2
Place dry paper towels separately beneath the faucet supply connections, shut-off valves, drain flange, trap joints, and any dishwasher or disposal connection, then run a small amount of water while watching the towels.
Expected result: Record the first towel to dampen, water tracking from above, water appearing only after the drain flows, or water arriving from a hose or valve that stays wet with the faucet off.
Next step: Photograph or mark the first wet point and stop the test. Arrange plumbing service if the point is not a simple, hand-accessible user connection identified by the manual.
Stop if: Do not put hands into a disposal, disconnect a hose, reach behind electrical equipment, or loosen a fitting to see whether it leaks.
Why this matters
Why: The first wet point is more useful than the puddle location. A supply or faucet connection is pressurized, while a drain or trap normally shows water when the basin empties.
-
Check 3
With towels in place, fill the basin slightly without using the faucet again, wait briefly, and then release the water while observing the drain flange and trap from a safe position.
Expected result: Record moisture while the basin is full, moisture only as water drains, no moisture at the drain but a wet faucet hose, or a leak that continues after the basin is empty.
Next step: Leave the drain area dry and the sink unused if the leak returns. Request plumbing service for a flange, trap, concealed drain, or persistent supply leak rather than applying sealant over the wet area.
Stop if: Do not remove the drain flange, disassemble a trap containing unknown water, or use the sink if the cabinet is flooding.
Why this matters
Why: A flange or basin seal can leak while water is held or drained; a trap joint often shows during discharge. A leak unrelated to basin water points back toward a supply or valve.
-
Check 4
From a dry position, look at the shut-off valve body and handle, the supply line, and the faucet connection for a split, corrosion, bulge, or moisture that remains when the faucet is untouched; operate a valve only if it turns normally and does not require force.
Expected result: Record a dry valve and line, a steady drip at the valve or supply line, a damaged or bulging hose, a valve that will not close, or a connection that leaks only when the faucet is used.
Next step: If the valve operates normally, close it to stop a controllable leak and leave the faucet off. If it will not close or the line is damaged, stop using the sink and call a plumber; do not force the handle.
Stop if: Do not disconnect a pressurized hose, overtighten a nut, use pliers on a stuck valve, or continue if water sprays or the valve body moves.
Why this matters
Why: Moen distinguishes steady valve or supply leaks from intermittent faucet-connection leaks. A damaged hose or valve can worsen suddenly, and a valve that will not isolate the fixture needs prompt professional help.
-
Check 5
Look for water entering from the sink rim, overflow path, disposal, dishwasher hose, water filter, or cabinet wall while the faucet runs; keep hands and tools away from disposal blades and electrical connections.
Expected result: Record a leak at an accessory connection, water at the overflow or rim, a disposal or dishwasher hose leak, or moisture that appears to come from the wall or ceiling.
Next step: Stop using the affected fixture or appliance and arrange plumbing service. If water is near electrical equipment, keep clear and use the appropriate electrical or emergency response.
Stop if: Do not operate a disposal with water present near its electrical parts, pull appliances out, open a wall, or enter a flooded cabinet.
Why this matters
Why: A connected appliance or overflow can mimic a faucet or drain leak. Water from a wall, ceiling, or energized appliance area exceeds a simple faucet adjustment and may damage the building.
-
Check 6
Record the first wet point, whether the faucet was on or the basin was draining, the leak rate, valve response, visible hose or seal condition, sink and faucet model if safely available, and any water damage.
Expected result: Confirm that the record contains external observations only and that no supply line, drain, trap, valve, disposal, or concealed connection was disturbed.
Next step: Request plumbing service and provide the timing, photos, model information, and whether closing a normal shut-off valve stopped the leak.
Stop if: Stop all user troubleshooting when the leak requires disconnection, force, concealed access, electrical isolation, or work inside a wall or ceiling.
Why this matters
Why: Timing and location let a plumber distinguish a faucet connection from a shut-off valve, supply line, drain flange, trap, overflow, or concealed leak without unnecessary disassembly.
Use your observations
Decision map
Find the observation that best matches what you see, then follow the next safe action.
-
PATH 01Next step
What you see
The first wet point appears at a faucet hose or connection only while the faucet is on or immediately afterward, while the drain and trap stay dry.
Do this next
Stop using the faucet, close the normal hot or cold valve if it operates without force, and arrange plumbing service for model-specific connection or hose diagnosis.
Why this path and its safety boundary
Why it matters: An intermittent faucet supply or connection leak is more likely than a drain leak.
-
PATH 02Next step
What you see
The cabinet stays dry while filling, but water appears at the drain flange, trap, or drain connection as the basin empties.
Do this next
Stop using the sink if the leak reaches the cabinet floor and arrange plumbing service. Do not cover a wet flange with sealant or disassemble the trap without safe isolation and model-specific guidance.
Why this path and its safety boundary
Why it matters: A drain seal, flange, trap joint, or downstream drain connection is more likely than a pressurized faucet hose.
-
PATH 03Safety boundary
What you see
A valve, supply line, or faucet connection stays wet or drips with the faucet untouched, and the leak does not depend on basin drainage.
Do this next
Close the affected normal shut-off valve only if it turns normally; otherwise leave it alone, stop using the sink, and obtain prompt plumbing service.
Why this path and its safety boundary
Why it matters: A pressurized supply or shut-off-valve leak is more likely and can continue damaging the cabinet even when the sink is not used.
Safety stop: Do not force the valve, disconnect a line, or keep the water supply on when the hose is split or spraying.
-
PATH 04Next step
What you see
Water appears at a disposal, dishwasher or filter hose, overflow, wall, ceiling, or another connected fixture rather than at the faucet or drain joints.
Do this next
Stop using the affected fixture or appliance and request plumbing service; keep clear of electrical equipment and use emergency or electrical help if water is entering energized equipment.
Why this path and its safety boundary
Why it matters: A connected appliance, overflow path, or concealed plumbing leak may be responsible, and the visible sink puddle is not the source.
-
PATH 05Safety boundary
What you see
Water is fast-flowing, the valve will not isolate it, the cabinet is swelling or flooding, or there is water near electrical equipment.
Do this next
Stop using the sink, keep clear, close the main or accessible supply only if it can be done safely, and obtain prompt plumbing or emergency electrical help as appropriate.
Why this path and its safety boundary
Why it matters: The immediate priority is damage and shock prevention, not identifying a washer or fitting.
Safety stop: Do not enter standing water near electricity, operate a disposal, force a stuck valve, or remove a pressurized connection.
Helpful context
Understand the symptom
Timing tells you which side of the sink to inspect
Start with a dry cabinet and observe whether the first drop appears while the faucet is open, immediately after it closes, while the basin drains, or even when the sink is untouched. Moen specifically recommends recording the frequency and location of an under-sink faucet leak. A leak only during use makes a faucet hose, drain, or connection likely; a continuous wet spot makes a shut-off valve, supply line, or stored water more likely. The timing narrows the search but does not prove a failed part.
Find the first wet point, not the largest puddle
Dry the underside of the sink and set separate paper towels at the faucet supply connections, valve handles and outlets, drain flange, trap joints, and any connected appliance hose. Run water briefly, then follow the first damp mark upward. Water can travel along a hose or cabinet floor, so the puddle at the bottom is often downstream of the actual leak. Do not put hands into a disposal, reach near energized equipment, or use a tool to test a fitting.
Supply leaks and drain leaks behave differently
A pressurized supply or faucet connection can drip while the faucet is open or continue briefly after it closes. A drain, trap, or flange leak usually appears as water leaves the basin, especially when the sink is filled and emptied. If the sink is full but water does not reach the cabinet until the drain is opened, the drain assembly deserves attention. If a shut-off valve or supply line leaks with the faucet untouched, stop using that supply and arrange repair rather than trying to tighten it repeatedly.
A model-specific connection may need the faucet manual
Faucet connection styles vary. Moen notes that its under-sink connection hoses differ by product and installation period, and Delta describes distinct connection arrangements for some widespread faucets. That is why a replacement hose, washer, valve, or drain seal should not be chosen from appearance alone. Record the faucet and sink model if safely available and have the exact connection identified before ordering parts.
Safety boundary
Stop conditions
- Stop immediately for a fast stream, a split or bulging supply hose, a valve that will not close, water near electrical equipment, cabinet flooding or swelling, a ceiling or wall stain, or standing water.
- Leave the sink unused for a leak that returns after a normal shut-off, a drain flange or trap leak, a concealed source, or water damage that is spreading.
- Never force a shut-off valve, disconnect a pressurized hose, overtighten a fitting, operate a disposal near water or exposed wiring, or open a wall or ceiling as a homeowner.
Only after diagnosis
Potential parts
- faucet supply connection hose or seal
A hose or seal is only a candidate when the first wet point is the faucet connection and the exact faucet design is known; an intermittent under-sink leak can also arise from the shut-off valve or drain.
Confirm the faucet model, connection style, dimensions, and manufacturer-approved part before selecting a replacement. - shut-off valve, drain flange seal, or trap gasket
These parts require source identification first. A valve or drain replacement chosen from appearance can fail to isolate the leak or fit the installed plumbing.
Have a plumber confirm the source, connection type, material, dimensions, and local installation requirements before replacement.
When checks do not resolve it
Need a professional?
Call a qualified plumber when the leak continues after safe external checks, appears at a faucet hose, shut-off valve, drain flange, trap, appliance connection, wall, or ceiling, or returns when the faucet or drain is used. Request prompt help for a split hose, valve that will not close, fast-flowing leak, flooding, cabinet damage, or water near electrical equipment; keep clear and use emergency electrical help when needed.
Have this ready
- Provide the first wet point, timing relative to faucet use and draining, photos, leak rate, valve response, sink and faucet model if safely available, connected appliances, and any cabinet, wall, ceiling, or electrical-area damage.
Common questions
FAQ
Why does my sink leak only when the faucet is running?
The first wet point may be a pressurized faucet connection, but water can also be reaching the cabinet from the drain as the basin empties. Dry the cabinet, use separate paper towels, and identify which joint wets first; stop and arrange plumbing service if the source is pressurized or inaccessible.
How can I tell whether the leak is from the drain or faucet supply?
A supply leak can appear while the faucet is open or continue with the faucet untouched. A drain or trap leak generally appears as basin water is released. Use dry towels and timing rather than tightening every fitting; the first wet point is the useful evidence.
Should I tighten the fitting under the sink?
Do not tighten blindly or use force. First identify whether the leak is a supply connection, valve, drain flange, or trap, and isolate a controllable supply only if the valve turns normally. A stuck valve, split hose, or leak near electrical equipment needs qualified service.
When is an under-sink leak an emergency?
Get prompt help for a fast stream, a valve that will not close, a split hose, flooding or cabinet swelling, water from a wall or ceiling, or water near electrical equipment. Keep clear of standing water near electricity and do not disconnect a pressurized line.
Read the exact guide
Official sources
- Bathroom Faucet: Leaking Under The Sink BaseMoen Solutions · Moen official faucet guidance used for general timing and source classification; connection designs and repair details vary by faucet model.
- Why doesn't my pop-up sink stopper stop the water from draining?Delta Faucet · Delta official drain guidance used for general sink drain source identification; exact sink and drain designs govern repair access.
- How to Fix a Leaky FaucetDelta Faucet · Delta official faucet guidance used for the isolation principle and model-specific caution, not as universal instructions for every sink faucet.
Community feedback
Share a repair observation
Share a plain-text repair observation. Accepted observations are published automatically; this page may take a moment to update.