
On this page
Start here
Quick answer
When a sink will not drain, stop adding water and first determine whether the stopper is closed, the drain opening has reachable hair or debris, or water is leaking under the sink. Use only the installed drain's instructions to open or remove a user-serviceable stopper, clear visible debris, and check the exposed trap and connections for leaks. Do not mix or pour harsh drain chemicals into a blocked sink, force a stuck fitting, or open concealed plumbing. If the stopper and visible drain are clear but the sink still backs up, the clog is not visible, more than one fixture is affected, sewage backs up, or a leak appears, stop and arrange qualified plumbing service.
Before you begin
Safety first
- This article supports ordinary-access observation and manufacturer-approved stopper or visible-debris care only. Do not mix chemicals, force fittings, disconnect concealed plumbing, use powered clearing equipment without training, or leave an untested leak-prone reassembly.
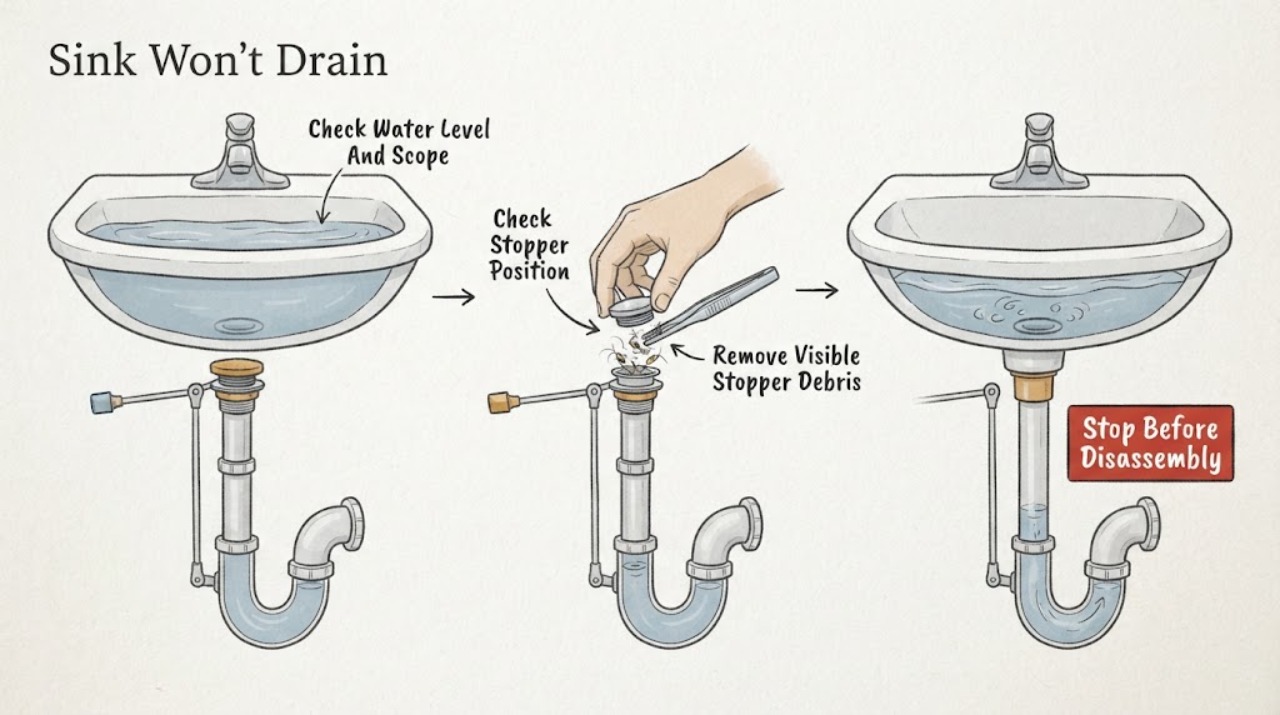
Work through in order
Diagnostic checks
Use only checks that match the exact appliance or system and its official guide.
-
Check 1
Stop running water and observe the sink from above and below the cabinet without opening concealed plumbing. Identify whether the sink bowl is full, drains slowly, or never held water because the stopper is closed; note whether another nearby fixture also backs up.
Expected result: Record whether the problem is isolated to this sink, whether water level changes at all, whether water appears under the cabinet, and whether a second sink bowl or nearby fixture is affected.
Next step: Keep the sink unused, place a container under exposed connections if water may leak, and continue only with the stopper check when there is no overflow, sewage backup, or cabinet damage.
Stop if: Stop and arrange plumbing service for sewage backup, overflowing water, a leak inside the wall, water near electrical equipment, or more than one fixture backing up.
Why this matters
Why: A closed stopper or one-sink problem supports a drain-assembly check. A full sink bowl with no movement, multiple affected fixtures, sewage odor or backup, or water under the cabinet suggests a deeper blockage or leak and lowers the safe DIY boundary.
-
Check 2
Operate the sink's lift rod or push stopper normally and confirm from above that the stopper actually rises to the open position. If the installed drain instructions permit access below the sink, inspect the visible linkage for a disconnected clip or rod without forcing it.
Expected result: Classify the stopper as fully open, partly closed, stuck, disconnected from the linkage, or impossible to assess without removing trim or sealed parts.
Next step: Use only the exact drain instructions to restore normal stopper movement, then test a small amount of water. If the stopper is fully open but the sink remains blocked, inspect only the reachable drain area next.
Stop if: Do not pry the stopper, force the lift rod, remove concealed trim, or continue if the linkage is corroded, broken, or likely to fall into the drain.
Why this matters
Why: A stopper that does not lift fully can block the drain even when the pipe is clear. A disconnected or damaged linkage can require adjustment or a compatible repair, while a stuck assembly that needs force is not a safe reason to twist harder.
-
Check 3
Only if the stopper is designed for ordinary removal and the manufacturer's instructions allow it, remove it with the specified linkage or cap procedure and inspect the stopper and drain opening for reachable hair, soap buildup, food residue, or another visible object.
Expected result: Record whether debris is wrapped around the stopper, lodged at the opening, absent, or located beyond safe reach; keep the stopper, clip, rod, and washer together.
Next step: Remove only reachable debris, rinse the permitted part, and reinstall it exactly as instructed. If the drain remains blocked or the part cannot be restored without force, stop and request plumbing service.
Stop if: Do not push sharp tools into the drain, use a coat hanger, force a threaded cap, discard a seal, or leave the linkage disconnected while running water.
Why this matters
Why: Debris on the stopper or at the opening can explain a localized blockage. If no reachable debris is present, the obstruction may be in the P-trap or farther downstream, and probing blindly can damage the drain or push material deeper.
-
Check 4
After any permitted stopper cleaning, reconnect the visible linkage and confirm the stopper moves between open and closed positions. Add only a small amount of water when the connections are dry and secure, then observe the drain and the cabinet below.
Expected result: Note whether water drains normally, drains slowly, remains in the sink bowl, or leaks at the drain body, ball-rod connection, tailpiece, or P-trap.
Next step: If drainage is normal and there is no leak, monitor it. If the sink remains blocked or a connection leaks, stop using it and arrange qualified plumbing diagnosis.
Stop if: Do not run the sink unattended, overtighten slip nuts, use the fixture with a leak, or continue if water reaches the cabinet wall or electrical equipment.
Why this matters
Why: Normal drainage after debris removal supports a stopper or opening blockage. Persistent slow or no drainage means the obstruction is not resolved; a new leak points to a seal, washer, or reassembly problem rather than a reason to tighten everything harder.
-
Check 5
With the sink unused, place a towel and container below the exposed drain pipe and visually inspect the tailpiece, P-trap, and accessible connections for standing water, a loose joint, crushed pipe, or a visible blockage. Do not disconnect the trap unless the installed instructions and your tools and experience make that procedure safe.
Expected result: Classify the exposed plumbing as dry and intact, visibly leaking, loose or damaged, full of water, or inaccessible because the blockage is concealed or the cabinet is unsafe to enter.
Next step: Keep the sink out of service and request a plumber for leaks, damaged fittings, a trap that needs disconnection, or a blockage that cannot be reached without force. Provide photos before moving parts.
Stop if: Do not loosen a fitting that is seized, cracked, corroded, or under tension; do not work without spill protection or reconnect a joint that cannot be sealed and tested.
Why this matters
Why: A visible leak or damaged connection is a plumbing repair condition. A dry, intact trap does not prove the line is clear; a full trap or inaccessible blockage needs controlled clearing and leak testing rather than repeated chemical treatment.
-
Check 6
If the stopper, reachable drain opening, and visible connections are clear but water still will not drain, stop adding water and document the sink water level, affected fixtures, and any odor or backup. Do not pour additional drain products into the standing water.
Expected result: Record whether the blockage is complete or partial, whether another fixture backs up, whether wastewater returns, and whether a previous chemical product was already used.
Next step: Arrange qualified plumbing service and disclose any chemical used, the stopper configuration, the visible inspection result, and whether multiple fixtures are affected.
Stop if: Do not mix products, plunge against a sealed or chemically treated drain, use a powered auger without training, or open a concealed clean-out without professional guidance.
Why this matters
Why: No visible debris with persistent blockage is evidence that the clog may be in the P-trap or downstream plumbing. Multiple fixtures, wastewater backup, or unknown chemicals raise the risk and require professional handling.
Use your observations
Decision map
Find the observation that best matches what you see, then follow the next safe action.
-
PATH 01Safety boundary
What you see
The stopper does not rise fully or the lift linkage is disconnected while the drain opening appears clear.
Do this next
Follow the installed drain's adjustment or removal instructions, restore the linkage, and test a small amount of water while watching for leaks.
Why this path and its safety boundary
Why it matters: The stopper assembly itself can be blocking the sink rather than a deeper pipe clog.
Safety stop: Stop for a broken, corroded, inaccessible, or forced linkage and arrange plumbing service.
-
PATH 02Safety boundary
What you see
Hair, soap, food residue, or another object is visible on the stopper or at the drain opening and drainage improves after permitted removal.
Do this next
Reinstall the stopper and linkage exactly as instructed, then monitor for normal drainage and leaks.
Why this path and its safety boundary
Why it matters: A localized stopper or opening blockage was likely contributing to the backup.
Safety stop: Do not keep probing once reachable debris is gone or use the sink if a connection leaks.
-
PATH 03Safety boundary
What you see
The stopper and reachable drain area are clear, but the sink remains full or drains only slowly.
Do this next
Keep the sink unused and arrange qualified plumbing service for controlled clearing and leak testing.
Why this path and its safety boundary
Why it matters: The obstruction may be in the trap or downstream plumbing and cannot be located safely by surface inspection.
Safety stop: Do not keep adding chemicals, force a trap, or use powered clearing equipment without appropriate training.
-
PATH 04Safety boundary
What you see
Water appears at the drain connection, tailpiece, P-trap, or cabinet floor during or after a drainage test.
Do this next
Stop using the sink, contain the water, photograph the connection, and arrange plumbing service if the leak is not resolved by the exact installed instructions.
Why this path and its safety boundary
Why it matters: A seal, washer, loose joint, damaged pipe, or reassembly issue is present in addition to the drainage problem.
Safety stop: Do not overtighten fittings, use unapproved sealant, leave a joint disconnected, or allow water to reach the wall or electrical equipment.
-
PATH 05Safety boundary
What you see
More than one fixture backs up, wastewater returns, sewage odor is present, or the sink overflows without added water.
Do this next
Stop using affected fixtures and arrange prompt qualified plumbing service; protect the area from contact with wastewater.
Why this path and its safety boundary
Why it matters: The problem is no longer established as a local stopper blockage and may involve a branch or building drain.
Safety stop: Do not pour chemicals, open concealed clean-outs, or continue testing fixtures against a shared backup.
-
PATH 06Safety boundary
What you see
A drain chemical was already poured into the blocked sink or the product and concentration are unknown.
Do this next
Stop handling the drain, keep people and pets away, preserve the product information, and tell the plumber exactly what was used before service.
Why this path and its safety boundary
Why it matters: The standing water and drain parts may present a chemical exposure risk, so ordinary plunging or disassembly is unsafe.
Safety stop: Do not mix another product, plunge, siphon, or disconnect the trap while chemical residue may remain.
Helpful context
Understand the symptom
Separate a closed stopper from a blocked drain
A sink can appear clogged when a pop-up or push stopper has not opened fully, when hair or soap is wrapped around the stopper, or when a blockage is farther down the drain. Check the water level and the stopper position before adding more water. If the stopper opens and visible debris is removed but water still does not move, the remaining blockage is no longer a surface-only problem.
Use ordinary access and protect the cabinet
Keep a towel and container below the exposed drain connections before looking under the sink. Remove only a stopper or linkage that the installed manufacturer's instructions identify as user-serviceable, and keep seals and parts together. A loose connection, damaged washer, or water in the cabinet changes the task from unclogging to leak control and may require a plumber.
Escalate when the obstruction is not visible
If the drain opening and stopper are clear but the sink remains full, do not keep adding chemicals or force a trap, clean-out, or concealed line. A persistent or hidden blockage can involve the P-trap, branch drain, venting, or building plumbing. Qualified plumbing service can clear and test the line without leaving a chemical hazard or a leaking reassembly.
Safety boundary
Stop conditions
- Do not mix drain chemicals or add another product to standing water; disclose any product already used to the plumber.
- Do not force a stuck stopper, threaded cap, slip nut, trap, or concealed clean-out, and do not use powered clearing equipment without training.
- Stop for a leak, damaged or corroded pipe, water near electrical equipment, wastewater backup, sewage odor, or more than one affected fixture.
- Keep removed stoppers, rods, clips, washers, and seals together; do not run water with a linkage or connection left loose.
- Arrange qualified plumbing service when no reachable debris is visible, the sink remains blocked after permitted stopper cleaning, or the cause is concealed.
When checks do not resolve it
Need a professional?
Arrange qualified plumbing service when the stopper and reachable drain area are clear but the sink remains blocked, the P-trap or concealed line needs disconnection or clearing, multiple fixtures back up, wastewater or sewage odor appears, a leak or damaged pipe is found, a chemical product was used, or any fitting cannot be safely restored and leak-tested.
Safety scope: This article supports ordinary-access observation and manufacturer-approved stopper or visible-debris care only. Do not mix chemicals, force fittings, disconnect concealed plumbing, use powered clearing equipment without training, or leave an untested leak-prone reassembly.
Common questions
FAQ
What should I check first when a sink will not drain?
Stop adding water, check whether the stopper is fully open, and inspect the reachable drain opening and stopper for hair, soap, food residue, or another visible object. If the sink remains blocked after permitted cleaning, the clog may be farther down the plumbing and needs a plumber.
Can I remove the sink stopper to clear a clog?
Only if the installed drain's instructions identify it as user-serviceable and explain the removal. Keep the rod, clip, washer, and stopper together, clear only reachable debris, reinstall the linkage exactly as directed, and test for both drainage and leaks.
Should I pour chemical drain cleaner into a blocked sink?
Do not mix products or keep adding chemicals to standing water. Chemical residue can make plunging or trap disassembly unsafe and should be disclosed to the plumber. Use the installed drain instructions and arrange professional clearing when the blockage is not visible.
When does a clogged sink need a plumber?
Call a plumber when the stopper and visible drain are clear but water still will not drain, the P-trap or concealed line needs opening, multiple fixtures back up, wastewater or sewage odor appears, a leak or damaged pipe is found, a drain chemical was used, or you cannot safely restore and test the connection.
Read the exact guide
Official sources
- Pfister Frequently Asked Questions (FAQs)Pfister Faucets · Pfister sink and drain FAQ guidance; the installed drain manufacturer's instructions control a different design.
- My pop up drain is not draining waterPfister Faucets · Pfister pop-up drain troubleshooting; use the installed drain's exact instructions for other stopper mechanisms.
Community feedback
Share a repair observation
Share a plain-text repair observation. Accepted observations are published automatically; this page may take a moment to update.