
On this page
Start here
Quick answer
When the toilet shut-off works but the toilet keeps running, first close the valve to stop wasted water while you identify whether water is leaking from the tank through the flapper or flush-valve seal, rising into the overflow because the float is too high, or entering through a fill valve that will not shut off. With the tank lid off, watch the water level, press the flapper briefly, and check the chain, refill tube, and fill-valve behavior. If the valve leaks, the tank or bowl is cracked, the shut-off will not reliably stop flow, or a simple adjustment does not end the run, leave the toilet isolated and arrange qualified plumbing service.
Before you begin
Safety first
- A plumber can identify a leaking flush seal, worn fill valve, concealed tank mechanism, damaged supply connection, overflow condition, or cracked fixture and make a compatible repair. Homeowner checks should remain limited to operating the shut-off, observing the open tank, a permitted adjustment, and a manufacturer-directed dye test.
Work through in order
Diagnostic checks
Use only checks that match the exact appliance or system and its official guide.
-
Check 1
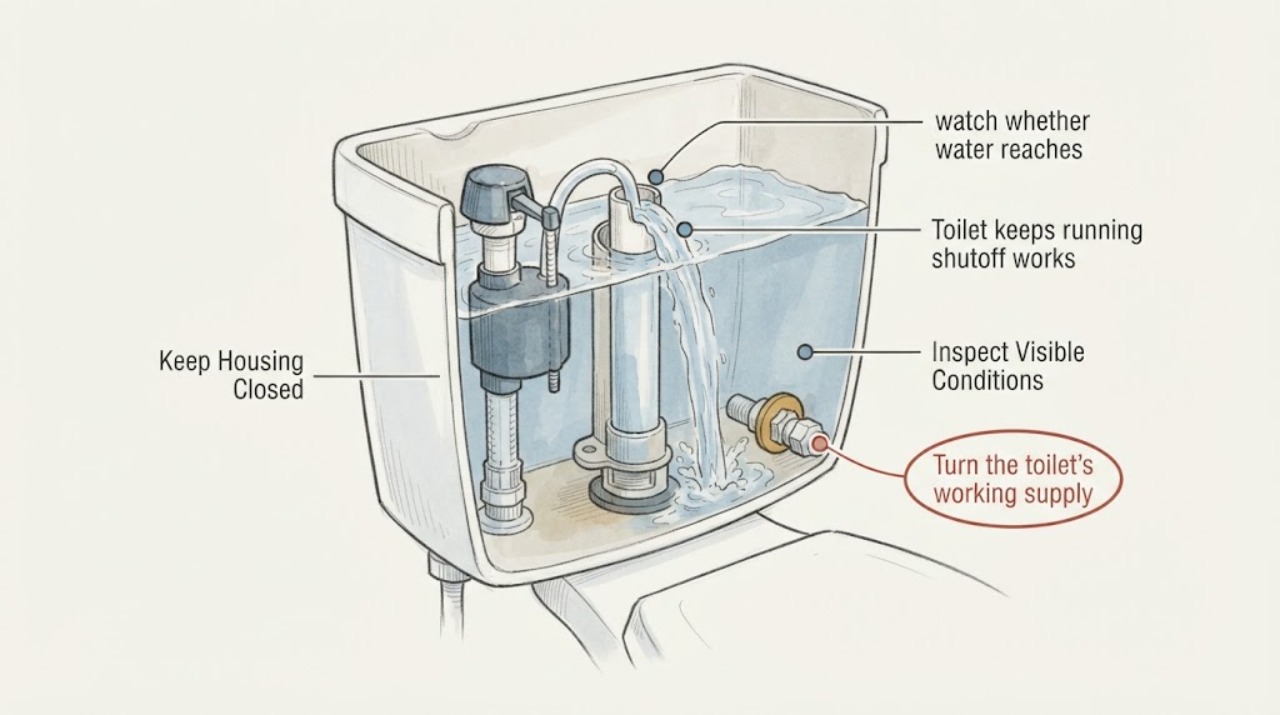
Turn the toilet's working supply shut-off gently toward closed until the running stops, and keep the floor and fittings visible while you remove the tank lid.
Expected result: Flow stops cleanly, the valve drips or will not close, or water is already reaching the floor, base, tank, or bowl rim.
Next step: If the shut-off leaks, will not stop flow, the tank or bowl is cracked, or water is spreading, leave the toilet isolated if safe and arrange qualified plumbing help. Otherwise continue with the lid-off observation and do not repeatedly flush.
Why this matters
Why: A clean shut-off limits water loss and gives you time to diagnose. A leaking or unreliable shut-off, overflow, or water near the base raises the risk of property damage and may require service before further testing.
-
Check 2
With the tank lid off and the supply reopened only for observation, watch whether water reaches the overflow tube or stops below it after refill; compare the level with the manufacturer's mark.
Expected result: Water rises into the overflow, stops at the marked level but the fill valve cycles again, or stops at the mark and stays quiet.
Next step: Close the shut-off again before any adjustment. Follow the exact toilet instructions for float or fill-valve adjustment; if the level is correct but cycling continues, inspect the flush seal and linkage rather than raising or lowering the float at random.
Why this matters
Why: Overflowing water points toward a float or fill-valve shutoff problem. A correctly filled tank that cycles again suggests water is escaping through the flush valve or flapper. A stable level makes an active tank leak less likely at that moment.
-
Check 3
On a gravity tank with the water controlled, observe the flapper or flush-valve seal and press it down gently for a moment without forcing the mechanism.
Expected result: The running stops while the seal is held down, the seal looks warped or dirty, the chain prevents full closure, or pressing it makes no difference.
Next step: Close the supply before cleaning or replacing a seal. Use the toilet model's instructions and match the replacement to that design; do not assume a two-piece, dual-flush, or pressure-assisted toilet uses the same flapper.
Why this matters
Why: Stopping when pressed supports a leaking, misaligned, or poorly seated flush seal. Chain tension or a handle that does not return can hold the seal open. No response shifts attention toward the fill valve, overflow, or a different toilet design.
-
Check 4
Inspect the handle, button rods, chain or cable, and refill tube from above the tank; confirm the operating linkage returns freely and the refill tube is clipped as the manual directs.
Expected result: A chain or rod is taut, a button remains depressed, the flush valve is held open, the refill tube is misplaced, or the linkage moves and returns normally.
Next step: Correct only the accessible linkage position described by the manual, with the supply closed if your hand will enter the tank. Do not shorten a chain or alter button travel by guesswork; persistent running needs exact model diagnosis.
Why this matters
Why: Linkage tension can prevent the flush seal from closing. A misplaced refill tube can contribute to abnormal filling or siphoning. Normal visible linkage makes a worn seal, float, or fill-valve internals more likely.
-
Check 5
Perform a dye or food-coloring leak check in the tank when the bowl is stable, following the published instructions and flushing promptly after the observation.
Expected result: Color appears in the bowl, no color crosses but the fill valve still runs, or the tank level falls without an obvious external leak.
Next step: Close the supply and service the identified seal only if the toilet instructions support that repair. If the dye result and visible behavior disagree, stop repeated testing and provide the observations to a plumber.
Why this matters
Why: Color in the bowl confirms water is crossing the flush seal. No color with ongoing fill points more toward the fill valve, overflow level, refill path, or another model-specific mechanism; an unexplained level drop may be a concealed or intermittent seal leak.
-
Check 6
If the float is free and the level is not overflowing, watch the fill valve through one refill cycle for hissing, pulsing, debris-related restriction, or failure to shut off; do not open a valve cap or disconnect the supply while pressurized.
Expected result: The valve keeps admitting water after the marked level, runs only intermittently, has weak or noisy refill, or shuts off normally after the seal or linkage is corrected.
Next step: Use the exact product instructions for any debris check or valve replacement and close the shut-off first. If the valve continues to run, the fitting is corroded, or the tank cannot hold its level, leave the toilet isolated and call a plumber.
Why this matters
Why: A fill valve that will not close can be worn, obstructed, or incorrectly adjusted. Intermittent running often means the tank is losing water and the fill valve is replacing it, while a normal cycle after linkage correction points to the flush control rather than the valve body.
-
Check 7
Reopen the working shut-off slowly for one controlled retest after an approved adjustment, and inspect the tank, supply connection, floor, bowl, and overflow path for fresh water.
Expected result: The toilet fills and stops quietly, starts running again after a delay, continues without stopping, or leaks outside the tank.
Next step: Close the shut-off again for delayed or continuous running and arrange plumbing service. For any leak at a supply connection, base, cracked tank, or bowl, do not tighten porcelain fittings aggressively or keep operating the toilet.
Why this matters
Why: A quiet complete cycle supports a successful adjustment but should be monitored. Delayed restarting means the tank is losing water. Continuous running or an external leak indicates an unresolved component or connection fault.
Use your observations
Decision map
Find the observation that best matches what you see, then follow the next safe action.
-
PATH 01Next step
What you see
The tank level rises into the overflow and the fill valve does not stop, while the flapper appears seated.
Do this next
Close the supply, adjust only as the model instructions describe, and retest once. If the valve still will not stop or the overflow continues, leave it isolated and call a plumber.
Why this path and its safety boundary
Why it matters: A float setting, fill-valve shutoff, or fill-valve debris/seal problem is more likely than a leak through the flush seal.
-
PATH 02Next step
What you see
The tank stops at its marked level but the toilet periodically starts again, dye reaches the bowl, or pressing the flapper stops the run.
Do this next
Close the shut-off and inspect chain travel and the seal. Clean or replace only the exact model's seal using its instructions; persistent seepage needs plumbing service.
Why this path and its safety boundary
Why it matters: A leaking or misaligned flapper or flush-valve seal is more likely; the fill valve is refilling water that is escaping into the bowl.
-
PATH 03Next step
What you see
The handle, button, chain, or cable does not return freely, or a rod holds the flush valve open.
Do this next
Restore only the intended free movement according to the toilet manual with the water isolated as needed. Do not force the button or change linkage dimensions by guesswork; call a plumber if the mechanism remains stuck.
Why this path and its safety boundary
Why it matters: The control linkage is holding the flush mechanism open rather than the water supply being the primary fault.
-
PATH 04Next step
What you see
The float and flush seal look correct, but the fill valve continues hissing or filling after the tank reaches its marked level.
Do this next
Close the shut-off before any model-approved valve service. If the valve cap, supply connection, or internal part is inaccessible, corroded, or still faulty, leave the toilet off and arrange plumbing service.
Why this path and its safety boundary
Why it matters: The fill valve may have internal debris, a worn seal, or a component fault that is not solved by changing the float position.
-
PATH 05Next step
What you see
The toilet runs after every adjustment, leaks at the base or supply connection, has cracked porcelain, or the shut-off cannot be operated reliably.
Do this next
Keep the supply shut off if safe and arrange qualified plumbing service. Do not keep cycling the toilet, overtighten tank or supply fittings, or lift a cracked fixture.
Why this path and its safety boundary
Why it matters: The problem exceeds a safe adjustment and may involve a damaged fixture, connection, hidden leak, or valve that can cause water damage.
Helpful context
Understand the symptom
A working shut-off changes the first move
Because the shut-off works, you can stop the flow without repeatedly flushing or trying to catch the source by sound. Turn it gently to the closed position if the area stays dry, then remove the tank lid. A running toilet usually has one of two visible patterns: water is escaping from the tank into the bowl, or the fill valve is admitting water that never reaches a stable level. The same symptom can be caused by a flapper, flush-valve seal, chain or button, float, fill valve, or overflow setting.
Read the tank water level before adjusting anything
Watch the water after a normal refill. If it rises into the overflow tube, the float or fill setting is too high or the fill valve is not shutting off. If it stops below the manufacturer's waterline but the fill valve cycles again, water is likely leaving through a flapper or flush-valve seal. The correct level is model-specific, so use the mark and the toilet manual instead of copying a measurement from another toilet.
Use the flapper test to separate a tank leak
On a gravity tank, pressing the flapper down briefly can show whether the rubber seal is the leak path: if the running stops immediately, the flapper may be dirty, worn, misaligned, or pulled by an incorrectly adjusted chain. A dye test can confirm silent seepage from tank to bowl; flush promptly after the test to avoid staining. Dual-flush and pressure-assisted toilets may use different seals or assemblies, so do not assume a conventional flapper is present.
Check the linkage and refill tube
A handle, button rod, chain, or cable that remains under tension can hold the flush valve partly open. Check only the accessible linkage and make sure the refill tube is clipped as the toilet's instructions show rather than pushed below the tank waterline. A misrouted refill tube or linkage can produce constant flow or repeated cycling even when the shut-off is open and usable.
Do not treat a fill-valve repair as universal
If the float is free and correctly set but the valve continues hissing or filling, debris or a worn internal seal may be preventing the fill valve from closing. Cleaning or replacing an internal part is model-specific. Shut off the supply before any disassembly, follow the exact instructions, and avoid forcing plastic fittings or disconnecting a corroded supply connection.
Retest without creating a new leak
After one permitted adjustment, reopen the shut-off slowly and watch the entire refill and shutoff cycle. Check the tank, supply connection, floor around the base, and bowl for fresh water. If the valve shuts off but the toilet starts again later, the tank is still losing water; if it never shuts off, the fill path remains faulty. A persistent run, visible leak, or damaged porcelain is a repair decision, not a reason to keep turning adjustments.
Safety boundary
Stop conditions
- Close the working shut-off and stop testing if water reaches the overflow, floor, base, or electrical equipment, if the tank or bowl is cracked, or if the valve leaks while being operated.
- Do not force a corroded shut-off, disconnect a pressurized supply line, overtighten porcelain or tank hardware, or keep flushing to see whether a running toilet eventually stops.
- Do not assume a generic flapper, fill valve, button rod, or seal fits the toilet. Use the model instructions and compatibility information, especially for dual-flush and pressure-assisted designs.
- Arrange qualified plumbing service when a seal, fill valve, linkage, overflow condition, or external leak remains after one safe adjustment, or whenever the toilet cannot be left reliably shut off.
Only after diagnosis
Potential parts
- toilet flapper or flush-valve seal
Consider this only when dye reaches the bowl, pressing the seal stops the run, or direct inspection confirms seepage, wear, or misalignment.
Match the exact toilet model, flush-valve style, seal dimensions, and manufacturer instructions; dual-flush and pressure-assisted designs may use a different assembly. - toilet fill valve
Consider this only when the float and setting are correct but the valve continues to admit water, cycles from an internal fault, or cannot maintain the marked tank level.
Confirm the exact toilet design, inlet arrangement, adjustment range, and installation instructions before selecting a replacement. - toilet handle, button, chain, or cable assembly
Consider this only when the control does not return freely or holds the flush valve open; a running toilet caused by a leaking seal needs the seal diagnosed instead.
Match the control style, tank geometry, rod or chain travel, and manufacturer fit information; do not alter dimensions by guesswork.
When checks do not resolve it
Need a professional?
Safety scope: A plumber can identify a leaking flush seal, worn fill valve, concealed tank mechanism, damaged supply connection, overflow condition, or cracked fixture and make a compatible repair. Homeowner checks should remain limited to operating the shut-off, observing the open tank, a permitted adjustment, and a manufacturer-directed dye test.
Common questions
FAQ
Why does my toilet keep running if the shut-off valve works?
A working shut-off only stops incoming water; it does not identify why the tank loses water or why the fill valve fails to close. Check the tank level, overflow, flapper or flush-valve seal, linkage, and fill valve with the supply controlled.
How do I know whether the flapper is leaking?
If gently pressing the flapper stops the running, the seal may be dirty, worn, or misaligned. A tank dye test that sends color into the bowl confirms a silent leak. Close the supply before a repair and match any replacement to the exact toilet design.
Can a high float make a toilet run constantly?
Yes. If the tank level rises into the overflow, water continuously leaves the tank and the fill valve keeps replacing it. Use the manufacturer's waterline and adjustment instructions; if the valve still does not stop, it may need model-specific service.
Why does the toilet stop running and then start again later?
Delayed restarting usually means the tank is slowly losing water through a flapper or flush-valve seal, so the fill valve periodically refills it. Check for dye entering the bowl and watch the seal and chain. A persistent leak needs a compatible seal repair or plumber diagnosis.
When should I call a plumber for a running toilet?
Call when the tank overflows, the shut-off leaks or will not close, the toilet or supply connection leaks, porcelain is cracked, the linkage or valve remains stuck, or the toilet keeps running after one safe adjustment and controlled retest. Leave the supply off if safe and report the observed pattern.
Read the exact guide
Official sources
- Quick Tips to Fix That Running ToiletDelta Faucet · Delta's general homeowner guidance; exact toilet mechanisms, adjustments, and parts vary by model
- Best Management Practice #6: Toilets and UrinalsU.S. Department of Energy · General tank-toilet maintenance; individual toilet manuals govern model-specific parts and adjustments
- Home MaintenanceU.S. Environmental Protection Agency WaterSense · General residential toilet maintenance; a specific toilet manual and qualified plumber govern repair details
Community feedback
Share a repair observation
Share a plain-text repair observation. Accepted observations are published automatically; this page may take a moment to update.