
On this page
Start here
Quick answer
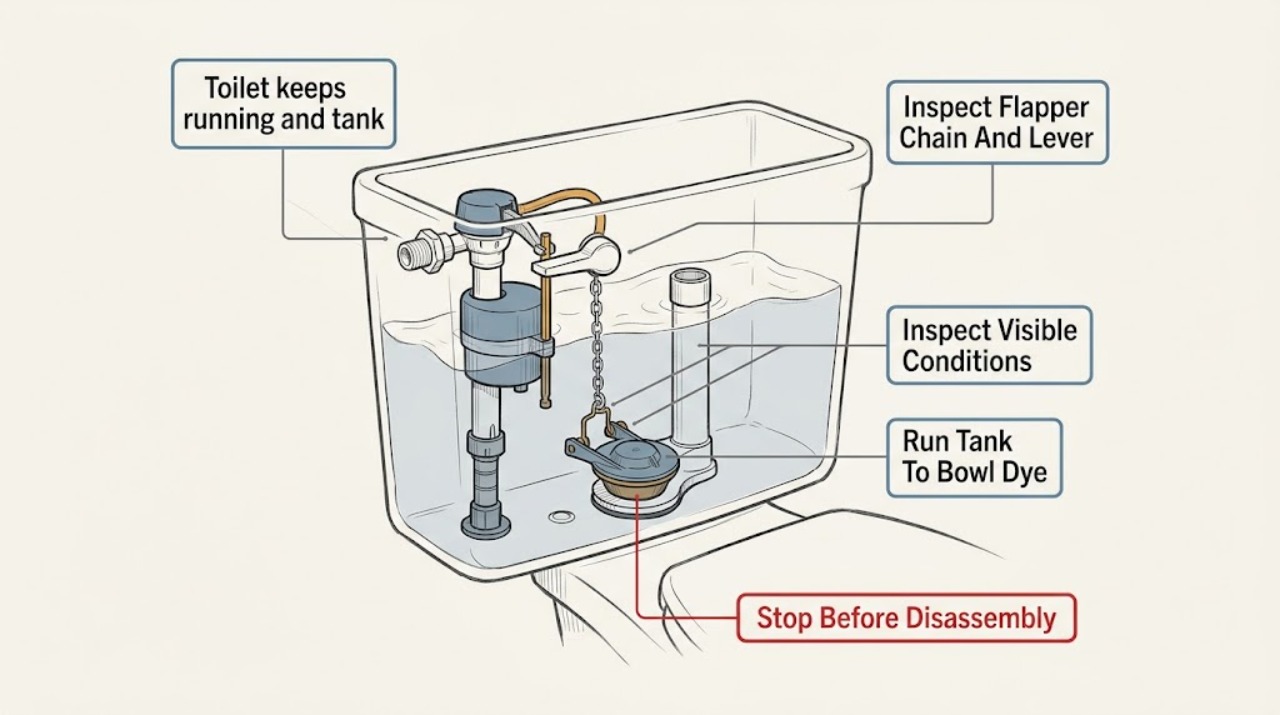
A running toilet whose tank level rises and falls is usually either losing water into the bowl through the flapper/flush-valve seal or failing to shut off at the fill valve. Remove the tank lid carefully and watch one refill cycle: water that reaches or enters the overflow points toward fill-level or fill-valve trouble, while a normal-looking level followed by a slow drop and automatic refill points toward a flush-valve seal, flapper, chain, or seat leak. Add a few drops of food coloring to the tank, wait 10 minutes without flushing, and check whether color reaches the bowl; flush afterward to avoid staining. If water is rising toward the overflow, the supply will not shut off, the shutoff valve leaks or will not turn, the tank or bowl is cracked, or water is reaching the floor, close the toilet's supply valve gently if it operates normally and arrange plumbing service. Do not force a stuck valve, remove a pressurized fitting, or keep flushing to hide the symptom.
Work through in order
Diagnostic checks
Use only checks that match the exact appliance or system and its official guide.
-
Check 1
Remove the tank lid carefully, keep fingers clear of the moving handle and valve parts, and observe one ordinary refill cycle without flushing repeatedly; note the starting level, refill stream, shutoff point, and whether water enters the overflow tube.
Expected result: Record water stopping below the overflow, water continuing into the overflow, a level that rises and falls without flushing, a refill that starts after the level drops, or a handle/lever that does not return freely.
Next step: Use the corresponding branch to choose a dye test, a level/lever check, or a service call. Keep the lid and internal parts in place and do not force a valve adjustment.
Stop if: Stop and close the supply valve gently if water is rising toward the overflow or floor, the tank/bowl is cracked, or a valve or connection is spraying or leaking.
Why this matters
Why: Water entering the overflow points toward an over-high level, float setting, or fill-valve shutoff problem. A level that drops and triggers refill without a flush points toward water escaping through the tank-to-bowl seal. A binding lever can hold the flush valve open and imitate a fill-valve failure.
-
Check 2
When the toilet is not overflowing, add a few drops of food coloring or a dye tablet to the tank, do not flush, wait 10 minutes, and inspect the bowl for matching color; flush after the test to avoid staining.
Expected result: Record color appearing in the bowl, no color after the wait, or an inconclusive result because the toilet was flushed or the bowl water was already colored.
Next step: If color appears, inspect the flapper/flush-valve path and chain only as the exact toilet design permits, then use model-matched repair or plumbing service. If no color appears, focus on the refill shutoff and water level.
Stop if: Do not use dye if the tank or bowl is cracked, water is near the floor, the supply cannot be stopped, or the toilet is overflowing; limit water first and call a plumber.
Why this matters
Why: Color in the bowl confirms a tank-to-bowl leak through the flapper or flush-valve seal. No color makes a continuous fill-valve, overflow, trip-lever, or intermittent issue more likely but does not prove every seal is perfect under all conditions.
-
Check 3
With the supply stable and the lid off, look at the trip lever, chain, flapper or canister seal, and flush-valve opening without removing the assembly; check whether the chain is tangled or holding the seal off its seat and whether the seal appears distorted or obstructed.
Expected result: Record a freely returning lever and seated seal, a tangled or tight chain, a seal that rocks or has visible debris, or a canister/flapper that remains partly open after the handle is released.
Next step: Correct only an obvious, user-accessible chain tangle if the model instructions allow it and no water or damage hazard exists; otherwise stop and arrange plumbing service. Use the exact toilet model when selecting any seal or valve.
Stop if: Do not force a flush valve, remove a brittle seal, reach into a cracked tank, or work on a toilet that cannot be isolated from the water supply.
Why this matters
Why: A chain or lever that prevents seating can cause intermittent refills and a fluctuating level. A worn, dirty, distorted, or misaligned seal can allow tank water into the bowl even when the fill valve shuts off. A clear-looking seal does not rule out a leak if the dye test was positive.
-
Check 4
Observe the tank level as the fill valve shuts off and compare it with the overflow tube and the exact toilet instructions; note whether the valve stops cleanly below the tube or continues to hiss, refill, or send water over the tube.
Expected result: Record a stable level below the overflow, water reaching/entering the overflow, a fill valve that never shuts off, or a level that changes when nearby fixtures are used.
Next step: Follow the exact model's level-adjustment instructions only for a clearly accessible adjustment. If the valve still runs, the level fluctuates, or the overflow is involved, close the supply gently if needed and request plumbing service.
Stop if: Do not loosen supply fittings, remove the fill-valve cap under pressure, force an adjustment screw, or continue if the valve, tank, or supply line leaks.
Why this matters
Why: Overflow or a continuously running fill valve points toward level adjustment, debris, pressure-related behavior, or a failing fill valve. A stable fill level followed by a drop shifts attention back to the tank-to-bowl seal. Nearby-use changes can make the symptom intermittent and are useful for service diagnosis.
-
Check 5
If the toilet continues running, observe the accessible supply stop, tank, bowl base, and supply connection for a safe shutoff and visible leak, then record the water path, dye result, level position, chain/lever condition, toilet model, and when the fluctuation occurs.
Expected result: Record a supply stop that turns normally and stops the flow, a stuck or leaking stop, water on the floor, a cracked tank/bowl, or no accessible way to isolate the toilet.
Next step: Close the stop only if it operates normally and without force, then arrange a licensed or qualified plumber. If water cannot be controlled or is spreading, use the home's main shutoff only if safely identified and seek urgent plumbing help.
Stop if: Do not force the stop, disconnect the supply line, lift the tank, mop around an energized nearby appliance, or keep using the toilet when the floor or structure is being damaged.
Why this matters
Why: A normal supply stop can limit water loss while service is arranged. A stuck/leaking stop, crack, floor leak, or inaccessible isolation point increases the risk of property damage and needs prompt plumbing attention; the internal part cannot be diagnosed safely while water is uncontrolled.
-
Check 6
Prepare a service handoff with the toilet make/model if visible, dye-test result, whether water enters the overflow or bowl, refill timing, level position, chain/lever observations, supply-stop status, and photos of any crack, corrosion, or floor water.
Expected result: Confirm that the record describes external observations and normal tank access only, with no supply fitting, valve cap, flush assembly, or tank hardware forced or removed.
Next step: Keep the supply closed when necessary to limit water loss and request plumbing service for persistent running, uncontrolled water, or any repair beyond a simple model-documented adjustment.
Stop if: Stop all homeowner work when the next step requires disassembling the fill or flush valve, removing the tank, replacing a supply stop, or repairing a cracked fixture or concealed pipe.
Why this matters
Why: This lets the plumber distinguish a flapper/flush-valve seal leak from fill-valve shutoff, overflow, trip-lever, supply-stop, pressure, or fixture damage and bring the appropriate model-matched repair plan.
Use your observations
Decision map
Find the observation that best matches what you see, then follow the next safe action.
-
PATH 01Next step
What you see
The tank level rises to or into the overflow tube, or the fill stream continues after the expected level is reached.
Do this next
Follow only the exact model's accessible level guidance. If the valve will not stop or water approaches the rim/floor, limit water at the supply stop without force and arrange plumbing service.
-
PATH 02Next step
What you see
Dye appears in the bowl after 10 minutes without flushing, or the tank level drops and refilling starts while the fill valve itself shuts off below the overflow.
Do this next
Inspect only for an obvious chain or lever obstruction. Use the exact toilet model for any seal choice and arrange service when the seal, seat, or flush assembly needs removal.
-
PATH 03Next step
What you see
The level fluctuation follows handle use, the lever or chain does not return freely, the seal is partly open, or the running starts and stops after a small movement.
Do this next
Correct only a plainly accessible chain tangle under the model instructions; do not force the valve or dismantle the flush mechanism. Arrange plumbing service if the symptom returns.
-
PATH 04Next step
What you see
Water is on the floor, the tank or bowl is cracked, the supply stop or connection leaks, or the stop is stuck and the toilet cannot be isolated.
Do this next
Keep clear of spreading water, close the stop only if it turns normally, and arrange prompt plumbing service. Do not disconnect the supply line or lift the tank.
-
PATH 05Next step
What you see
The dye test is inconclusive, the level still fluctuates, or the toilet continues running after a model-documented adjustment with no obvious chain or overflow cause.
Do this next
Limit water loss as safely as possible and request qualified plumbing diagnosis with the timeline, model, photos, and observations.
-
PATH 06Next step
What you see
Water cannot be controlled, is reaching electrical equipment or the ceiling below, the toilet is overflowing with waste water, or the tank/bowl is actively failing.
Do this next
Keep people away, use the safest known shutoff without force, and obtain urgent plumbing/building assistance; use appropriate electrical help if water has reached electrical equipment.
Helpful context
Understand the symptom
Watch where the water goes before changing a part
A fluctuating tank level is a useful clue because the water may be leaving through the flush valve into the bowl, or the fill valve may be adding water when it should stop. Kohler describes constant running from a binding trip lever, water overflowing the flush-valve tube, or debris in the fill-valve cap. Open the tank only for a calm visual check and compare the water path with the overflow tube; do not assume that every refill sound means the fill valve is the failed part.
A dye test separates a silent bowl leak from a refill problem
EPA WaterSense recommends adding a small amount of food coloring or a dye tablet to the tank, waiting 10 minutes without flushing, and checking the bowl. Color in the bowl means water crossed the tank-to-bowl seal, so the flapper or flush valve is implicated; flush after the test to avoid staining. No color does not prove the fill valve is good—it shifts attention toward the refill level, overflow path, trip lever, or intermittent valve behavior.
Stop an overflow without forcing the plumbing
If the water level is approaching the overflow tube or water is escaping onto the floor, the immediate goal is to limit water damage, not to keep adjusting parts while the toilet runs. Turn the toilet's supply stop only if it is clearly accessible and turns normally; stop if it is stuck, damaged, or begins leaking. EPA advises contacting a local plumber for a constantly running toilet or water continuously entering the overflow. A cracked tank or bowl, a leaking supply connection, or a valve that will not shut off needs service rather than a temporary tie, plug, or improvised clamp.
Safety boundary
Stop conditions
- Do not force a supply stop, loosen a pressurized fitting, remove a fill-valve cap under pressure, disconnect the supply line, lift the tank, or dismantle the flush valve as a homeowner.
- Do not keep flushing, tie the lever up, tape or glue a cracked tank/bowl, or substitute a valve or seal without confirming the exact toilet model and repair procedure.
- Stop immediately for uncontrolled water, waste-water overflow, a cracked or moving tank/bowl, water near electrical equipment, a stuck/leaking shutoff, or water reaching the floor or ceiling below; limit water safely and arrange prompt service.
Only after diagnosis
Potential parts
- toilet flapper or flush-valve seal
Consider this only when the dye test shows tank-to-bowl leakage or a technician confirms that the seal is not seating; a fluctuating level alone does not identify the seal.
Confirm the exact toilet model, flush-valve design, seal shape, and manufacturer instructions before selecting a replacement. - toilet fill valve
Consider this only when water reaches the overflow, the fill valve fails to shut off after a correct accessible adjustment, or qualified diagnosis confirms a fill-valve fault.
Confirm the toilet model, tank configuration, water-level requirements, and manufacturer-approved fit before replacement. - toilet trip lever or chain
Consider this only when the lever or chain binds, cannot return the flush seal to its seat, or is damaged and causes the observed intermittent refill.
Confirm the handle orientation, chain connection, tank geometry, and exact model fit before selecting a replacement.
When checks do not resolve it
Need a professional?
Arrange plumbing service for a toilet that keeps running after a clear, model-documented adjustment, a positive dye test that needs seal or flush-valve work, water entering the overflow, a fill valve that will not shut off, a stuck or leaking supply stop, a cracked tank or bowl, or any repair requiring valve disassembly, supply-line work, tank removal, or concealed-pipe diagnosis. Seek urgent help when water cannot be controlled, is spreading to the floor/ceiling below or electrical equipment, or includes waste-water overflow.
Have this ready
- Provide the toilet make/model if visible, dye result, overflow and bowl observations, refill timing, tank-level position, chain/lever condition, supply-stop status, photos, and the timing of any floor or ceiling water.
Common questions
FAQ
Why does the toilet tank level rise and fall by itself?
The tank may be losing water into the bowl through a flapper or flush-valve seal, or the fill valve may be failing to shut off or sending water into the overflow. Watch one cycle and use a dye test before choosing a part.
What does food coloring in the toilet tank tell me?
Add dye without flushing and wait 10 minutes. If matching color appears in the bowl, the tank-to-bowl seal is leaking. Flush afterward to avoid staining.
What if water is flowing into the overflow tube?
That points toward the refill level, fill-valve shutoff, debris, or related pressure behavior. Follow only the exact model's accessible adjustment instructions; if water keeps running or approaches the rim/floor, limit the supply safely and call a plumber.
Should I replace the flapper or fill valve first?
Do not choose by sound alone. A positive dye test or a tank level that drops after the fill valve shuts off points toward the tank-to-bowl seal; water entering the overflow or a valve that will not shut off points toward the fill path. Confirm the toilet model before selecting a part.
When should I shut off the toilet water and call a plumber?
Limit water when the toilet is overflowing, the level approaches the overflow, water reaches the floor, the tank or bowl is cracked, the supply stop leaks or will not turn, or the running continues without a clear model-documented adjustment. Do not force the shutoff or disconnect the supply line.
Read the exact guide
Official sources
- WaterSense at Work Sanitary Fixtures and Equipment Section 3.1: Toilets (Water Closets)U.S. Environmental Protection Agency WaterSense · EPA technical guidance used for tank-type toilet diagnostic reasoning; it is not a substitute for the exact fixture manual or licensed plumbing service.
- Toilet Constantly Leaking or RunningKohler Assist · Kohler troubleshooting guidance used for general tank-toilet symptom distinctions; exact toilet design and instructions govern any adjustment or part.
- Home MaintenanceU.S. Environmental Protection Agency WaterSense · EPA WaterSense household maintenance guidance used for general tank-type toilet leak checks; exact toilet instructions govern model-specific parts and access.
Community feedback
Share a repair observation
Share a plain-text repair observation. Accepted observations are published automatically; this page may take a moment to update.