
On this page
Start here
Quick answer
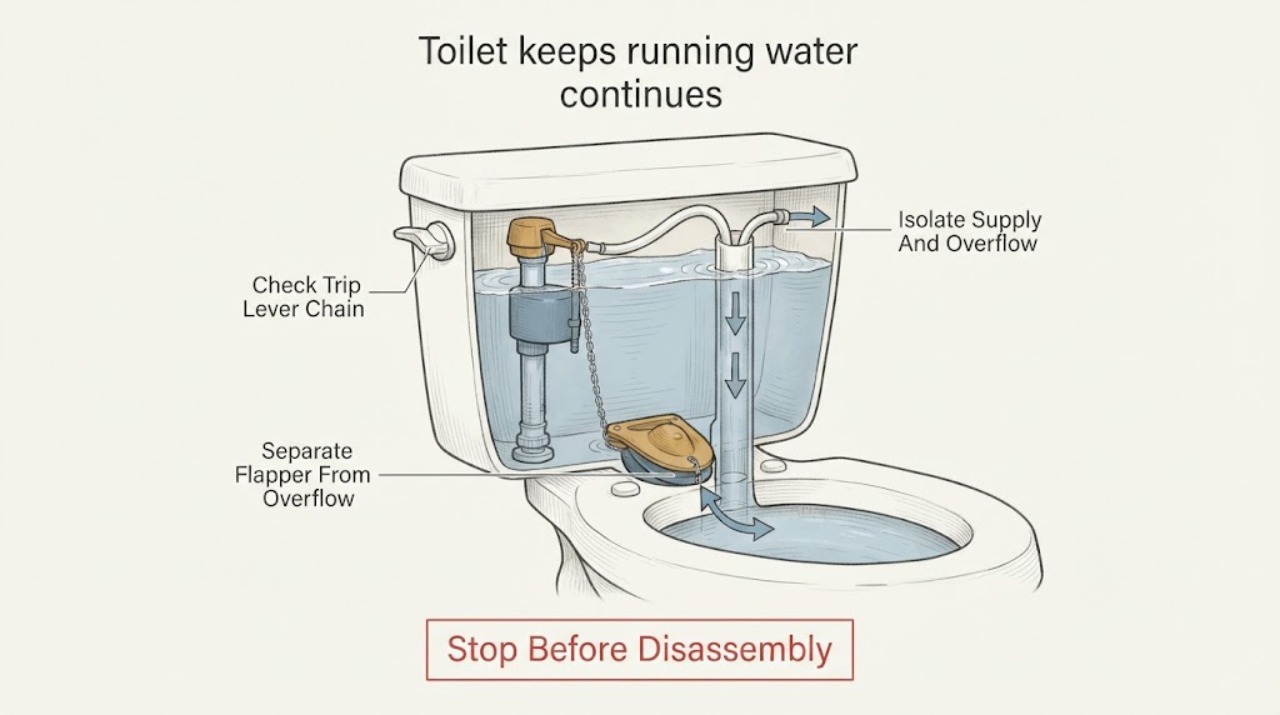
When water continues into the toilet bowl, first prevent waste and an overflow by turning the toilet's supply stop clockwise only until it stops if the valve is accessible and operable. Remove the tank lid and observe whether water is leaking past the flapper or canister seal, entering the overflow tube, or siphoning through a refill hose that sits below the tank waterline. A tight trip lever or chain can hold the flush valve open; a high or dirty fill valve can keep adding water until it spills into the overflow. Correct only a visible, model-appropriate chain, hose position, or water-level issue. If the supply stop will not close, the tank or bowl is cracked, the toilet may overflow, or the leak remains after basic checks, leave it isolated and call a plumber.
Before you begin
Safety first
- This article supports ordinary-access tank observation and model-approved chain, refill-hose, seal, or water-level adjustments only. Do not force shutoffs, disconnect pressurized fittings, remove the tank, use harsh tank chemicals, or work on a cracked fixture.
Work through in order
Diagnostic checks
Use only checks that match the exact appliance or system and its official guide.
-
Check 1
Turn the toilet's local supply stop clockwise only until it stops if the valve is accessible and moves normally, then remove the tank lid and protect the floor without forcing any fitting.
Expected result: Record whether the supply stops, the bowl level is rising, water is reaching the floor, the stop drips or will not turn, or the tank or bowl shows a crack.
Next step: Leave the toilet isolated and call a plumber for overflow, cracks, floor water, or a failed supply stop; otherwise continue with the tank-path observation.
Stop if: Do not force the supply stop, remove a corroded valve, repeatedly flush, or keep using the toilet when water cannot be controlled.
Why this matters
Why: A rising bowl or uncontrolled supply is an immediate overflow concern. A stop that will not isolate the toilet or a cracked tank or bowl requires plumbing service before internal troubleshooting; a safely isolated toilet can be observed from the tank.
-
Check 2
With the tank lid off and the supply safely controlled, observe the water level, overflow tube, flapper or canister seal, and bowl surface without reaching into moving parts.
Expected result: Record whether water reaches or enters the overflow tube, whether the bowl has a continuous ripple while the tank is below overflow level, and whether the seal sits flat or visibly lifts or leaks.
Next step: Follow the matching flapper, canister, chain, or fill-valve check and keep the supply off between observations.
Stop if: Do not press hard on brittle seals, remove the flush valve, or use cleaners containing chlorine or other chemicals in the tank.
Why this matters
Why: Water entering the overflow points to fill-valve or float shutoff trouble. A bowl ripple with the tank below overflow points to a flush-valve seal, seat, chain, or siphoning path instead; the two faults need different parts and checks.
-
Check 3
Inspect the trip lever, handle return, chain or strap, and flapper or canister movement from the open tank; correct only obvious slack or a chain caught under the seal as the toilet manual allows.
Expected result: Record whether the handle returns fully, the chain is tight or tangled, the seal hangs open, or the seal closes flat when the handle is released.
Next step: Restore only the model-specified chain slack and confirm the seal closes; if the seal is cracked, warped, or still leaks, identify the exact replacement or arrange plumber service.
Stop if: Do not shorten the chain until the seal is held open, force the lever, or use the toilet with a loose chain that can fall into the flush valve.
Why this matters
Why: A binding lever or tight chain can hold the flush valve partly open and send water continuously into the bowl. A chain with appropriate slack and a seal that still leaks points toward the seal or flush-valve seat rather than the handle.
-
Check 4
Inspect the refill hose end and its clip or connection from above the tank, comparing its position with the exact toilet instructions; do not push the hose below the tank waterline.
Expected result: Record whether the hose end is below the waterline, detached from the overflow port, spraying outside the tube, kinked, or secured at the intended position, and whether the bowl flow is slow or intermittent.
Next step: Restore the hose to the model-specified overflow connection or clip only if the correction is obvious and safe; if the hose or port is damaged or the bowl still receives water, arrange service.
Stop if: Do not seal the hose into the tank with adhesive, leave it submerged, or remove the fill valve to reach a concealed connection without model guidance.
Why this matters
Why: A hose below the waterline can siphon water through the fill valve into the bowl, producing a slow leak and periodic fill-valve operation even when the flush seal looks closed. A detached or spraying hose can also create refill noise or poor refill behavior.
-
Check 5
Observe one refill cycle with the tank lid off, keeping hands clear of the valve and float; compare the final water level with the model's overflow reference and note sediment or water continuing after the float rises.
Expected result: Record whether the fill valve shuts off below the overflow, water spills into the overflow, the float binds or is set high, or the valve continues admitting water after the tank is full.
Next step: Use only the exact model's fill-valve adjustment or approved cleaning procedure; replace the fill valve only when its failure is confirmed and the compatible model is known, otherwise call a plumber.
Stop if: Do not bend an unknown float arm, disassemble a pressurized valve, remove the tank, or allow the tank to overflow onto the floor.
Why this matters
Why: Overflow indicates a high or binding float, debris in the fill-valve cap, or a fill valve that cannot shut off. A normal final level with a bowl ripple makes the flapper, flush-valve seat, chain, or refill hose more likely.
-
Check 6
Prepare a service record with the toilet model, supply-stop condition, tank water level, overflow behavior, bowl ripple, flapper or canister condition, chain slack, refill-hose position, fill-valve response, and any floor or tank damage.
Expected result: Confirm whether the water path is through the flush seal, overflow, refill hose, or an unknown location, and whether the leak returns after one safe correction.
Next step: Keep the supply off when the running cannot be stopped or damage is present, and give the model and observations to a qualified plumber for diagnosis.
Stop if: Do not keep flushing, leave the tank overflowing, remove the tank, or use the toilet while the supply or internal leak is uncontrolled.
Why this matters
Why: A defined path supports a compatible flapper, fill valve, or flush-valve diagnosis. An unknown or recurring path, damaged seat, cracked tank, failed stop, or floor leak needs plumber inspection rather than another part swap.
Use your observations
Decision map
Find the observation that best matches what you see, then follow the next safe action.
-
PATH 01Safety boundary
What you see
The tank water rises into the overflow tube and the bowl receives a steady refill stream.
Do this next
Keep the supply isolated, follow the exact model's water-level or fill-valve guidance, and arrange service if the valve will not shut off or the level returns to overflow.
Why this path and its safety boundary
Why it matters: A high or binding float, dirty or failed fill valve, or incorrect fill-valve adjustment is more likely than a leaking flapper alone.
Safety stop: Do not let the tank overflow, bend an unknown float mechanism, or replace a valve without model compatibility.
-
PATH 02Safety boundary
What you see
The tank level stays below the overflow tube, but the bowl has a continuous ripple or visible stream.
Do this next
Check chain slack and refill-hose height, then follow the model's seal inspection or replacement guidance; call a plumber for a damaged seat or persistent leak.
Why this path and its safety boundary
Why it matters: A flapper or canister seal, flush-valve seat, tight chain, or refill-hose siphon is more likely than a fill valve overflowing.
Safety stop: Do not force the seal, use tank chemicals, or order a fill valve before locating the water path.
-
PATH 03Safety boundary
What you see
The handle does not return fully, the chain is tight or tangled, or the flapper or canister remains partly lifted after a flush.
Do this next
Restore the model-specified chain slack or remove an obvious tangle, then verify that the seal closes flat and the bowl stops receiving water.
Why this path and its safety boundary
Why it matters: The trip lever or chain is holding the flush valve open and allowing water to continue into the bowl.
Safety stop: Do not shorten the chain until it holds the seal open, force the lever, or use the toilet if the seal cannot close.
-
PATH 04Safety boundary
What you see
The flush seal appears closed and the tank is below overflow, but the refill hose end sits below the tank waterline and the bowl flow is slow or periodic.
Do this next
Secure the refill hose at the exact model-specified overflow connection or clip without submerging its end, then confirm the periodic fill stops; arrange service if the hose or valve is damaged.
Why this path and its safety boundary
Why it matters: Siphoning through the refill hose is more likely than a continuously open flapper.
Safety stop: Do not leave the hose submerged, glue it to the tank, or substitute a permanent clip that can corrode or disconnect.
-
PATH 05Safety boundary
What you see
The tank finishes below overflow, the chain has slack, the refill hose is correctly positioned, but pressing or reseating the flapper or canister changes or stops the bowl ripple.
Do this next
Clean or replace the seal only according to the exact toilet instructions and model fit; arrange plumber service for a nicked seat, corrosion, or a leak that returns.
Why this path and its safety boundary
Why it matters: A worn, dirty, warped, or incompatible flush-valve seal or damaged seat is more likely than a fill-valve fault.
Safety stop: Do not scrape the seat aggressively, use chlorine tablets, or install a seal that does not match the flush valve.
-
PATH 06Safety boundary
What you see
The local supply stop will not close, water is on the floor, the bowl is rising, or the tank or bowl is cracked.
Do this next
Stop using the toilet, isolate the nearest safe water supply if known and accessible, protect the area, and arrange prompt plumbing service.
Why this path and its safety boundary
Why it matters: The immediate problem is uncontrolled water or structural failure, regardless of which internal toilet part originally failed.
Safety stop: Do not force corroded valves, keep flushing, remove the tank, or use a cracked fixture.
Helpful context
Understand the symptom
Stop the water before diagnosing the bowl leak
A toilet that keeps sending water into the bowl is usually losing water from the tank through the flush valve or adding water above the intended level. Turn the local supply stop off if it can be operated safely, place a towel under the tank if needed, and remove the tank lid without forcing it. If the stop is stuck, the bowl is rising, water is reaching the floor, or the tank or bowl is cracked, do not continue adjusting parts—call a plumber.
A flapper leak and an overflow are different paths
With the tank lid off, watch the water level and the overflow tube. If the level rises to the overflow, the fill valve or float is not stopping the incoming water at the intended level. If the level is below the overflow but the bowl ripples, water is likely passing through the flapper or canister seal, a damaged flush-valve seat, a tight chain, or a refill hose that is siphoning. The visible path determines the next safe check.
Chain and refill-hose position can keep water moving
A trip-lever chain that is too tight or caught can hold the flush valve partly open. Kohler also describes an uncommon siphon path when the refill hose end sits below the tank waterline. A hose should be secured at the overflow tube according to the toilet design, not pushed deep into standing water. Use the exact toilet instructions for a clip or connection; do not improvise a permanent attachment that can corrode or disconnect.
Replace parts only after the leaking path is identified
A fill valve is not the right replacement for every running toilet. A worn flapper or canister seal may leak while the fill valve works normally; a fill valve may need service when sediment prevents it from shutting off or when water enters the overflow. A flush-valve seat, cracked tank, or uncertain model fit needs plumber assessment. Record the toilet model before ordering a part, because Kohler notes that fill-valve part numbers vary by model.
Safety boundary
Stop conditions
- Shut the toilet's supply stop if the running cannot be stopped, but do not force a corroded or leaking valve; arrange plumbing service instead.
- Stop immediately for a rising bowl, water on the floor, a cracked tank or bowl, a failed supply stop, or any leak that cannot be isolated.
- Do not remove the tank, disconnect the supply line, or work on pressurized fittings when the shutoff cannot isolate the toilet.
- Do not use chlorine or other in-tank chemicals, scrape a flush-valve seat aggressively, force a float or lever, or fit an unverified replacement part.
- Do not keep flushing or leave the toilet in service when water continues into the bowl after a model-approved adjustment or when the leak path is unknown.
Only after diagnosis
Potential parts
- toilet fill valve
Consider this class only when observation or model-specific diagnosis confirms that the valve cannot shut off, sends water into the overflow, or has an approved replacement procedure after debris or float checks.
Match the exact toilet model, tank height, connection, refill rate, float design, and manufacturer instructions; do not replace a fill valve when the bowl ripple is actually a flush-seal leak. - toilet flapper
Consider this class only when the flush-valve seal is visibly worn, warped, dirty beyond approved cleaning, or confirmed to leak while the tank remains below overflow.
Match the exact flush-valve opening, hinge, chain attachment, material, and toilet model; a generic seal can leak or hold the flush valve open. - toilet flush valve kit
Consider this class only when the flush-valve seat, canister assembly, overflow tube, or related mechanism is damaged or incompatible and a plumber or exact model instructions confirm a kit is appropriate.
Match the exact tank and bowl model, flush-valve height and opening, seal design, overflow arrangement, and installation requirements; tank removal or pressurized disconnection may require a plumber.
When checks do not resolve it
Need a professional?
Arrange medium-priority plumbing service when water continues into the bowl after the chain, refill-hose position, seal, and model-approved water-level checks; when the fill valve repeatedly enters overflow; when the flush-valve seat, tank, bowl, or supply stop is damaged; or when a compatible part cannot be identified. Seek prompt service for a rising bowl, floor water, structural crack, or a supply stop that cannot isolate the toilet.
Safety scope: This article supports ordinary-access tank observation and model-approved chain, refill-hose, seal, or water-level adjustments only. Do not force shutoffs, disconnect pressurized fittings, remove the tank, use harsh tank chemicals, or work on a cracked fixture.
Common questions
FAQ
Why does water keep running into my toilet bowl?
Water may be leaking past the flapper or canister seal, entering the overflow because the fill valve or float is too high, siphoning through a refill hose below the waterline, or being held open by a tight chain or binding handle. Observe the tank water path before choosing a part.
How do I tell if the toilet is overflowing or the flapper is leaking?
With the tank lid off, water entering the overflow tube points to a fill-valve or float shutoff problem. A bowl ripple while the tank stays below the overflow points to the flapper or canister seal, flush-valve seat, chain, or refill-hose path.
Can a refill hose make water siphon into the toilet bowl?
Yes. Kohler describes siphoning when the refill hose end sits below the tank waterline. Secure the hose at the model-specified overflow connection or clip without submerging it, and arrange service if the hose or valve is damaged.
Should I replace the fill valve or the flapper?
Replace neither by guesswork. A fill valve is implicated when water continues into the overflow or will not shut off; a flapper or canister seal is implicated when the tank is below overflow but the bowl ripples. Model-specific diagnosis and fit matter.
When should I shut off the toilet supply and call a plumber?
Shut the supply if the running cannot stop, the bowl is rising, water reaches the floor, the tank or bowl is cracked, or the supply stop will not isolate the toilet. Call when a model-approved chain, hose, seal, or water-level check does not stop the leak or the cause is unknown.
Read the exact guide
Official sources
- How to Fix a Running ToiletKohler · Kohler consumer guidance; exact model manual controls seal, valve, tank-level, and replacement procedures.
- Toilet Constantly Leaking or RunningKohler Assist · Kohler troubleshooting guidance for one- and two-piece toilets; exact toilet model instructions control part fit and adjustments.
- Tank Leak - Fill Valve Hose PositionKohler Assist · Kohler guidance for hose-position leakage; tank designs vary and exact model instructions control the connection or clip.
Community feedback
Share a repair observation
Share a plain-text repair observation. Accepted observations are published automatically; this page may take a moment to update.