
On this page
Start here
Quick answer
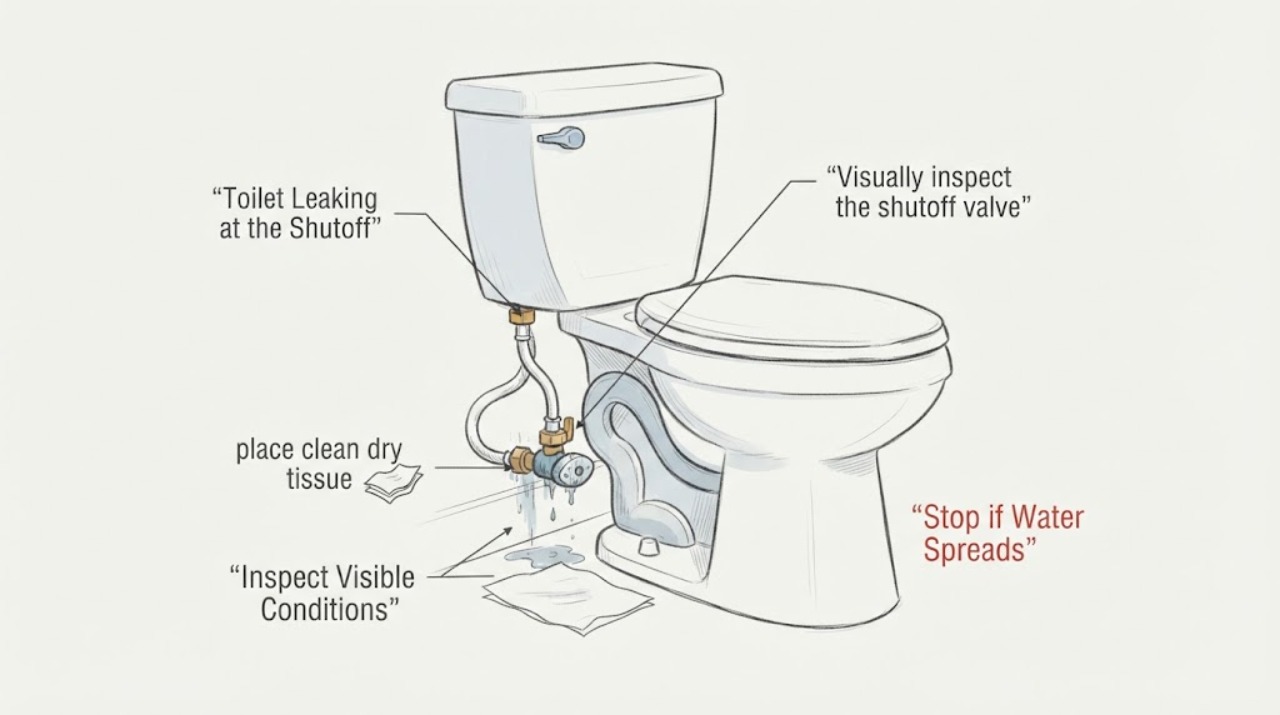
If a toilet appears to leak at its shutoff valve, first determine whether water begins at the valve, supply line, tank inlet, tank-to-bowl seam, or floor and then isolate the toilet only if the accessible valve turns normally. Turn the valve clockwise gently; never force a stiff or corroded valve. Do not flush while water is escaping, remove the supply line under pressure, or tighten fittings by guesswork. Dry the area and observe the first wet point from a safe position. A leak at the valve or supply connection keeps the valve, line, and seal in scope; a tank seam or base leak points elsewhere, even if water runs down to the valve. If the valve will not close, water continues, the tank or bowl is cracked, contaminated water or flooding is present, or nearby electrical equipment is wet, stop using the toilet and call a qualified plumber.
Work through in order
Diagnostic checks
Use only checks that match the exact appliance or system and its official guide.
-
Check 1
From a dry position, look at the shutoff valve, its wall or floor connection, the supply line, the tank inlet, the tank-to-bowl seam, and the bowl base. If water is actively flowing and the valve handle turns normally, close it clockwise gently; do not force it or flush the toilet.
Expected result: Flow that slows or stops supports a toilet-side supply or stored-water source. Flow that continues after the valve is closed suggests a valve that did not isolate, stored water, a concealed source, or water arriving from elsewhere.
Next step: Keep the toilet out of use and record whether the valve closed. Call a plumber if the handle is stiff, the valve leaks while being turned, water continues, or the area is unsafe.
Why this matters
Why: Isolation reduces additional water loss but does not establish that the valve itself is defective.
-
Check 2
With the supply isolated and the outside dry, place clean dry tissue or paper towel against the valve body, both valve connections, the supply line ends, and the tank inlet without loosening or tightening anything.
Expected result: The first tissue that becomes wet at the valve body suggests a valve leak; at a nut or line end suggests a connection or supply-line seal; at the tank inlet suggests the tank-side connection. A dry supply path shifts attention to water running down from the tank or bowl.
Next step: Leave the valve closed, photograph or note the exact wet point, and arrange plumbing service if the source is not an obvious external drip that the model instructions specifically address.
Why this matters
Why: A controlled first-wet-point check separates the shutoff-valve branch from a leak that only collects near it.
-
Check 3
Visually inspect the shutoff valve and supply line for corrosion, mineral tracks, bulging, cracked plastic, damaged threads, or a line that is kinked or under strain. Do not touch a wet fitting or attempt to straighten, disconnect, or open it.
Expected result: Corrosion, a crack, a bulge, or a damaged connection keeps the valve or supply line in professional scope. A sound-looking line with water starting higher on the tank does not support replacing the shutoff valve.
Next step: Keep the supply isolated and call a plumber for a damaged valve, line, wall connection, or persistent seepage. Do not use the toilet to pressurize the line for another test.
Why this matters
Why: The valve can be the collection point without being the origin, and visible damage can make further manipulation unsafe.
-
Check 4
Inspect the tank and bowl from outside for water at the tank-to-bowl seam, tank mounting area, flush-valve opening, bowl base, or a visible crack. Look only; do not tighten tank hardware or press on porcelain.
Expected result: Water beginning at the tank-to-bowl joint keeps the tank gasket or mounting seal in scope. Water at the base keeps the bowl seal, crack, drain, or water from above in scope. A crack or shifting tank is a structural stop condition.
Next step: Leave the water off and call a plumber for a joint leak, crack, movement, or base leak. Do not remove the tank or toilet to confirm a theory.
Why this matters
Why: A higher leak can run down and mimic a shutoff-valve leak, so the tank and base must be separated from the supply branch.
-
Check 5
Determine whether the complaint is external water or continuous flow into the bowl by listening for filling and looking at the bowl surface without reaching into the tank. Do not disturb the fill valve, flapper, trip lever, or flush mechanism.
Expected result: A steady ripple or filling sound with no outside wetness is an internal running-toilet branch. Water on the floor, valve, supply line, or porcelain exterior remains an external leak branch.
Next step: Keep the supply off if internal flow persists or is accompanied by external water, and call a plumber for model-specific fill or flush-valve diagnosis.
Why this matters
Why: An internal running toilet can waste water without a leaking shutoff valve, while an external valve leak can exist without bowl movement.
-
Check 6
Prepare a service note without restoring pressure: record the first wet point, whether the shutoff closed, valve and line condition, tank and base observations, whether water was clean or contaminated, whether the toilet was recently installed or moved, and whether another fixture was running.
Expected result: A valve-body leak supports shutoff-valve service; a line-end leak supports supply-line or seal service; a tank-joint leak supports gasket and mounting inspection; a base or cross-fixture leak supports bowl, drain, or concealed-pipe investigation.
Next step: Keep the toilet isolated and give the note to a qualified plumber. Do not restore water simply to repeat a leak that has already been located or that worsens under pressure.
Why this matters
Why: Timing and location prevent an unnecessary tank-gasket or shutoff-valve replacement based only on where water pooled.
Use your observations
Decision map
Find the observation that best matches what you see, then follow the next safe action.
-
PATH 01Safety boundary
What you see
The shutoff valve is stiff, damaged, leaking around its body, or does not stop water when gently closed.
Do this next
Stop using the toilet, keep people away from the water, isolate the home supply only if its main valve is safely accessible, and call a plumber.
Why this path and its safety boundary
Why it matters: The toilet cannot be safely isolated at the fixture and the valve or upstream supply is in professional scope.
Safety stop: Do not force the handle, remove the valve, disconnect the supply line, or work in standing water near electricity.
-
PATH 02Safety boundary
What you see
The first moisture returns on the shutoff-valve body or its wall/floor connection while the surrounding supply path remains dry.
Do this next
Leave the water isolated and have a qualified plumber inspect the valve, connection, and upstream pipe. Keep the toilet out of use.
Why this path and its safety boundary
Why it matters: The shutoff valve or its connection is a leading source, not the tank gasket.
Safety stop: Do not open the valve body, repack it, apply sealant, or pressurize the line to repeat the leak.
-
PATH 03Safety boundary
What you see
The first wet point is a supply-line end, connection nut, or tank inlet rather than the valve body.
Do this next
Keep the valve closed, avoid moving the line, and call a plumber if the connection remains wet or shows corrosion, cracks, or strain.
Why this path and its safety boundary
Why it matters: The supply line, connector seal, or tank inlet is more likely than the shutoff valve or tank-to-bowl gasket.
Safety stop: Do not disconnect a pressurized line, over-tighten the nut, or substitute a line without model and connection verification.
-
PATH 04Safety boundary
What you see
Water begins at the tank-to-bowl seam or tank mounting area while the shutoff and supply connection remain dry.
Do this next
Keep the supply off and arrange a plumber inspection of the model-specific joint and porcelain.
Why this path and its safety boundary
Why it matters: A tank gasket, mounting seal, hardware alignment, or porcelain condition is in scope; the shutoff valve is only a downstream collection point.
Safety stop: Do not overtighten tank hardware, remove the tank, or press on a cracked or shifting tank.
-
PATH 05Safety boundary
What you see
Water begins at the bowl base, under the floor, inside a wall, or only after another fixture runs.
Do this next
Stop using the toilet and related fixtures, keep water away from electrical equipment, and call a plumber for the base or concealed source.
Why this path and its safety boundary
Why it matters: A bowl seal, crack, drain, concealed supply, or neighboring fixture may be involved; a shutoff-valve repair is not supported by this location alone.
Safety stop: Do not lift the toilet, disturb a floor seal, enter contaminated water, or open a wall as a casual check.
-
PATH 06Safety boundary
What you see
The tank continually sends water into the bowl but no outside surface becomes wet.
Do this next
Keep the water off if the flow persists and use model-specific manufacturer guidance or plumber service; do not reach into an uncertain tank assembly.
Why this path and its safety boundary
Why it matters: This is an internal fill, overflow, trip-lever, or flush-seal branch rather than proof of a leaking shutoff valve.
Safety stop: Do not add cleaners, repeatedly flush, or manipulate internal parts while an external leak or water-damage risk is present.
Helpful context
Understand the symptom
A puddle around the toilet shutoff valve is a location clue, not a diagnosis. Water can travel along the supply line, tank underside, porcelain, or floor before collecting at the valve. Start with the supply connection, tank inlet, tank-to-bowl seam, and base as separate paths, and record the first place that becomes wet.
Keep the check external and low force. A normally moving shutoff valve may be closed gently to limit water, but a seized or damaged valve can break or worsen a leak if forced. Do not remove the supply line, open the valve body, or overtighten a porcelain tank connection as a first response.
If water is going into the bowl rather than onto the floor, it is a different problem from an external valve leak. If water reaches a ceiling below, electrical equipment, or a contaminated area, stop using the toilet and escalate promptly to a plumber or emergency service as appropriate.
Safety boundary
Stop conditions
- Stop and isolate water when the valve will not close normally, water continues after isolation, the valve or line is cracked or corroded, the tank or bowl is cracked or moving, or water reaches the floor, ceiling below, or electrical equipment.
- Do not force a shutoff valve, disconnect a pressurized supply line, open the valve body, overtighten fittings or porcelain tank hardware, remove the tank or toilet, or pressurize the system to repeat a leak test.
- Treat sewage or contaminated water, flooding, structural damage, and wet electrical equipment as professional or emergency conditions. Keep people and pets away and do not restore water merely to see whether the leak returns.
Only after diagnosis
Potential parts
- toilet shutoff valve
Consider this only after a qualified plumber confirms that the valve body or its connection is the first wet point and the upstream pipe can support service.
Valve type, connection, pipe material, access, and local requirements must be verified before selection; do not replace a valve by appearance alone. - toilet supply line
Consider this only when the first wet point is the supply line or its connector and a plumber confirms the line or seal is the source.
Connection type, length, valve condition, and model-specific fit must be confirmed before replacement. - tank-to-bowl gasket
Consider this only when water is confirmed at the tank-to-bowl joint and the tank, bowl, and mounting arrangement are sound.
Gasket shape and mounting hardware are model-specific, and porcelain can crack from excess force; have a plumber confirm the repair path.
Common questions
FAQ
How do I know if the toilet shutoff valve is the leak source?
Close the normally moving valve gently, dry the area, and observe the first place that becomes wet. If moisture starts on the valve body or its wall/floor connection, the valve is in scope; if it starts higher on the tank or at the base, water may only be collecting near the valve.
What if the toilet shutoff valve will not turn?
Do not force a stiff or corroded valve. Stop using the toilet, isolate the main supply only if safely accessible, and call a plumber to avoid breaking the valve or worsening the leak.
Does a puddle by the shutoff valve mean the tank gasket failed?
No. Water can travel down from a tank inlet, tank-to-bowl seam, supply line, bowl base, wall, or floor. Trace the first wet point before considering a gasket or valve part.
Why is the toilet leaking into the bowl but not onto the floor?
That is usually an internal running-toilet branch involving the fill valve, overflow, trip lever, or flush seal. It does not by itself indicate a leaking shutoff valve.
Read the exact guide
Official sources
- How to Clean the Toilet Water Control Valve of DebrisAmerican Standard · Toilet water-control valve shutoff context and manufacturer-specific valve servicing boundary
- Troubleshooting: Water Leaking From ToiletKohler · Toilet leak location, water-supply connection, tank-and-bowl joint, tank gasket, valve isolation, porcelain condition, and service escalation
- Toilet Constantly Leaking or RunningKohler Assist · Internal running-toilet symptoms, fill valve, overflow, trip lever, and flush-seal distinctions
- Home MaintenanceU.S. Environmental Protection Agency · Household leak monitoring, toilet maintenance, water damage awareness, and plumber escalation
- Fix a Leak WeekU.S. Environmental Protection Agency · Household leak identification, toilet leak testing, water-line shutoff, and plumbing escalation
Community feedback
Share a repair observation
Share a plain-text repair observation. Accepted observations are published automatically; this page may take a moment to update.