
On this page
Start here
Quick answer
First decide whether the complaint is a weak flush, a tank that refills slowly, or low pressure at several fixtures. For a tank toilet, check that the local shutoff is open and the supply connection is dry, then observe the tank water level and whether the fill valve stops at the normal line. A slow refill at one toilet points toward the shutoff, hose, inlet screen, or fill valve; weak flow throughout the home points toward the building supply or pressure-control system. Do not force a seized valve, disconnect a pressurized hose, pour chemicals into the tank, or keep flushing when the bowl is blocked, overflowing, contaminated, or not clearing. Use the exact toilet instructions for any adjustment and call a qualified plumber when the valve, supply, flush path, or whole-home pressure needs diagnosis.
Before you begin
Safety first
- This article supports ordinary-access observation, a gentle external valve check when dry and safe, tank-level observation, and a no-flush dye test. Do not disconnect pressurized plumbing, force valves, use chemicals, dismantle the toilet, or alter a regulator or main supply.
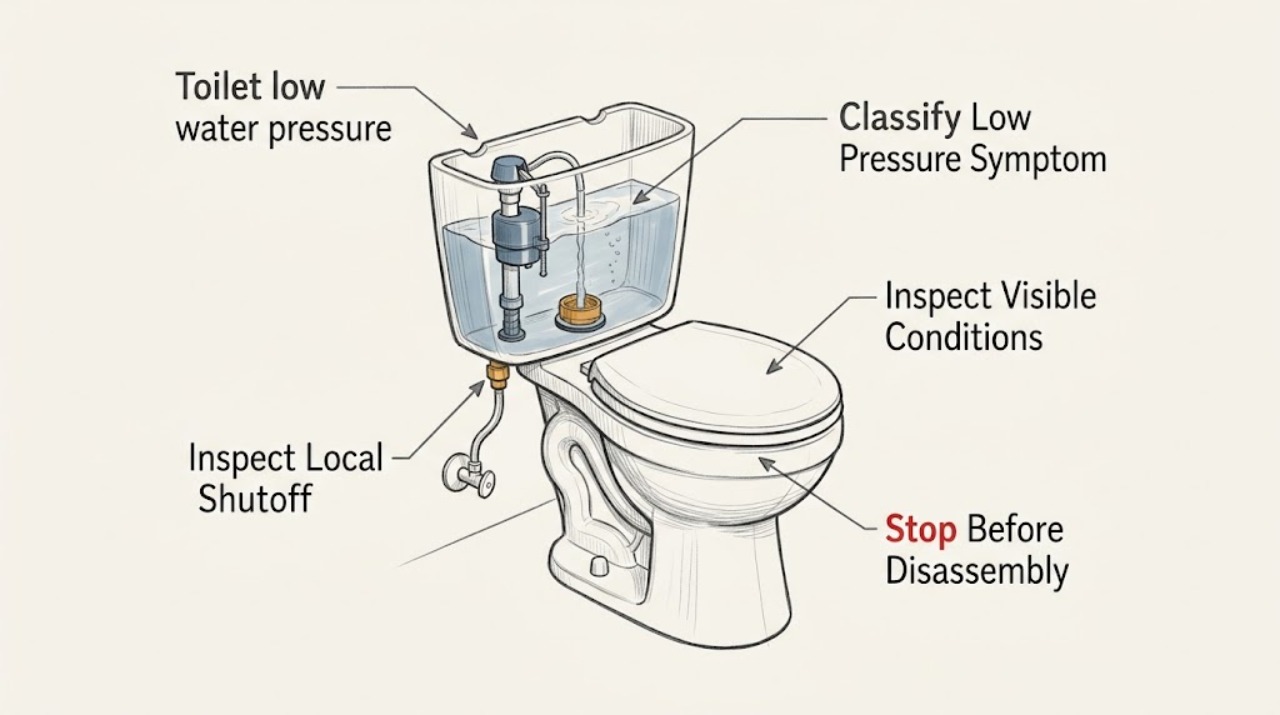
Work through in order
Diagnostic checks
Use only checks that match the exact appliance or system and its official guide.
-
Check 1
Observe one normal flush without holding the handle down and record whether the toilet has a weak bowl-clearing flush, a slow tank refill, a low tank level, a running sound, or several symptoms at once.
Expected result: Note whether the tank reaches its usual level, whether water enters the bowl with normal force, whether the bowl drains freely, and whether the refill sound continues after the tank should be full.
Next step: Use the symptom classification to choose the supply and fill-valve checks; if the bowl rises, does not clear, or overflows, stop flushing and arrange plumbing service.
Stop if: Stop for an overflowing or blocked bowl, dirty wastewater, a cracked fixture, uncontrolled water, or a toilet that moves when operated.
Why this matters
Why: Slow refill or a low tank level supports the supply, shutoff, hose, inlet, or fill-valve path. A normal tank level with a weak flush shifts attention to the flush valve, rim passages, bowl, or drain rather than water pressure alone. A continuing refill sound can also indicate a flapper leak.
-
Check 2
From dry ordinary access, look at the toilet's local shutoff and supply hose; if the valve is clearly intact and the area is dry, confirm its normal open position with a gentle movement only when the fixture instructions allow it.
Expected result: Record whether the valve appears partly closed, the hose is kinked, the connection is damp, the valve is corroded or seized, or the hose looks unobstructed and dry.
Next step: Leave a damaged or seized valve alone, keep a leaking connection isolated if safe, and arrange plumbing service. If the path is dry and fully open, continue with tank-level and whole-home comparison rather than disconnecting the hose.
Stop if: Do not force the shutoff, disconnect the supply hose, tighten a corroded fitting, or open the valve near standing water.
Why this matters
Why: A partly closed valve or kinked hose can reduce refill flow at one toilet. Dampness, corrosion, a seized valve, or a connection that changes when touched needs professional service; a clear supply path makes the fill valve or upstream pressure more likely.
-
Check 3
Remove only the tank lid if the toilet is stable and dry, locate the existing water line or overflow opening, and watch one refill cycle without putting hands into the tank or adjusting the fill valve.
Expected result: Record whether the tank fills slowly, stops below its normal line, sends water into the overflow, reaches the expected line but the bowl remains weak, or never shuts off.
Next step: Use the exact model instructions for any permitted level adjustment; otherwise close the local valve and call a plumber for a fill-valve, overflow, or internal supply diagnosis.
Stop if: Stop for an active overflow, a broken float, a cracked tank, unknown chemical cleaner, or any need to bend, pry, or replace internal parts by guesswork.
Why this matters
Why: Slow or low refill supports a restricted supply or fill-valve problem. Water entering the overflow or never stopping indicates level-control or fill-valve trouble. A normal tank level with weak bowl action makes a flush or drain issue more likely than low pressure.
-
Check 4
If the toilet refills slowly or runs intermittently, perform one no-flush dye observation only when the bowl is clear and the fixture is stable: add dye to the tank and check whether color reaches the bowl during the recommended wait.
Expected result: Record whether the bowl remains clear, shows color, or cannot be tested because of an active leak, colored tank product, overflow, or blocked bowl.
Next step: If color appears, inspect only the visible chain and seal condition with the supply isolated and use exact model guidance; if clear, compare other fixtures and the local supply path. Do not keep flushing to repeat the test.
Stop if: Do not perform the dye test during overflow, dirty water, a blocked bowl, a cracked tank, or when tank chemicals cannot be identified.
Why this matters
Why: Color in the bowl shows tank water is crossing the flapper or flush-valve seal, so the apparent low pressure may be caused by water loss rather than an inadequate supply. A clear bowl leaves the supply, fill valve, level, or another fault for further checks.
-
Check 5
From ordinary safe use, compare the affected toilet with another toilet, a nearby faucet, and another cold-water fixture; record the result without running several fixtures at once for an extended test.
Expected result: Classify the issue as one toilet only, all toilets, one bathroom, all cold-water fixtures, or a pressure change that follows other water use; note any recent shutoff or building work.
Next step: Provide the comparison and any recent water-service event to a plumber or water utility; do not alter a pressure regulator or open a main supply assembly.
Stop if: Stop for widespread loss of water, discolored or unsafe water, a leak, pressure surges, or a need to adjust or dismantle a main valve or regulator.
Why this matters
Why: One toilet supports a local shutoff, hose, fill valve, tank level, or flush-path fault. Several fixtures with low flow support an upstream valve, pressure regulator, service line, building supply, or utility issue rather than a single fill valve.
-
Check 6
If the tank reaches its normal level but the bowl clears weakly, observe the handle, chain, flapper or flush-valve movement, rim flow, and bowl drain from ordinary access; do not insert tools or chemicals into the bowl or rim.
Expected result: Record whether the handle has normal travel, the flapper opens fully, water flows around the bowl rim, the bowl drains freely, or there is gurgling, backup, or a persistent obstruction.
Next step: Use only the exact fixture instructions for a visible handle or chain correction; call a plumber for a blocked drain, weak flush valve, hidden obstruction, or any need to remove the bowl or open the drain.
Stop if: Do not use chemical drain opener, force the handle, remove the bowl, or continue flushing a bowl that rises or backs up.
Why this matters
Why: Normal tank level with incomplete valve movement or weak rim flow is not a fill-pressure diagnosis. Slow bowl drainage, gurgling, or backup points toward a drain or obstruction issue; a stuck handle or chain can reduce the flush opening.
-
Check 7
Record the toilet model markings, tank-level result, refill time category, local valve and hose condition, dye result if safely completed, comparison with other fixtures, and any leak or wastewater sign for the plumber.
Expected result: Note whether the problem began after a supply shutoff, renovation, pressure change, freezing event, internal-part work, or without a known trigger.
Next step: Keep the toilet available only when it is safe and not overflowing; arrange qualified plumbing service for unresolved low refill, low tank level, weak flush, or whole-home pressure symptoms.
Stop if: Do not disconnect plumbing, adjust a regulator, drill an inlet, or continue operation when there is leakage, contamination, structural damage, or a failed shutoff.
Why this matters
Why: This record helps separate a fill-valve or local supply restriction from a flapper leak, weak flush mechanism, blocked drain, or whole-home pressure problem without unsafe disassembly.
Use your observations
Decision map
Find the observation that best matches what you see, then follow the next safe action.
-
PATH 01Safety boundary
What you see
Only this toilet refills slowly or stops below its normal tank level, while nearby fixtures have normal flow.
Do this next
Inspect the valve and hose externally, then use model-specific fill-valve guidance or arrange plumbing service; do not disconnect the hose by force.
Why this path and its safety boundary
Why it matters: The local shutoff, supply hose, inlet path, fill valve, or tank-level control is more likely than whole-home pressure.
Safety stop: Stop for a wet connection, seized valve, damaged hose, overflow, or a tank that cannot be safely opened.
-
PATH 02Safety boundary
What you see
The tank fills to its normal level, but the bowl-clearing action is weak or the bowl drains slowly.
Do this next
Observe the visible flush movement and drain behavior without chemicals or force; call a plumber for an obstruction, weak flush valve, or hidden drain problem.
Why this path and its safety boundary
Why it matters: The symptom is not established as low supply pressure and may involve the handle, flush valve, rim flow, bowl, or drain.
Safety stop: Do not keep flushing a rising bowl, use chemical opener, or remove the bowl as a pressure repair.
-
PATH 03Safety boundary
What you see
The tank dye appears in the bowl during a no-flush test.
Do this next
With the local valve closed, inspect visible chain and seal alignment and follow exact fixture instructions or arrange a plumber for the internal repair.
Why this path and its safety boundary
Why it matters: Water is leaking through the flapper or flush-valve seal, which can make refill or available flush water appear inadequate.
Safety stop: Do not add tank chemicals, force the seal, or replace a part without confirming model fit and the source of the leak.
-
PATH 04Safety boundary
What you see
The tank sends water into the overflow or never shuts off after refilling.
Do this next
Close the local shutoff and use model-specific instructions or qualified plumbing service; do not keep the toilet supplied while it overflows.
Why this path and its safety boundary
Why it matters: The fill valve, float, or level-control path is not stopping water at the intended level; this can waste water and may become an overflow.
Safety stop: Do not bend the float, force the valve, or leave the fixture unattended with an active overflow.
-
PATH 05Safety boundary
What you see
Several toilets or cold-water fixtures have low flow, or pressure changes when another fixture runs.
Do this next
Record the affected fixtures and timing, contact a qualified plumber or water utility, and leave the toilet's internal parts unchanged.
Why this path and its safety boundary
Why it matters: The cause may be upstream in a private shutoff, regulator, service line, building plumbing, or utility supply rather than this fill valve.
Safety stop: Stop for a widespread outage, pressure surge, leak, unsafe water, or any need to dismantle a main valve or regulator.
-
PATH 06Safety boundary
What you see
The local valve or supply hose is damp, corroded, kinked, seized, or sprays when moved.
Do this next
Do not move it further; close the main supply only if it is safe and known, then arrange plumbing service for the valve, hose, wall connection, and fill path.
Why this path and its safety boundary
Why it matters: The pressurized local connection may be restricting flow or creating a water-damage risk.
Safety stop: Stop for uncontrolled water, standing water, a valve that breaks, or water near electrical equipment.
-
PATH 07Safety boundary
What you see
The bowl rises, backs up, overflows, contains dirty wastewater, or the toilet rocks or is cracked.
Do this next
Stop flushing, close the local valve, keep people away from contaminated or unstable areas, and arrange prompt plumbing service.
Why this path and its safety boundary
Why it matters: The immediate issue is blockage, sanitation, or structural safety, not a fill-valve adjustment.
Safety stop: Do not use chemicals, plunge forcefully against a damaged fixture, touch contaminated water without protection, or move the toilet.
Helpful context
Understand the symptom
Define what feels like low pressure
A toilet can flush weakly even when its tank fills normally, or it can refill slowly while the flush itself is adequate. A low tank level, partially closed shutoff, restricted supply path, or fill-valve fault can limit the water available for the next flush. A blocked bowl, weak flush valve, clogged rim, or drain problem is a different path. Compare the exact symptom and timing before changing a fill valve.
Check the local supply before the internal valve
The small shutoff behind or below a toilet should be open and the supply hose should be dry and undamaged, but old valves can seize or leak when moved. Look from ordinary access and change its position only gently when the area is dry and the fixture instructions support it. If other fixtures are also weak, or the pressure changes when another fixture runs, the cause may be upstream of this toilet and needs plumbing assessment.
Use tank level and refill behavior as decision points
After one normal flush, observe how the tank refills and where the water stops relative to the overflow opening and the marked level. A tank that stops low or takes unusually long to fill supports a supply or fill-valve check. A tank that reaches its normal level but the bowl still flushes poorly points toward the flush valve, rim, bowl, or drain instead. Avoid bending floats or replacing internal parts unless the exact model instructions identify that adjustment.
Safety boundary
Stop conditions
- Stop flushing for a rising or blocked bowl, overflow, dirty wastewater, sewer odor, cracked porcelain, or a toilet that rocks.
- Do not force a seized shutoff, disconnect a pressurized hose, tighten corroded fittings, adjust a regulator, or dismantle a main supply assembly.
- Do not bend floats, pry a fill valve, add tank or drain chemicals, drill an inlet, or replace an internal part without exact model-specific guidance.
- Keep water away from electrical equipment and stop for uncontrolled flow, standing water, a failed shutoff, or a connection that sprays when touched.
- Call a qualified plumber for persistent low refill, low tank level, weak flush with a normal tank level, low flow at multiple fixtures, or any symptom that cannot be safely localized.
Only after diagnosis
Potential parts
- toilet fill valve
Consider this category only when the tank refills slowly, stops at the wrong level, or continues into the overflow and inspection supports a failed fill valve.
Confirm the exact toilet model, inlet connection, valve style, antisiphon arrangement, level range, and manufacturer instructions before selecting a replacement. - toilet supply hose
Consider this category only when the hose is kinked, damaged, leaking, or restricted and a plumber confirms that replacement is appropriate.
Confirm connection sizes, length, material, routing, and shutoff condition; do not disconnect a pressurized or corroded connection as a test. - toilet flapper or flush-valve seal
Consider this category only when a no-flush dye test confirms tank water entering the bowl or inspection confirms a worn seal that is reducing available flush water.
Confirm the toilet model, flush-valve opening, chain connection, and manufacturer fit information; do not assume a universal seal fits every tank.
When checks do not resolve it
Need a professional?
Call a qualified plumber when the toilet refills slowly despite a dry, open local supply path, the tank never reaches or holds its normal level, water enters the overflow, the fill valve or shutoff is seized or leaking, the dye test shows water loss, the bowl flushes weakly with a normal tank level, several fixtures have low flow, or the bowl backs up. Keep the fixture out of use for overflow, wastewater, cracked porcelain, standing water, or a failed shutoff.
Safety scope: This article supports ordinary-access observation, a gentle external valve check when dry and safe, tank-level observation, and a no-flush dye test. Do not disconnect pressurized plumbing, force valves, use chemicals, dismantle the toilet, or alter a regulator or main supply.
Common questions
FAQ
Does a weak toilet flush always mean low water pressure?
No. If the tank reaches its normal level, a weak flush can involve the handle, flush valve, rim flow, bowl, or drain. If the tank refills slowly or stays low, inspect the local supply path and fill-valve behavior instead.
Why does my toilet tank refill slowly?
A partly closed or restricted shutoff, kinked supply hose, inlet restriction, fill-valve problem, or upstream pressure issue can slow refill. Compare other fixtures, inspect only the visible supply path, and do not disconnect a pressurized connection.
What tank level should a toilet have?
Use the existing water line, overflow opening, and the exact toilet instructions rather than a universal measurement. A tank that stops low, enters the overflow, or never shuts off needs model-specific adjustment or plumbing service.
Can a leaking flapper look like low water pressure?
Yes. If tank water leaks into the bowl, the toilet can refill repeatedly or have less stored water available for the next flush. A no-flush dye test can confirm that tank-to-bowl path when the bowl and fixture are safe to test.
When should a plumber check toilet water pressure?
Call when one toilet has slow refill despite a dry open supply path, the fill valve overflows, the shutoff or hose is damaged, the tank level stays low, several fixtures have low flow, the bowl backs up, or the cause cannot be localized safely.
Read the exact guide
Official sources
- Toilet Leak DetectionNew York City Department of Environmental Protection · NYC DEP household toilet guidance; exact fixture instructions and local plumbing requirements control a particular toilet.
- Leak Alerts: Find and Fix LeaksSan Francisco Public Utilities Commission · SFPUC household leak guidance; model-specific instructions control internal adjustments and repairs.
- Frequently Asked QuestionsCity of Tampa Water Department · City of Tampa water-service FAQ; shutoff locations and hardware vary by property and fixture.
- How to Check for LeaksCity of Tampa Water Department · City of Tampa household leak-detection guidance; it does not authorize disassembly of a particular toilet or supply line.
Community feedback
Share a repair observation
Share a plain-text repair observation. Accepted observations are published automatically; this page may take a moment to update.