
On this page
Start here
Quick answer
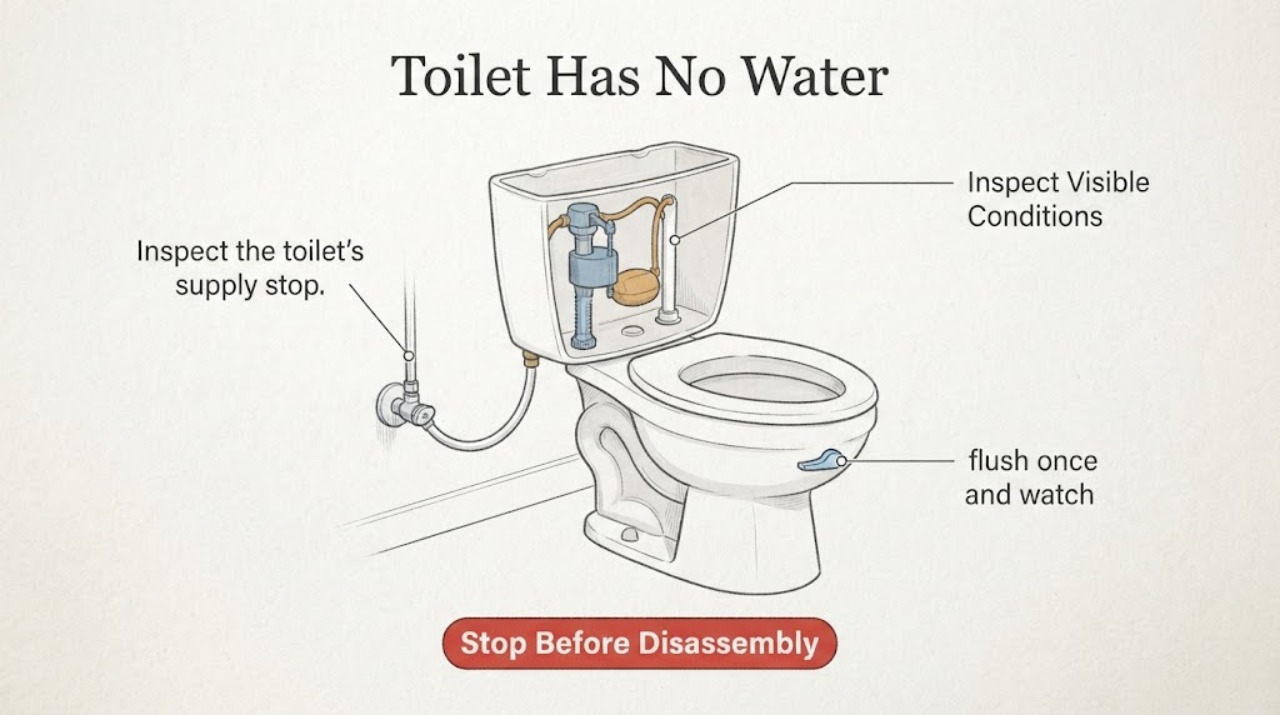
If the toilet tank is empty after a flush, first check whether other fixtures have water, then verify the toilet's supply stop is fully open and the supply line is not kinked. If water reaches the fill valve but the tank still does not refill, debris or a failed fill-valve/float assembly is more likely. Turn the stop valve off if water is leaking, the tank or supply connection is cracked, or a valve will not shut off; do not force a stuck valve or open a concealed or pressure-assisted assembly without its model instructions.
Work through in order
Diagnostic checks
Use only checks that match the exact appliance or system and its official guide.
-
Check 1
Confirm what is actually dry: look at the tank after a flush and briefly test a nearby cold-water faucet without dismantling the toilet.
Expected result: The nearby faucet also has no water, or water service is visibly interrupted; alternatively, other fixtures work but the toilet tank remains empty.
Next step: If other fixtures are also dry, check the home's accessible main shutoff and any known building outage. If only this toilet is affected, continue to the toilet stop and line check.
Stop if: Stop if there is sewage backup, flooding, or a damaged supply connection.
Why this matters
Why: No water at multiple fixtures points to a building supply or shutoff issue. Water elsewhere narrows the problem to the toilet's stop, supply line, fill valve, or float.
-
Check 2
Inspect the toilet's supply stop and exposed supply line. Turn the stop counterclockwise only by hand until it is open; inspect the line for kinks, crushing, or a wet connection.
Expected result: The stop was closed or partly closed, the line is kinked, or water begins leaking when the stop is opened; alternatively, the stop is open and the line stays dry and intact.
Next step: Open an intact stop fully and test one flush. If the line is kinked, correct only an accessible, flexible line without twisting its fittings. If it leaks, close the stop and arrange plumbing service.
Stop if: Do not force a stuck stop, loosen a pressurized fitting, or continue if water sprays or the connection moves in the wall.
Why this matters
Why: A closed stop or restricted line can prevent any tank refill. Leakage at the stop, compression nut, or line indicates a connection or valve fault, not a fill-level adjustment.
-
Check 3
With the tank lid removed carefully, flush once and watch the float and fill valve. Do not hold the flush mechanism open; keep hands clear of moving parts and water connections.
Expected result: The float drops but no water enters; water enters weakly or intermittently; or the valve fills and then stops at the tank's marked water line.
Next step: If there is no or weak inlet flow, continue to the model-appropriate valve cleaning check. If the tank fills normally, perform a second flush and inspect for a refill-tube or flush-valve issue instead of replacing parts.
Stop if: Stop if the tank, valve body, or mounting hardware is cracked, unstable, or leaking.
Why this matters
Why: No inlet flow with an open stop suggests a blocked inlet/supply path or failed fill valve. Weak intermittent flow suggests debris or restriction. A normal fill that reaches the marked line means the original issue may have been the stop or an incomplete refill.
-
Check 4
If the stop and line are sound but the fill valve is restricted, use the toilet model's instructions to isolate the supply, remove only the approved valve cap or screen, and clear visible debris without probing seals or forcing plastic parts.
Expected result: Debris is present at the inlet or valve head, or the valve remains clear but will not pass water after the supply is briefly restored.
Next step: For a compatible valve design, reinstall the cap exactly as instructed, reopen the stop slowly, and verify that the tank fills and shuts off. If the valve remains blocked or the design is unfamiliar, stop and have a plumber identify the assembly.
Stop if: Stop before removing a pressure-assisted vessel, concealed valve, electronic control, or any part not covered by the model instructions.
Why this matters
Why: Debris can block the valve seat or inlet. If cleaning does not restore flow, a damaged float, seal, or fill-valve assembly becomes more likely and model-specific replacement may be required.
-
Check 5
After water returns, check the tank and bowl during a complete refill: verify the fill valve stops, the refill tube remains secured as designed, and no water runs continuously into the bowl or onto the floor.
Expected result: The tank reaches its marked level and stays quiet, or the valve runs continuously, the level falls, the bowl ripples, or a connection leaks.
Next step: If the level is stable, retest the flush once. If it runs or falls, close the stop when the toilet is not needed and arrange service to inspect the fill and flush valves; if the floor is wet, keep the stop closed.
Stop if: Stop immediately for a cracked tank, active floor leak, uncontrolled flow, or wastewater backup.
Why this matters
Why: A stable water level indicates a restored supply. Continuous running or a falling level can indicate a leaking flush valve/flapper, float or fill-valve seal problem, or a refill connection issue; a floor leak is a plumbing connection or fixture fault.
Use your observations
Decision map
Find the observation that best matches what you see, then follow the next safe action.
-
PATH 01Next step
What you see
Other fixtures also have no water.
Do this next
Treat this as a building supply or main-shutoff problem; do not replace toilet parts until water service is restored.
-
PATH 02Next step
What you see
Other fixtures work and the toilet stop is closed or partly closed.
Do this next
Open the accessible stop gently, test a refill, and close it again if the valve or connection leaks.
-
PATH 03Next step
What you see
The stop is open but the exposed line is kinked, crushed, or wet.
Do this next
Do not pressurize a leaking connection; isolate the stop and have the supply line or connection corrected.
-
PATH 04Next step
What you see
The float drops but no or weak water enters with an open, dry supply.
Do this next
Follow the model's valve-cleaning procedure if it is an accessible gravity fill valve; otherwise arrange service for inlet or fill-valve diagnosis.
-
PATH 05Next step
What you see
Water enters but never shuts off or the tank level falls after filling.
Do this next
Close the stop when the toilet is not in use and have the fill valve, float, flush valve, and refill path inspected.
-
PATH 06Next step
What you see
The toilet is pressure-assisted, concealed, electronic, touchless, or otherwise unlike a basic gravity tank.
Do this next
Use the exact model instructions and keep electrical or pressurized service within the manufacturer's or a qualified professional's boundary.
Helpful context
Understand the symptom
This symptom usually means one of two different things: the tank is not receiving water, or the tank has water but the bowl is not being refilled or flushed normally. Lift the tank lid only if it is stable and dry. A normal gravity toilet should begin filling when its supply stop is open and the float has dropped after a flush. The checks below separate a house-supply problem from a toilet-side fill-valve problem.
Do not use the toilet if the bowl is empty and the fixture normally relies on a water seal, if wastewater is backing up, or if water is escaping onto the floor. A pressure-assisted, touchless, bidet, or concealed-cistern toilet can have additional controls and electrical parts; identify its model and use the manufacturer's instructions before disconnecting anything.
Safety boundary
Stop conditions
- Close the toilet supply stop and stop testing for an active leak, cracked tank or valve, uncontrolled flow, or wet wall/floor connection.
- Stop and use a plumber for a stuck stop, concealed piping, a pressure-assisted vessel, an electronic toilet, or any repair requiring a pressurized fitting to be opened.
- Do not continue flushing when the bowl is backing up, wastewater is rising, or the fixture has lost its intended water seal.
When checks do not resolve it
Need a professional?
Call a plumber when the supply stop is open and intact but the fill valve still admits no water after an approved cleaning check., Call promptly for recurring loss of water, a valve that will not shut off, a tank that will not hold its level, or any leak at the wall, stop, tank, or floor., Use the toilet manufacturer's service channel for a concealed, pressure-assisted, touchless, bidet, or electronic model when the model procedure does not resolve the symptom.
Common questions
FAQ
Why is there no water in my toilet tank after flushing?
The local stop may be closed, the supply line may be restricted, or the fill valve inlet may be blocked or failed. Check water at another fixture first, then observe whether water enters with the toilet stop open.
Can I open the toilet fill valve to clear it?
Only if the model instructions identify that valve design and the water is isolated first. Some manufacturer procedures allow an approved cap or screen to be cleaned while using a container to control spray; unfamiliar, concealed, or pressure-assisted designs should be serviced professionally.
What if the toilet has water in the tank but the bowl has no water?
Check whether the refill path is connected and whether the flush completes normally. If the bowl water is absent, the fixture is backing up, or wastewater behaves abnormally, stop using it and arrange plumbing service rather than repeatedly flushing.
Should I replace the fill valve immediately?
No. First distinguish a building supply interruption, closed stop, restricted line, or removable debris from a failed valve. Replace a valve only after its model and condition are confirmed.
Read the exact guide
Official sources
- How to Clean the Toilet Water Control Valve of DebrisAmerican Standard · Official manufacturer procedure for an accessible water-control valve; it supports the isolation, splash-control, brief flush-through, and reinstallation cautions but is not a universal procedure for every toilet.
- Troubleshooting Guide (cont.)Kohler Co. · Official Kohler troubleshooting guidance for a power-assisted toilet; used for the general distinction between supply-stop, inlet, fill-valve, float, and continuous-fill symptoms, with special-toilet limitations stated in the article.
Community feedback
Share a repair observation
Share a plain-text repair observation. Accepted observations are published automatically; this page may take a moment to update.