
On this page
Start here
Quick answer
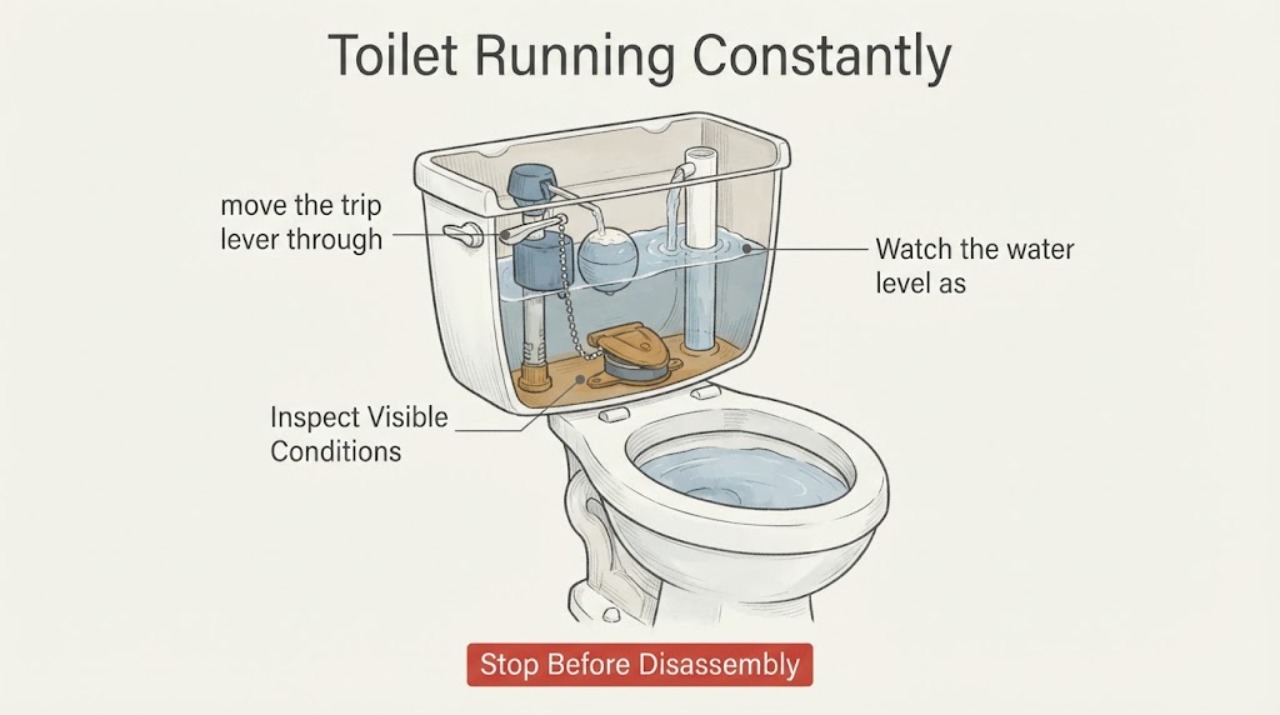
A toilet that keeps running is usually sending water from the tank into the bowl, or the tank level is high enough to spill into the overflow. Remove the tank lid and watch the water path: a ripple in the bowl with a stable tank level points toward the flush valve or flapper seal; water at the overflow points toward a fill valve, float, or level problem; a lever or chain that does not return can hold the flush valve open. Close the toilet supply stop if water is rising, leaking onto the floor, or will not shut off, and do not force a stuck valve.
Work through in order
Diagnostic checks
Use only checks that match the exact appliance or system and its official guide.
-
Check 1
Remove the tank lid carefully and observe one complete cycle without holding the handle: look for a ripple or trickle in the bowl, water entering the overflow tube, or a trip lever that remains partly depressed.
Expected result: Water is visibly moving from tank to bowl, water is spilling into the overflow, or the lever/chain is holding the flush valve open.
Next step: Follow the branch that matches the observed water path; do not replace the fill valve solely because you hear running.
Stop if: Stop immediately for a rising bowl, floor leak, cracked tank, or uncontrolled flow.
Why this matters
Why: Tank-to-bowl flow points toward the flush valve seal or its actuation. Overflow points toward an over-high level or fill-valve shutoff fault. A held lever or tight chain can prevent the flush valve from seating.
-
Check 2
With the water supply on and the tank at rest, move the trip lever through its normal travel and inspect the chain or linkage for binding, excess tension, or contact with the tank lid; let the lever return fully.
Expected result: The lever does not return, the chain is taut when the flush valve should be closed, or the linkage catches; alternatively, the lever returns and the flush valve appears seated.
Next step: Correct only an obvious, accessible linkage issue without forcing ceramic or plastic parts, then flush and verify that the seal closes. If the linkage is free, continue to the tank-level check.
Stop if: Stop if the trip mechanism is concealed, broken, or requires removing the tank or a pressurized component.
Why this matters
Why: A binding lever or chain can hold the flush valve open and produce a continuous bowl leak. A returning lever shifts suspicion toward the flush seal, tank level, or fill valve.
-
Check 3
Watch the water level as the tank fills and compare it with the tank's marked line or the model instructions; do not raise the float above the manufacturer's intended level.
Expected result: Water reaches the overflow before the fill valve shuts off, or the level stops below the normal line while the bowl still ripples.
Next step: If the model provides an accessible level adjustment, make only the documented adjustment and test the cycle. If the valve cannot shut off or the level is unstable, close the stop and arrange service.
Stop if: Stop if water cannot be controlled at the fill valve, the overflow is blocked, or the tank is cracked.
Why this matters
Why: Overflow before shutoff indicates a water-level, float, or fill-valve shutoff problem. A normal tank level with bowl flow makes a flush-valve seal leak more likely.
-
Check 4
If the water level is high or the fill valve will not shut off, close the supply stop and use the model's approved fill-valve cleaning procedure; remove only an identified cap or screen, keep a container over the opening, and reinstall the part exactly as directed.
Expected result: Sediment or debris is visible at the approved valve opening, or the valve remains clean but continues to pass water after reassembly.
Next step: Reopen the stop slowly and verify that the valve stops at the intended line. If running returns, keep the stop closed when the toilet is not needed and document the model for a plumber or manufacturer service.
Stop if: Stop before opening a pressure-assisted vessel, concealed cistern, electronic valve, or any valve whose cap or connection is not identified by the model instructions.
Why this matters
Why: Debris can prevent the valve from shutting off. Persistent flow after an approved flush-through points toward a damaged valve, float, or seal and requires model-specific diagnosis.
-
Check 5
For a bowl ripple with a normal tank level and free trip lever, close the supply stop, flush to lower the tank only as appropriate for the fixture, and inspect the flush valve seal/flapper for visible mis-seating, chain interference, or damage; reinstall or replace only according to the model guide.
Expected result: The seal is visibly displaced or damaged, the chain prevents seating, or the seal looks seated but the bowl still receives water after the tank is full.
Next step: Correct a clear chain or seating issue and refill the tank. If the seal is damaged or the leak persists, identify the model and have the flush valve or seal serviced rather than guessing at a part.
Stop if: Stop if tank-to-bowl hardware is corroded, ceramic is cracked, or removing the assembly would disturb the tank-to-bowl seal.
Why this matters
Why: A displaced or damaged seal can let tank water leak continuously into the bowl. Continued leakage with a seated-looking seal can be caused by a worn seal, flush-valve seat, or model-specific mechanism that needs service.
Use your observations
Decision map
Find the observation that best matches what you see, then follow the next safe action.
-
PATH 01Next step
What you see
The bowl has a steady ripple but the tank level is not reaching the overflow.
Do this next
Inspect the trip mechanism and flush valve seal/flapper for interference or damage; keep the stop closed if the leak cannot be stopped.
-
PATH 02Next step
What you see
Water rises into the overflow tube or spills into the bowl from the overflow.
Do this next
Close the supply stop, then check the documented tank level, float, and fill-valve shutoff; arrange service if the valve will not stop.
-
PATH 03Next step
What you see
The lever or chain is binding or remains taut when the flush should be closed.
Do this next
Restore free movement and proper slack using the model procedure, then verify the flush valve seats before returning the toilet to use.
-
PATH 04Next step
What you see
An approved fill-valve inspection finds sediment or debris.
Do this next
Isolate the water, follow the model-specific cleaning procedure with splash control, and test for shutoff after reassembly.
-
PATH 05Next step
What you see
The trip mechanism is free, the tank level is normal, and the bowl still receives water.
Do this next
Treat the flush valve seal or flapper as the leading conditional fault and arrange model-specific replacement or plumbing service.
-
PATH 06Next step
What you see
The toilet is pressure-assisted, concealed, electronic, touchless, or otherwise not a basic gravity tank.
Do this next
Use the exact product instructions and keep pressurized or electrical service within the manufacturer's or a qualified professional's boundary.
Helpful context
Understand the symptom
A running sound is not a diagnosis by itself. On a conventional tank toilet, water should enter through the fill valve, stop at the intended level, and remain in the tank until the flush valve opens. A worn or mis-seated flush seal lets tank water escape into the bowl, while an over-high level can send water through the overflow. Start by watching the tank and bowl so you do not adjust the wrong part.
If the tank is filling continuously, the bowl is close to overflowing, or water is reaching the floor, turn the toilet supply stop clockwise by hand if it moves normally. Do not force it or open pressurized, concealed, electronic, or pressure-assisted assemblies without the exact model procedure.
Safety boundary
Stop conditions
- Close the toilet supply stop and stop testing for active floor leakage, a cracked tank or valve, an overflowing bowl, or uncontrolled water flow.
- Do not force a stuck stop or lever, loosen a pressurized fitting, or remove tank-to-bowl hardware as a first-line adjustment.
- Stop and use a plumber for concealed piping, pressure-assisted or electronic mechanisms, repeated running after a model-approved cleaning, or a leak that returns immediately.
When checks do not resolve it
Need a professional?
Call a plumber when the toilet runs after the lever, tank level, and approved valve-cleaning checks are normal., Arrange prompt service for water at the floor or wall, a cracked tank, a supply stop that will not close, or a bowl that is rising or backing up., Use the manufacturer's service channel when the toilet has a concealed, pressure-assisted, touchless, bidet, or electronic flushing system.
Common questions
FAQ
Why does my toilet keep running after I flush?
Watch where the water goes. A bowl ripple with a normal tank level suggests the flush valve seal or flapper; water reaching the overflow suggests a fill-valve, float, or level problem; a lever or chain that does not return can hold the flush valve open.
Should I close the toilet water supply when it keeps running?
Yes, close the accessible stop gently when water is rising, leaking, or will not shut off, then arrange diagnosis. Do not force a stuck stop or loosen a pressurized connection.
Can debris make a toilet run continuously?
Yes. Manufacturer guidance identifies sediment or debris at the fill-valve cap or inlet as a possible reason the valve cannot shut off. Clean it only with the model-approved procedure and with the water isolated first.
Do I need a new flapper or fill valve?
Not automatically. First identify whether water is leaking through the flush seal or entering through an over-high fill level, and check the lever and chain. Choose a replacement only after confirming the toilet model and the failed component.
Read the exact guide
Official sources
- How to Replace the Flapper Float Ball on the Cadet ToiletAmerican Standard · Official model-specific replacement sequence used only to support the isolation and model-matching boundary for a flapper/float repair; it is not presented as a universal fit or procedure.
- How to Clean the Toilet Water Control Valve of DebrisAmerican Standard · Official manufacturer procedure for an accessible water-control valve; supports isolating the supply, controlling spray, briefly flushing debris, and reinstalling the cap, but is not a universal procedure for every toilet.
- Toilet Constantly Leaking or RunningKohler Assist · Official Kohler guidance for standard one- and two-piece toilets; supports observation of bowl ripple, overflow, trip-lever chain, water level, and fill-valve debris, while the article limits special toilet work to model instructions or professionals.
Community feedback
Share a repair observation
Share a plain-text repair observation. Accepted observations are published automatically; this page may take a moment to update.