
On this page
Start here
Quick answer
If a shutoff valve leaks when it is open, first dry the valve and trace the first wet point while keeping a towel and the correct upstream shutoff available. A ring of water around the stem or packing nut points to the stem seal area; water from the valve body or bonnet seam points to a valve fault; water at a threaded, compression, push-fit, or hose connection points to the connection; and water that appears farther downstream may not be from the shutoff valve at all. Do not use a shutoff valve as a pressure regulator, force a seized handle, loosen a pressurized connection, or remove the valve. If the valve will not isolate the line, the leak is spraying, the line is hidden, hot, contaminated, or near electricity, shut off the main supply if safe and call a plumber.
Before you begin
Safety first
- This article is limited to drying and observing the outside of the valve, locating a known safe isolation point, and documenting flow behavior. Valve disassembly, packing replacement, connection work, pressure or temperature checks, and work on hidden or service lines belong to a qualified plumber.
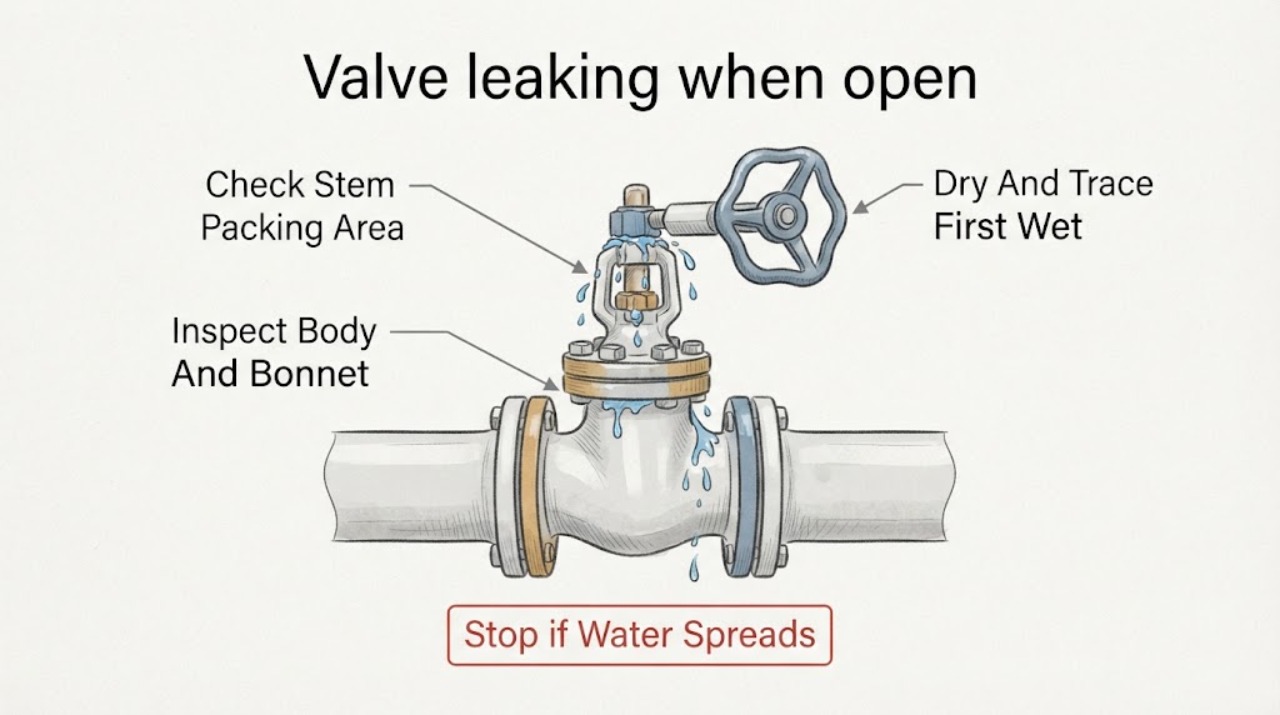
Work through in order
Diagnostic checks
Use only checks that match the exact appliance or system and its official guide.
-
Check 1
Stop nearby water use, wipe the shutoff valve, pipe, hose, and floor dry, then watch the assembly with the valve open long enough to see the first new wet point.
Expected result: Record whether moisture starts at the stem or packing nut, body or bonnet seam, inlet or outlet connection, hose, or a downstream fixture.
Next step: Photograph the location and continue only if the leak is slow, accessible, cool, and away from electricity.
Stop if: Stop for a spray, rapidly growing leak, hot water, hidden-wall leak, water near electricity, or a surface that cannot be made safe.
Why this matters
Why: Water can travel along pipe or hose surfaces. The first wet point is more useful than the largest puddle for separating stem, body, connection, and downstream leaks.
-
Check 2
With the handle and valve body left assembled, inspect the stem, handle base, packing nut, and bonnet area from the outside while the valve remains open.
Expected result: Note a bead forming around the stem or packing nut, water from under the handle, a loose or seized handle, or a dry stem with water appearing elsewhere.
Next step: Keep the valve in its current position, photograph the result, and use the exact valve instructions or a plumber for any packing adjustment or seal repair.
Stop if: Do not force a seized handle, remove the packing nut, or make an adjustment while the valve is hot, corroded, inaccessible, or unable to be isolated.
Why this matters
Why: A wet stem or packing nut points to the stem sealing area. Orem identifies the packing nut beneath the handle as a common main-valve leak source; a dry stem makes a body or connection path more likely.
-
Check 3
Visually inspect the valve body, bonnet or cap seam, drain or outlet port if fitted, and casting for a crack, corrosion, bulge, or water emerging from the metal boundary.
Expected result: Record whether water begins from the body itself, a bonnet seam, a drain port, or a visible crack rather than from the stem or a removable connection.
Next step: Use a safe upstream or main shutoff if needed and arrange a plumber to evaluate or replace the valve; do not open the body.
Stop if: Stop immediately for a spray, split body, severe corrosion, hot line, or a valve that moves or twists the attached pipe.
Why this matters
Why: A body or bonnet leak is a pressure-boundary or internal sealing problem. It is not established by a wet handle, and tightening a different nut may worsen the fault or leave the valve unable to isolate.
-
Check 4
After drying the assembly again, observe the pipe-to-valve inlet and outlet, compression or threaded nuts, push-fit collar, and any appliance hose without moving the piping.
Expected result: Record whether the first bead forms at one connection, changes when the valve is opened, or travels from a higher point on the pipe or hose.
Next step: Close a known working upstream or main shutoff if safe, then have a plumber repair the connection or replace the valve section; do not loosen a pressurized fitting.
Stop if: Do not wrench a corroded fitting, pull a push-fit tube, cut a pipe, or continue if the isolation valve does not work.
Why this matters
Why: A connection or hose seal can leak only when line pressure is restored. A moving pipe, damaged tubing, or wetness above the valve makes a connection or upstream leak more likely than the valve body.
-
Check 5
If the valve can be operated normally and the area is safe, observe the downstream fixture or appliance before and after a normal, gentle close; do not force the handle past its stop.
Expected result: Record whether downstream flow stops, only slows, or continues, and whether the valve's own stem or body still becomes wet when open.
Next step: If flow does not stop or the handle is hard to move, use another safe isolation point and arrange prompt plumbing service.
Stop if: Do not cycle a seized valve, use it to throttle pressure, or work on the downstream connection while pressurized.
Why this matters
Why: Continued downstream flow suggests the valve is not closing fully or the downstream plumbing has another source. A valve that leaks only at the stem when open has a separate seal symptom from incomplete shutoff.
-
Check 6
Locate the nearest known working upstream or whole-house main shutoff and confirm that it is accessible without entering unsafe water, heat, electrical, or confined conditions.
Expected result: Record whether the local valve isolates the affected line, the main valve is identifiable and operable, the meter indicator changes after safe isolation, or water continues despite the attempted shutoff.
Next step: Use only a known, safe isolation point to limit damage and call a plumber or water utility for a failed main shutoff; do not remove the meter or buried valve.
Stop if: Stop for a valve that will not turn, a damaged main, flooding, a buried or inaccessible service line, or water near electrical equipment.
Why this matters
Why: Orem and Flower Mound guidance use the main shutoff and meter behavior to separate indoor, service-line, and fixture leaks. If the shutoff does not work, the leaking valve cannot serve as a dependable emergency barrier.
-
Check 7
Once the area is dry and isolated as appropriate, perform one outside-only recheck with the valve open and closed positions documented; do not disassemble, loosen, or reseal the valve.
Expected result: Record whether the first wet point repeats at the stem, body, connection, or downstream section and whether the valve can isolate flow normally.
Next step: Keep the affected line isolated when practical and provide the photos, valve type, leak position, and shutoff result to a plumber.
Stop if: Stop after one recheck for any worsening leak, failed isolation, hot or contaminated water, or visible structural damage.
Why this matters
Why: A repeatable location supports the service branch, but it still does not select a washer, packing, valve body, or connector without the valve type and dimensions.
-
Check 8
Prepare a plumber record with the valve location and purpose, valve type, pipe or hose material, open/closed behavior, first wet point, leak rate description, and whether an upstream or main shutoff works.
Expected result: Note any corrosion, body crack, movement at the pipe, hidden-wall moisture, water temperature, appliance connection, or prior attempt to operate the handle.
Next step: Arrange plumbing service and leave the line isolated if safe; use temporary containment only where it cannot contact electricity or hot water.
Stop if: Do not keep cycling the valve, use the handle for pressure regulation, or attempt replacement without verified isolation and the correct procedure.
Why this matters
Why: This information helps distinguish stem packing, body, inlet or outlet connection, downstream equipment, and failed isolation without opening a pressurized plumbing system.
Use your observations
Decision map
Find the observation that best matches what you see, then follow the next safe action.
-
PATH 01Safety boundary
What you see
The first new bead forms around the valve stem or packing nut and the body and connections remain dry.
Do this next
Keep the valve assembled and arrange a plumber or follow only the exact product instructions after safe isolation; do not assume a generic packing fits.
Why this path and its safety boundary
Why it matters: A stem seal or packing-area leak is more likely. Orem identifies the packing nut beneath a handle as a common source, while Watts warns against forcing or over-tightening a packing nut.
Safety stop: Do not remove the packing nut on a pressurized, hot, corroded, or unisolated valve.
-
PATH 02Safety boundary
What you see
Water begins at the valve body, bonnet seam, cap, drain port, crack, or severe corrosion rather than at the stem or a pipe connection.
Do this next
Use a known safe upstream or main shutoff and arrange prompt plumber service for evaluation or valve replacement.
Why this path and its safety boundary
Why it matters: A pressure-boundary, body, or internal seal fault is more likely than a simple handle-area leak.
Safety stop: Do not open the valve body, force fasteners, or leave a cracked or spraying valve pressurized.
-
PATH 03Safety boundary
What you see
The first wet point is a compression nut, threaded joint, push-fit collar, hose connection, or pipe-to-valve interface, especially only after the valve is opened.
Do this next
Isolate the line at a working upstream or main valve and have a plumber repair the connection; preserve the valve position and photos.
Why this path and its safety boundary
Why it matters: A connection seal, fitting, tubing, or upstream/downstream pipe issue is more likely than a stem packing leak.
Safety stop: Do not loosen or retighten a corroded or pressurized fitting or pull tubing from a push-fit valve.
-
PATH 04Safety boundary
What you see
The valve itself is dry, or downstream flow continues after a gentle close, or water appears at a fixture or appliance farther along the line.
Do this next
Use another safe isolation point and arrange plumbing diagnosis of the valve and downstream device.
Why this path and its safety boundary
Why it matters: The leak may be downstream, or the shutoff may not be closing fully because of seat, stem, or internal wear. The symptom does not identify which part needs replacement.
Safety stop: Do not use the valve as a pressure regulator or force it past its stop.
-
PATH 05Safety boundary
What you see
The local valve will not turn, the main shutoff cannot be located or does not stop flow, the meter continues to indicate use, or the leak is between the building and meter.
Do this next
Limit access to the wet area, contact the water utility or a plumber as appropriate, and do not disturb the meter or buried service valve.
Why this path and its safety boundary
Why it matters: The affected valve is not a dependable emergency isolation point and the leak may involve the service line or a failed main valve.
Safety stop: Stop for flooding, an inaccessible or damaged main, water near electricity, or a leak that cannot be contained.
-
PATH 06Safety boundary
What you see
The water is hot or contaminated, the leak is inside a wall or ceiling, the valve is near electrical equipment, the body is spraying, or visible damage is worsening.
Do this next
Leave the area as needed, isolate only from a safe known point, and call a plumber or emergency service; do not reopen the valve.
Why this path and its safety boundary
Why it matters: The repair has crossed the safe homeowner observation boundary and may cause burns, structural damage, contamination, or electrical injury.
Safety stop: Do not touch wet electrical equipment, enter a flooded or confined area, or open a hot or pressurized valve assembly.
Helpful context
Understand the symptom
Trace the leak before touching the handle
Close nearby fixtures, wipe the valve and the pipe dry, and watch where the first new bead forms while the valve is in its normal open position. Water can run along a pipe or hose and make a downstream connection look like a valve leak. Photograph the whole valve, handle, stem, body, inlet, outlet, and any hose or fitting before changing anything.
Stem or packing is a different leak from the body
Water emerging around the handle stem or packing nut is a seal-area pattern. City of Orem guidance identifies the packing nut beneath the handle as a common source of water from a main shutoff valve, while Watts warns that an adjustment that is too tight can impede stem movement. Treat a wet bonnet seam, cracked casting, or water from a body joint as a valve-body problem rather than a packing adjustment.
Connections can imitate a leaking valve
Dry and observe each side separately: the pipe-to-valve inlet, valve-to-hose or appliance outlet, compression nut, threaded joint, or push-fit collar. A connection leak may appear only when the valve is open because opening restores line pressure. Do not tighten a corroded or moving pipe, and do not loosen any connection to inspect a seal while it is pressurized.
Use the downstream symptom carefully
If water continues at the fixture or appliance after the shutoff is closed, the valve may not be closing fully, or the downstream device may have its own leak. If the valve itself stays wet only while open, a stem seal or body pressure boundary is more likely. A valve that cannot stop flow is not a reliable emergency isolation point and needs prompt plumbing service.
Make isolation and escalation the decision
If the leak is more than a small controlled drip, place a container only when it can be done without contact with hot water or electricity. Use the nearest working upstream or main shutoff only if you can operate it safely and know what it serves. Do not take apart a pressurized valve; arrange a plumber to isolate, replace, or repair the correct section.
Safety boundary
Stop conditions
- Stop for a spraying or rapidly worsening leak, flooding, hidden-wall or ceiling moisture, a cracked or severely corroded body, or a valve that moves the attached pipe.
- Do not loosen, remove, rebuild, or replace a shutoff valve or connection while it is pressurized, hot, contaminated, or not positively isolated.
- Do not force a seized handle, over-tighten a packing nut, or use the shutoff valve to regulate pressure.
- Do not touch water near electrical outlets, cords, appliances, or energized equipment; isolate power only from a dry safe location when appropriate.
- If the local or main shutoff will not stop flow, cannot be located, or the meter continues to indicate a service-line leak, call a plumber or water utility rather than dismantling the valve.
- After one safe outside-only trace and isolation check, arrange plumbing service for a repeat leak, failed shutoff, body or connection fault, hot/contaminated water, or any uncertainty about the valve type.
Only after diagnosis
Potential parts
- valve stem packing or O-ring
Consider this category only when the first wet point is the stem or packing area and the exact valve design or plumber's diagnosis identifies a compatible seal.
Packing geometry, material, stem size, temperature, and valve type must match; do not infer fit from a generic leak description. - complete shutoff valve assembly
Consider a replacement only when the body, bonnet, seat, or failed isolation is confirmed and the line can be safely isolated by a qualified plumber.
Confirm valve type, connection method, pipe material, flow direction, service temperature, and installation access. - connection seal, gasket, or hose
Consider this category only when the first wet point is a verified connection or hose and the correct replacement is identified after isolation.
Match the connection standard, size, material, appliance or fixture requirements, and any potable-water or temperature rating.
When checks do not resolve it
Need a professional?
Call a plumber promptly when the leak is from the valve body, bonnet, connection, or a stem that remains wet; when the valve cannot close or the main shutoff fails; when a pipe moves, the line is hidden, hot, contaminated, or near electricity; or when one safe outside-only trace does not identify a controllable source. Use emergency water or building procedures for a spraying leak or flooding.
Safety scope: This article is limited to drying and observing the outside of the valve, locating a known safe isolation point, and documenting flow behavior. Valve disassembly, packing replacement, connection work, pressure or temperature checks, and work on hidden or service lines belong to a qualified plumber.
Common questions
FAQ
Where does a leaking shutoff valve usually leak?
Trace the first new wet point. Water around the stem or packing nut points to the stem seal area; water from the body or bonnet seam points to the valve itself; and water at an inlet, outlet, hose, compression, threaded, or push-fit connection points to that connection. Water can travel, so the puddle is not always the source.
Why does the valve leak only when it is open?
Opening the valve restores flow and pressure through the valve and downstream line. That can reveal a stem seal, body, seat, or connection problem that is not wet while closed. A downstream fixture or hose can also appear to leak only when the shutoff is open.
Can I tighten the packing nut on a leaking shutoff valve?
Only use the exact product instructions and only after the line is safely isolated if that procedure requires it. Orem identifies the packing nut as a possible source, but Watts warns not to force it; a hot, corroded, seized, pressurized, or unknown valve belongs to a plumber.
What if the shutoff valve will not stop the water?
Do not force it or use it as a pressure regulator. Use a known safe upstream or main shutoff if available, limit water damage, and call a plumber or water utility. A valve that cannot isolate its line is not a dependable emergency barrier.
How can I tell whether the leak is from the valve or the pipe connection?
Dry the assembly and watch the first new bead with the valve open. A stem or body bead begins on the valve; a connection leak begins at the pipe, hose, nut, collar, or threaded joint and may travel along the valve. Do not move or loosen a pressurized fitting.
When is a leaking valve an emergency?
Treat a spray, rapidly worsening leak, flooding, hidden-wall moisture, hot or contaminated water, severe corrosion, a failed main shutoff, or water near electricity as urgent. Isolate only from a safe known point, leave unsafe areas, and call a plumber or emergency water service.
Read the exact guide
Official sources
- Water LeaksTown of Flower Mound · Official municipal residential leak guidance; use its isolation principles without assuming local valve locations or service responsibility.
- How to fix a faucet leakCity of Portland Water Bureau · Official municipal faucet guidance used for leak-location distinctions; a generic shutoff valve may require a different model procedure.
- VA-115 Instructions – Electronic Control Valve, CXT-EWatts · Official Watts service manual for a commercial electronic control-valve family, used only for general safety boundaries and packing/body distinctions; not a residential valve repair procedure.
- WaterCity of Orem · Official municipal water guidance for residential water-service and main shutoff observations; local valve layouts and service responsibilities vary.
Community feedback
Share a repair observation
Share a plain-text repair observation. Accepted observations are published automatically; this page may take a moment to update.