
On this page
Start here
Quick answer
A wet floor below a water heater does not prove that the tank itself has failed. Water may come from condensation, the hot or cold connections, a drain valve, a temperature-and-pressure relief valve or its discharge pipe, an electric-element gasket, or the tank. First keep people away from hot or contaminated water and identify the first wet point without removing panels. If the heater is gas-fired and you smell gas, or if water contacts electrical equipment, turn away and call emergency or qualified service; do not operate switches in a suspected gas leak. If the leak is active or spreading, shut off the heater's water supply only if the correct valve turns freely, and turn off the gas or electrical supply only when this can be done safely and in accordance with the model instructions. Never cap or plug a relief discharge, open a drain valve to empty a hot tank as a first response, or restart a leaking heater to test it. A leak from the tank body, a relief path, an electrical access area, or a ceiling or wall needs qualified plumbing or water-heater service.
Before you begin
Safety first
- Owner checks are limited to safe observation, model-label and indicator reading, external source tracing on cool accessible surfaces, and safe isolation only when the correct shutoff is clear and turns freely. A qualified professional must handle tank draining or removal, relief or drain-valve work, electric elements and wiring, gas and combustion equipment, pressure diagnosis, concealed leaks, and replacement decisions.
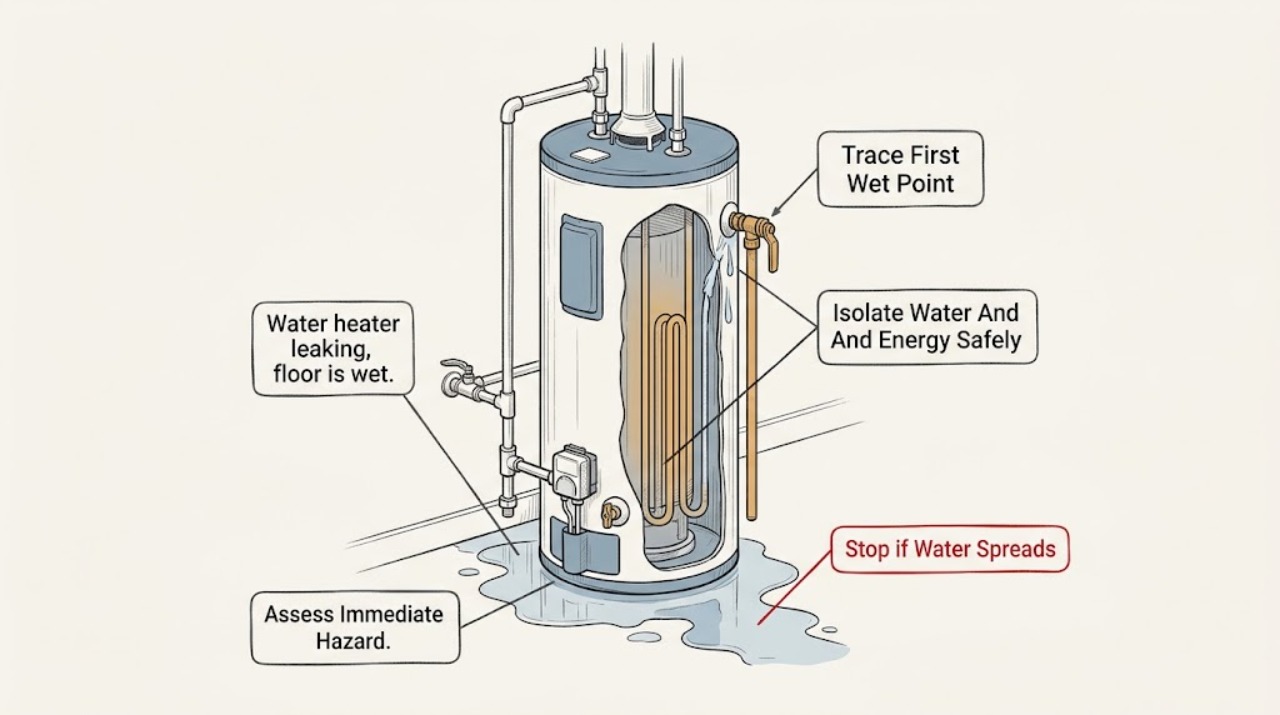
Work through in order
Diagnostic checks
Use only checks that match the exact appliance or system and its official guide.
-
Check 1
From a dry, stable position, check whether the water is hot or producing steam without touching it, whether it is near a gas burner or electrical equipment, and whether there is gas odor, smoke, a carbon-monoxide alarm, or fast-spreading flooding. Keep children and pets away and do not use a flame or electrical switch to locate the leak.
Expected result: Record no immediate hazard, gas odor, a carbon-monoxide alarm, smoke or fire, hot or steaming water, water near electrical parts, or active flooding that is spreading beyond the pan or floor.
Next step: For gas odor or a carbon-monoxide alarm, leave as appropriate and contact emergency services or the gas utility from a safe location. For hot discharge, smoke, electrical contact, or flooding, keep clear and request urgent qualified service. Do not restart the heater.
Stop if: Stop immediately for gas odor, a carbon-monoxide alarm, smoke, fire, exposed wiring, hot spray or steam, or water reaching electrical equipment.
Why this matters
Why: Gas odor or a carbon-monoxide alarm is an emergency, not a plumbing diagnosis. Hot water, steam, water at electrical equipment, and active flooding increase burn, shock, fire, and property-damage risk.
-
Check 2
If there is no gas or electrical emergency, identify the individual cold-water shutoff above or beside the heater and the labeled gas control or electrical disconnect from a dry position. Close the water shutoff only if it turns freely; isolate gas or electricity only when the model instructions and conditions make that safe. Do not force a seized valve, open the drain, or remove a panel.
Expected result: Record water flow slowing after a safe shutoff, a valve that will not turn, an unknown or inaccessible shutoff, a gas heater, an electric heater, or water continuing from the heater after supply isolation.
Next step: If isolation is uncertain, leave the area and call a plumber. If water continues, keep clear and arrange urgent service; do not open the drain valve or attempt to remove the relief valve to speed draining.
Stop if: Stop for a seized valve, hot or pressurized discharge, water near electrical equipment, gas odor, or any need to remove covers or manipulate gas, electrical, drain, or relief components.
Why this matters
Why: Stopping incoming water can limit damage, but it does not empty a tank or stop hot residual water. A continuing leak after the supply is closed can be stored water, a relief discharge, a drain path, or a tank failure. A seized or unknown valve prevents reliable isolation.
-
Check 3
Once the area is safe and surfaces are cool enough to approach, use a flashlight and dry paper towel only on visible, cool exterior areas to trace upward from the floor or drain pan. Check the hot and cold connections, nearby pipe joints, the top and side of the heater, the drain valve area, and the relief discharge end; do not wipe hot surfaces or reach behind the appliance.
Expected result: Record a wet top connection, a wet side or drain-valve area, water at the relief discharge, moisture only on the outside surface, water from the tank bottom or seam, or no identifiable source.
Next step: Photograph the first wet point and keep the heater isolated if a drip continues. Arrange qualified service for any unidentified source, tank-body moisture, relief discharge, or leak that cannot be safely reached.
Stop if: Stop for hot water, steam, pressurized spray, unstable equipment, a wet electrical access area, or a source behind a panel or insulation.
Why this matters
Why: A wet connection or valve can be an external plumbing repair. Moisture at the relief discharge can reflect pressure or temperature activation. Water from a tank seam, bottom, or internal area is more consistent with tank or internal-component failure. Surface moisture alone may be condensation or a leak running from above.
-
Check 4
Note when moisture appears: after the heater is first filled, after a long hot-water draw, during a heating cycle, continuously, or only after cold-water piping becomes chilled. Compare the moisture trail with the visible pipe connections without turning the heater back on just to test it.
Expected result: Record a small amount of surface moisture that stops as the heater warms, a continuing drip, water that follows a pipe or fitting, moisture after every heating cycle, or pooling that grows while the heater is idle.
Next step: If moisture continues, pools, or cannot be separated from a leak, keep the heater off and have a plumber inspect it. Do not dry the area with a flame, space heater, or other heat source.
Stop if: Stop for rising water, hot surfaces, gas or electrical warning, or any attempt to use heat or a tool to force a diagnosis.
Why this matters
Why: Temporary condensation after a cold fill or heavy draw can be different from a continuing drip or pooling. Moisture that follows a connection keeps a plumbing leak in consideration; repeated relief discharge or idle pooling needs service rather than a condensation assumption.
-
Check 5
From a safe distance, inspect the visible end of the temperature-and-pressure relief discharge pipe and the drain valve for water, corrosion, an obstructed outlet, or a wet floor below them. Do not lift the relief lever, cap or plug the pipe, tighten a drain fitting, or place anything that blocks discharge.
Expected result: Record a dry relief path, water at the relief outlet, a hot or forceful discharge, moisture at the drain valve, corrosion, an obstructed or altered discharge pipe, or no safe view.
Next step: Keep the heater off and call a qualified plumber or water-heater technician for any relief discharge, drain-valve leak that persists, corrosion, or altered pipe. Do not replace the relief valve as a guess or use a cap to stop the water.
Stop if: Stop for hot water, steam, forceful discharge, an obstructed relief pipe, or any need to operate or remove a relief or drain valve.
Why this matters
Why: Relief-path water can indicate pressure or temperature activation or a valve that is not sealing. Drain-valve moisture can indicate a serviceable valve leak, but hot or pressurized water requires professional handling. An obstructed relief path is unsafe regardless of puddle size.
-
Check 6
Read the heater's brand, model, fuel type, age or serial label, and visible control or leak-detection indicator from a dry position. For an electric model, look only for water at or below an access panel; for a gas model, look only at external piping and the burner-area floor without opening the combustion compartment.
Expected result: Record gas or electric type, a leak alarm, water at an electric access area, a tank-body or bottom seam leak, corrosion, a relief or connection leak, or an unreadable label.
Next step: Keep the heater isolated and provide the label, photos, and leak location to a qualified technician. Do not remove panels, insulation, burner covers, element covers, or leak sensors.
Stop if: Stop for water behind a cover, corrosion at the burner or wiring, a leaking tank body, a gas odor, or any need to expose energized or combustion components.
Why this matters
Why: Water at an electric access area can reach energized components; a tank-body or seam leak points toward replacement or major service; a visible connection leak is a different repair path. Fuel type and model determine safe isolation and parts, so an unreadable label prevents a reliable part choice.
-
Check 7
Prepare a service record with the model and serial number, gas or electric type, first wet point, leak rate and timing, photos, whether water was hot or cool without touching, the shutoff result, relief and drain observations, corrosion, recent installation or maintenance, and any affected floor, wall, ceiling, or electrical equipment.
Expected result: Confirm that the record contains direct observations and safe photos, not an assumed failed tank, relief valve, drain valve, element gasket, thermostat, or connection.
Next step: Arrange qualified plumbing or water-heater service for any continuing leak, tank or internal leak, relief discharge, electrical access moisture, gas equipment concern, or unresolved wet floor. Keep the heater out of service until the cause is addressed.
Stop if: Stop owner troubleshooting when the next step requires draining, lifting, opening, rewiring, removing an element or relief valve, handling hot or contaminated water, or entering the combustion compartment.
Why this matters
Why: The pattern lets a professional separate condensation, plumbing connections, drain or relief components, electric element gaskets, leak detection, and a tank-body failure. Model identity is needed for the correct replacement and safe procedure.
Use your observations
Decision map
Find the observation that best matches what you see, then follow the next safe action.
-
PATH 01Next step
What you see
There is gas odor, a carbon-monoxide alarm, smoke, fire, hot spray or steam, water near electrical equipment, active flooding, or major floor, wall, or ceiling damage.
Do this next
Leave as appropriate and contact emergency services, the gas utility, or urgent qualified service from a safe location. Do not operate switches in a suspected gas leak, touch wet electrical equipment, or restart the heater.
-
PATH 02Next step
What you see
A cool drip is traced to an accessible hot or cold connection, a visible pipe joint, or the drain valve, while the tank shell, relief path, electrical areas, and gas or combustion areas remain dry.
Do this next
Keep the heater isolated and arrange qualified plumbing service to repair the identified connection or drain component. Do not tighten a hot or pressurized fitting or remove a panel to reach it.
-
PATH 03Next step
What you see
Water appears at the temperature-and-pressure relief valve or discharge pipe, especially during heating, or the pipe is hot, forceful, corroded, obstructed, or altered.
Do this next
Keep clear and call a qualified plumber to diagnose pressure, temperature, thermal expansion, and valve condition. Never cap, plug, constrict, hold closed, or remove the relief discharge.
-
PATH 04Next step
What you see
The heater is electric and water appears at or below an element or electrical access panel, or a leak alarm indicates water near electrical components.
Do this next
Keep clear, isolate power only if it can be done safely from a dry location, and arrange qualified service. Do not remove access panels, test for voltage, tighten an element, or dry the area with heat.
-
PATH 05Next step
What you see
Only a small amount of surface moisture appears after a cold fill or heavy draw, then stops as the heater warms, or the heater is dry while a nearby pipe, drain, appliance, or ceiling is wet.
Do this next
Continue monitoring only from a safe, dry position and document the pattern. If moisture returns, pools, or the nearby source is uncertain, isolate water as appropriate and have a plumber trace it; do not assume the heater is safe to operate.
-
PATH 06Next step
What you see
Water emerges from the tank shell, bottom seam, an internal cabinet area, or continues after external connections are dry, with corrosion or a widening puddle.
Do this next
Keep the heater isolated and arrange prompt qualified service. A confirmed tank leak generally changes the decision toward replacement, but the technician must verify the source, model, access, and safe removal path.
-
PATH 07Next step
What you see
The floor stays wet, the first wet point cannot be seen, the shutoff is inaccessible or seized, or water continues despite a safe supply isolation.
Do this next
Keep people away, protect flooring without touching hot or contaminated water, and call a qualified plumber or water-heater technician. Do not open the drain, move the heater, or restart it to reproduce the leak.
Helpful context
Understand the symptom
A puddle is a location clue, not a diagnosis
Water can run down pipes or the outside of a heater before reaching the floor. A dry-paper-towel check at a cool, accessible connection can help show whether the connection is the first wet point, but do not reach around hot surfaces, remove insulation, or open an access cover. A puddle that grows during heating, appears at the relief discharge, or comes from the tank body follows a different service path from a small amount of condensation after a heavy draw.
Gas and electric heaters need different boundaries
A gas heater adds combustion and gas-leak risk; an electric heater adds energized elements and wiring behind covers. The same floor symptom can therefore require different isolation steps. Read the rating label from a dry, safe position and follow the exact owner's manual. Do not assume a gas shutoff, breaker, element, thermostat, or access cover is safe to operate when water is present or the source is unknown.
Do not defeat the relief safety
The temperature-and-pressure relief valve and its discharge pipe are safety devices. A drip there can reflect pressure or temperature activation, thermal expansion, or a valve that is not seating. Capping, plugging, constricting, or removing the pipe can create a dangerous condition. Leave the discharge path visible and unobstructed and have a qualified professional diagnose why water is escaping.
A tank-body leak usually changes the repair decision
If water is confirmed to emerge from the tank shell, bottom seam, or an internal area rather than a replaceable connection, the tank may be corroded or otherwise failed. A. O. Smith's bulletin says a confirmed tank leak calls for tank replacement, but the model, installation, access, and local requirements determine the service path. Do not lift, tip, drain, or dismantle a full heater yourself.
Safety boundary
Stop conditions
- Do not operate electrical switches in a suspected gas leak, touch wet electrical equipment, open a combustion compartment, test live voltage, or adjust gas controls.
- Never cap, plug, constrict, hold closed, or remove the temperature-and-pressure relief valve or discharge pipe; do not treat relief water as an ordinary fitting leak.
- Do not open the drain valve, drain or move a full tank, remove access panels, tighten a hot or pressurized fitting, or handle hot, unknown, or contaminated water as a first response.
- Do not use a flame, space heater, or other heat source to dry a spill. Stop and call qualified service for water at an electrical area, tank-body leak, active flooding, gas odor, carbon-monoxide alarm, smoke, steam, or major water damage.
Only after diagnosis
Potential parts
- hot or cold water connection gasket or valve
Consider this only when the first wet point is confirmed at a specific external inlet, outlet, fitting, or valve and the tank body and relief path are dry.
Confirm heater model, pipe material, connection size, pressure and temperature ratings, and local requirements before replacement; hot or pressurized plumbing work requires qualified service. - temperature-and-pressure relief valve or discharge assembly
Consider this only after a qualified technician confirms relief-path water and diagnoses the pressure, temperature, thermal-expansion, or valve-seating cause.
Confirm the exact heater model, valve rating, discharge requirements, and local code; never cap, plug, or substitute the relief assembly based on appearance. - water-heater drain valve
Consider this only when water is traced to the drain valve and the valve, tank port, and surrounding piping are confirmed by a professional to be the source.
Verify model, port, thread, material, temperature and pressure ratings, and safe isolation and draining requirements; do not open a drain valve on a hot full tank. - electric heating-element gasket or element
Consider this only for an electric heater when qualified diagnosis traces water to an element gasket or element and confirms power is safely isolated.
Confirm exact model, element type, voltage, wattage, gasket, sealing surface, and electrical safety procedure; do not remove an access panel or test an energized circuit. - water-heater tank replacement or internal leak service
This is a professional replacement or removal category only when the tank shell, bottom seam, or internal vessel is confirmed to leak after external connections and safety devices are excluded.
Verify exact fuel type, capacity, venting or electrical requirements, installation space, drain pan, local code, and safe removal path; do not move or drain a full heater yourself.
When checks do not resolve it
Need a professional?
Call a qualified plumber or water-heater technician for any continuing puddle, leak from a tank body or bottom seam, relief discharge, drain-valve leak, electric access moisture, gas-heater concern, corroded connection, inaccessible source, seized shutoff, or water damage. Seek emergency help for gas odor, a carbon-monoxide alarm, smoke, fire, hot spray or steam, water near electrical equipment, active flooding, or major structural damage.
Safety scope: Owner checks are limited to safe observation, model-label and indicator reading, external source tracing on cool accessible surfaces, and safe isolation only when the correct shutoff is clear and turns freely. A qualified professional must handle tank draining or removal, relief or drain-valve work, electric elements and wiring, gas and combustion equipment, pressure diagnosis, concealed leaks, and replacement decisions.
Have this ready
- Provide the brand, model, serial number, gas or electric type, age if known, first wet point, leak timing and rate, safe photos, hot or cool appearance without touching, shutoff result, relief and drain observations, corrosion, recent work, and affected floor, wall, ceiling, or electrical equipment.
Common questions
FAQ
Why is my water heater leaking onto the floor?
A. O. Smith lists condensation, water connections, the drain valve, the temperature-and-pressure relief path, electric-element gaskets, and tank leaks as separate possibilities. Trace the first wet point safely before choosing a repair.
Does a wet floor mean the water heater tank is bad?
No. Water can run from a top connection, pipe, drain valve, relief discharge, or condensation to the floor. If water is confirmed at the tank shell, bottom seam, or internal area, the tank may have failed and needs qualified evaluation.
What should I do first when a water heater is leaking?
Keep people away from hot or contaminated water, look for gas odor or electrical danger, and shut off the water supply only if the correct valve turns freely and it is safe. Isolate gas or power according to the exact model instructions and call a plumber for an active or unexplained leak.
Can I cap the water heater relief-valve pipe to stop the leak?
Never cap, plug, constrict, hold closed, or remove the temperature-and-pressure relief discharge. Water there may indicate a pressure or temperature safety event; a qualified professional must find the cause.
Why is water coming from the top of the water heater?
The hot or cold connection, a nearby pipe, the relief-valve path, or condensation may be involved. Trace only cool, visible exterior areas and have a plumber repair the confirmed source; do not tighten a hot or pressurized fitting.
Can condensation make the floor under a water heater wet?
Yes, temporary condensation can occur after a cold fill or heavy draw, but continuing moisture, pooling, or a trail from a connection should be treated as a leak until checked. Do not use a heat source to dry the spill.
What if water is leaking from an electric water-heater access panel?
Keep clear and isolate power only if it can be done safely from a dry location, then call qualified service. Water can reach energized components; do not remove the panel, test voltage, tighten an element, or touch wet wiring.
What if the water heater drain valve is leaking?
Do not open or remove the drain valve on a hot or full tank. Have a qualified plumber confirm the valve or tank port is the source and repair it after safe isolation and temperature control.
Should I drain a leaking water heater?
Do not drain it as a generic first response. Stored water may be hot, the drain may discharge uncontrollably, and gas or electric isolation and relief protection must remain correct. A qualified professional should decide and perform draining when needed.
When does a leaking water heater need replacement?
Replacement becomes more likely when the tank shell, bottom seam, or internal vessel is confirmed to leak, or when corrosion has compromised the tank. A professional must distinguish that from a replaceable connection, valve, relief, condensation, or element-gasket issue.
When is a water-heater leak an emergency?
Treat gas odor, a carbon-monoxide alarm, smoke, fire, steam, hot spray, water near electrical equipment, active flooding, or major floor, wall, or ceiling damage as an emergency. Leave as appropriate and contact emergency or qualified service from a safe location.
Read the exact guide
Official sources
- Water Heater Tips for Winter Weather ConditionsRheem Manufacturing Company · Rheem homeowner guidance used for a generic water-heater safety boundary; exact product instructions and local service govern.
- urgent helpRheem Manufacturing Company · Rheem urgent-help guidance used for general water-heater emergency boundaries; equipment and local emergency procedures govern.
- Technical Bulletins - Bulletin #51 Puddle On The FloorA. O. Smith · A. O. Smith technical bulletin used for generic source separation; exact heater model and instructions govern.
- What to Do Before Calling a Plumber or Replacing Your Water HeaterRheem Manufacturing Company · Rheem homeowner water-heater guidance used for safe observation and service handoff; exact heater model governs.
- Gladiator Electric Residential Water Heater with Leak DetectionRheem Manufacturing Company · Rheem Gladiator electric manual used only for an example of model-specific leak-detection behavior and safety; other heaters differ.
- Electric Tank LeakA. O. Smith University · A. O. Smith electric-tank leak guide used for general symptom and safety context; exact model manual governs.
Community feedback
Share a repair observation
Share a plain-text repair observation. Accepted observations are published automatically; this page may take a moment to update.