
On this page
Start here
Quick answer
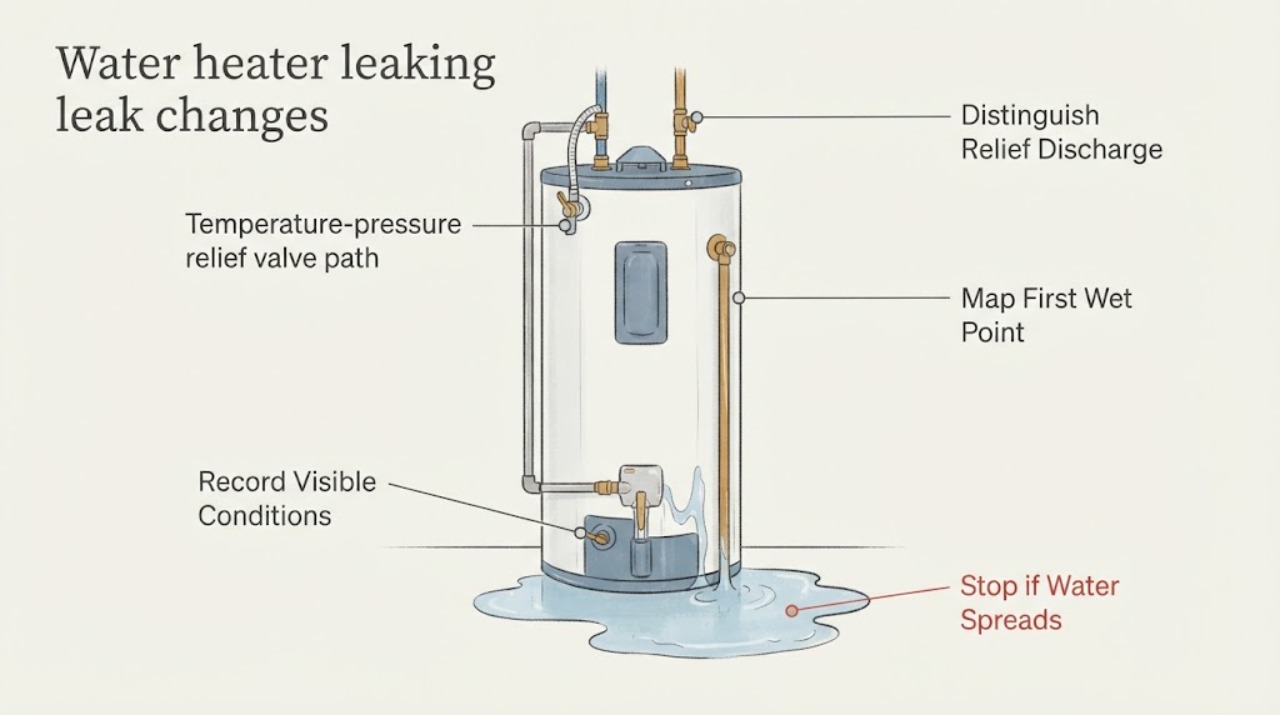
A water-heater leak that appears or gets worse during a heating cycle often points to water expansion and pressure at the temperature-and-pressure (T&P) relief path, but the timing alone does not identify the failed part. From a safe distance, identify whether water exits the relief discharge pipe, a top connection, the drain valve, a side seam, or the tank base, and note whether it is cool, warm, intermittent, or a growing stream. Do not touch or lift the relief-valve lever, cap or block its discharge pipe, open an access panel, or work on a gas control or live electrical parts. If water is coming through the tank shell or base, the flow is increasing, hot water or steam is present, there is gas odor, or water is near electrical equipment, stop using the heater and arrange urgent qualified service; use the emergency gas or fire response appropriate to the hazard.
Work through in order
Diagnostic checks
Use only checks that match the exact appliance or system and its official guide.
-
Check 1
With the heater off from normal use and viewed from a safe, dry position, use a flashlight or phone camera to identify the highest visible wet point without removing panels, insulation, covers, or the discharge pipe.
Expected result: Record whether the first wet point is the end of the T&P discharge pipe, the T&P valve-to-tank connection, a hot or cold top fitting, the drain valve, a side seam, the tank base, or nearby piping/condensation.
Next step: Photograph the point and surrounding area, then use the matching branch below. If the source cannot be seen safely, leave the unit alone and arrange a qualified inspection.
Stop if: Stop immediately if the water is hot, steaming, spraying, near electrical parts, or the floor is unstable or flooding.
Why this matters
Why: The exit point separates a relief-path or plumbing-connection investigation from a possible tank-shell failure; floor water alone is not enough to identify the source.
-
Check 2
Without deliberately forcing a heating cycle, note the leak during ordinary household use and record whether it starts or increases while the heater is recovering, then slows during standby; do not touch the water or valve to take a temperature reading.
Expected result: Record no timing relationship, a small intermittent drip during recovery, a steady leak that continues during standby, or a sudden hot discharge/stream.
Next step: Add the timing and approximate pattern to the service handoff. Do not repeat cycles to reproduce a leak once a hazard or active flow is present.
Stop if: Stop using the heater for observation if hot water, steam, a strong flow, unusual noise, smoke, gas odor, or water near electrical equipment appears.
Why this matters
Why: A recovery-linked drip is compatible with pressure or thermal-expansion behavior at the relief path, while a persistent or rapidly increasing leak points to a failed fitting, valve, tank, or another supply source. Timing cannot prove which component is at fault.
-
Check 3
From the side and without operating the lever, visually follow the T&P discharge pipe to its outlet and check whether the water is coming from the pipe end or from around the valve's tank connection.
Expected result: Record a wet discharge-pipe outlet, moisture at the threaded valve connection, no moisture at either point, or a discharge that is hot or forceful.
Next step: Keep the discharge path unobstructed and have a qualified plumber assess system pressure, thermal expansion, the relief valve, and the heater's temperature control. Preserve the photo rather than manipulating the valve.
Stop if: Do not lift the relief lever, insert anything into the opening, remove the valve, or place a hand under the discharge.
Why this matters
Why: Pipe-end discharge can reflect pressure, thermal expansion, excessive temperature, or a valve that is not seating; moisture at the tank connection is a fitting/sealing problem. Neither pattern justifies capping the pipe or assuming a replacement valve is correct.
-
Check 4
After the area is cool and dry enough to approach safely, visually inspect the exposed hot and cold connections, drain-valve area, and nearby pipes; use a dry paper towel on the surrounding floor or pipe exterior only, never inside a fitting or at the relief outlet.
Expected result: Record a new wet ring at a top connection, moisture at the drain-valve body or threads, a dry heater with wet nearby plumbing, or water that returns from behind the jacket.
Next step: Do not tighten, remove, or reseal a pressurized or hot fitting. Close the heater's water supply and energy source only when the exact manual and clearly labeled controls make that safe; otherwise leave controls untouched and arrange service.
Stop if: Do not remove insulation, disconnect plumbing, drain the tank, open an access panel, or continue where water is hot, spraying, or near electrical parts.
Why this matters
Why: A connection or drain valve can leak independently of the tank and may merely appear worse when heat changes the fitting or water movement. Water returning from behind the jacket or from the tank body is outside a routine external tightening check.
-
Check 5
Look around the tank shell, side seam, and base without moving the heater, and compare the first wet point with the connection and relief-path observations; do not scrape rust, probe the jacket, or remove the pan.
Expected result: Record a dry shell with a confirmed fitting source, a wet shell or seam, corrosion with water emerging from the body, a full pan with no visible source, or an uncertain result.
Next step: If the body or seam is wet, stop using the heater and obtain an urgent qualified tank assessment. Do not attempt a patch or continue heating to see whether the leak stops.
Stop if: Stop and keep clear if the flow increases, the water is hot, the tank shifts, or the pan is overflowing.
Why this matters
Why: Water emerging through the tank body or collecting from an untraceable shell source makes internal corrosion or tank failure more likely; it is not made safe by the fact that the leak changes during heating. A full pan also needs source tracing because water may be from a valve, fitting, condensation, or another line.
-
Check 6
Prepare a service handoff with the heater type if known, the first wet point, leak timing relative to heating, water temperature impression without touching, photos, whether the T&P discharge path is unobstructed, and any gas, electrical, noise, or corrosion symptom.
Expected result: Confirm that the record contains observations only and that no relief valve, gas control, wiring, access panel, drain connection, or tank support was disturbed.
Next step: Arrange qualified plumbing service for any recurring or unexplained leak. Keep the heater off when the leak is active, hot, rapidly worsening, or coming from the tank body; use the appropriate emergency response for gas odor, fire, flooding, or electrical danger.
Stop if: Stop all homeowner diagnosis when the next step would require pressure testing, draining, valve removal, gas work, electrical access, or moving the heater.
Why this matters
Why: These details let a qualified technician distinguish thermal expansion or high system pressure from a leaking valve, fitting, drain valve, condensation, or failed tank instead of guessing from a floor puddle.
Use your observations
Decision map
Find the observation that best matches what you see, then follow the next safe action.
-
PATH 01Next step
What you see
The only wet point is the T&P discharge outlet, and a small intermittent drip appears mainly while stored water is reheating.
Do this next
Keep the discharge unobstructed and have a qualified plumber evaluate pressure, any closed-water-system expansion control, valve condition, and temperature control before selecting a part.
-
PATH 02Next step
What you see
The discharge is a sudden hot stream, steaming, or forceful flow, or the leak is accompanied by abnormally hot water.
Do this next
Keep people away, do not touch or operate the valve, stop using the heater if it can be done without entering a hazard, and arrange urgent qualified service. Use emergency help for burns, fire, or an uncontrolled release.
-
PATH 03Next step
What you see
The tank shell is dry, but water starts at a hot/cold connection, relief-valve tank fitting, drain-valve area, or nearby pipe and persists beyond the heating cycle.
Do this next
Leave the fitting undisturbed and arrange qualified plumbing service. Do not tighten or remove a hot or pressurized connection, and do not drain the tank as a homeowner to reach it.
-
PATH 04Next step
What you see
Water emerges from the tank shell, side seam, or base, or corrosion and a wet jacket remain after external fittings are dry.
Do this next
Stop using the heater, keep clear of hot water and the equipment, and obtain an urgent qualified tank assessment for safe replacement or other approved resolution.
-
PATH 05Next step
What you see
The tank and fittings remain dry while cool pipes or nearby equipment form droplets, or the puddle appears only at startup and then disappears as surfaces warm.
Do this next
Document the location and timing, then have a plumber verify the source if it recurs, damages the area, or cannot be distinguished from a heater leak without removing covers.
-
PATH 06Next step
What you see
There is gas odor, smoke, flame trouble, arcing, water near electrical equipment, an unstable floor, uncontrolled flooding, or a rapidly increasing hot leak.
Do this next
Leave the area and use the applicable emergency gas, fire, electrical, or water response. Do not operate switches or controls in a suspected gas atmosphere, and do not re-enter until the hazard is cleared.
Helpful context
Understand the symptom
Why heating changes the symptom
Heating raises the temperature of stored water and can make a pressure-related discharge or a marginal fitting show up more clearly. A. O. Smith describes slow relief-valve weeping as pressure actuation and identifies thermal expansion in a closed system as one cause. That pattern is a clue, not a diagnosis: the same puddle can be fed by a top fitting, drain valve, condensation, or water tracking down from a different point. Start with the exit point and timing rather than replacing a valve or tank by appearance alone.
The exit point changes the next step
Water at the end of the T&P discharge pipe is a different branch from water at the valve's threaded tank connection. Water from a top hot or cold connection, an anode fitting, or a drain valve suggests a connection or valve assessment. Water emerging through the tank jacket, side seam, or bottom itself is more concerning for tank integrity. A. O. Smith notes that condensation and other nearby plumbing can also make the floor look like the heater is leaking, so trace the first wet point without removing covers or insulation.
A relief discharge is not something to cap
The T&P valve is a safety device, not a routine drain. A. O. Smith's installation guidance says its discharge opening must remain unobstructed and that the valve is intended to protect against excessive temperature and pressure. Do not cap, plug, reduce, or add a shutoff to the discharge path, and do not operate the lever as a leak test. A recurring discharge needs a qualified diagnosis of pressure, thermal expansion, valve condition, and temperature control.
When the tank body is the source
If clean water reappears directly from the tank body, side seam, or base after nearby fittings are ruled out, treat the tank as a possible failed pressure vessel. Rheem says pooling around the tank body often indicates internal corrosion and that replacement may be the safe resolution. A changing rate during heating does not make a shell leak a valve repair. Keep clear of hot water, protect the area from further damage only if it can be done without touching the heater, and arrange qualified service.
Safety boundary
Stop conditions
- Do not lift, remove, cap, plug, block, or modify the temperature-and-pressure relief valve or its discharge pipe.
- Do not open electrical or burner access panels, test live parts, adjust gas controls, drain the tank, disconnect pressurized plumbing, move the heater, or attempt a tank patch as a homeowner.
- Stop immediately for hot or forceful water, steam, smoke, gas odor, flame trouble, arcing, shock, water near electrical equipment, an unstable floor, rapid flooding, or a tank-body leak; keep clear and arrange the appropriate qualified or emergency response.
Only after diagnosis
Potential parts
- temperature-and-pressure relief valve
Consider this only after qualified diagnosis confirms that the valve itself is leaking or failing after pressure, thermal expansion, temperature control, and the valve-to-tank connection have been assessed.
Confirm the exact heater model, valve temperature and pressure markings, discharge capacity, connection, and local installation requirements; do not substitute an unverified valve or alter its discharge path. - thermal expansion control component
Consider this only when a qualified plumber confirms a closed water system and pressure behavior consistent with thermal expansion, rather than a failed relief valve, fitting, or tank shell.
Confirm system configuration, water pressure, sizing, connection, precharge procedure, and manufacturer/local requirements before selection or installation. - water-heater connection or drain-valve sealing component
Consider this only after the leak is traced to a serviceable connection or drain-valve interface and a qualified technician confirms the sealing component or valve is the cause.
Verify the exact heater model, connection type, thread or gasket specification, temperature/pressure duty, and approved installation method before ordering. - storage water heater tank
Consider replacement only when qualified inspection confirms water is emerging through the tank body, seam, or base, or that tank integrity cannot be safely restored; a floor puddle alone is not enough.
Match fuel or electrical service, venting or exhaust requirements, connections, dimensions, capacity, safety controls, and local code through a qualified installer.
When checks do not resolve it
Need a professional?
Arrange qualified plumbing service for any leak that recurs, changes with heating, cannot be traced to a harmless external source, or comes from the T&P path, a fitting, the drain valve, or the tank body. Treat water from the tank shell or base, hot or forceful discharge, a rapidly increasing flow, corrosion, or water near electrical equipment as urgent. Leave the area and use the appropriate emergency gas, fire, electrical, or water response for gas odor, smoke, fire, arcing, shock, uncontrolled flooding, or an unstable installation.
Have this ready
- Provide the heater type and model information if safely visible, first wet point, timing relative to heating, photos, whether the flow is intermittent or continuous, water-temperature impression without touching, corrosion signs, and any gas, electrical, noise, or flooding symptom.
Common questions
FAQ
Why does the water heater leak only while it is heating?
Heating can expose a pressure or thermal-expansion problem at the T&P relief path or a marginal connection. It can also make condensation or a pre-existing leak easier to see. The leak location and whether it continues during standby matter more than timing alone.
Is a few drops from the relief discharge pipe something to ignore?
No. A recurring discharge needs qualified assessment of system pressure, thermal expansion, the relief valve, and temperature control. Keep the discharge path unobstructed; never cap it or operate the lever to try to stop the leak.
Does water at the bottom always mean the tank must be replaced?
No. A. O. Smith lists condensation, loose connections, relief-valve operation, and other nearby sources as possibilities. But water that truly emerges through the tank body, side seam, or base is a serious tank-integrity concern and should be assessed urgently rather than patched or repeatedly heated.
Can I tighten the fitting or replace the relief valve myself?
Do not work on a hot or pressurized water heater or disturb the safety valve as a leak experiment. A qualified technician should confirm the source, pressure condition, valve rating, temperature control, and tank integrity before any repair or part selection.
What should I do if the water is very hot or there is a gas odor?
Keep people away and stop ordinary troubleshooting. For gas odor, leave without operating switches or controls and use the applicable emergency gas response. For a hot or forceful discharge, smoke, fire, arcing, shock, or uncontrolled flooding, use the appropriate emergency service and qualified technician response.
Read the exact guide
Official sources
- 5 Signs Your Water Heater Is Going Bad (And What to Do About It)Rheem Manufacturing Company · Rheem consumer guidance used for general leak-source triage; a qualified technician must confirm tank integrity and replacement need.
- LEAKAGE CHECKPOINTSA. O. Smith Water Products Company · Manufacturer checklist for residential storage water heaters; exact construction and user-accessible checks vary by model.
- LEAKAGE CHECKPOINTSA. O. Smith Water Products Company · A. O. Smith residential gas-water-heater manual; discharge and service requirements must be checked against the exact appliance manual and local code.
- How to Keep Your Tank and Tankless Water Heaters Running at Peak PerformanceRheem Manufacturing Company · Rheem general maintenance article; exact model manuals and qualified service requirements govern access and testing.
- Technical Operations and Maintenance Guidelines on Common Water EquipmentU.S. Department of Energy · DOE facilities guidance; used for the pressure-related explanation, not as a model-specific homeowner adjustment procedure.
- Publication 5098 - Tap Water ScaldsU.S. Consumer Product Safety Commission · CPSC consumer safety publication; used only for the scald warning and emergency boundary, not for model-specific service instructions.
- STANDARD RESIDENTIAL GAS WATER HEATERA. O. Smith Water Products Company · Manufacturer technical handbook; used for general storage water-heater relief-path reasoning. Exact model instructions govern.
Community feedback
Share a repair observation
Share a plain-text repair observation. Accepted observations are published automatically; this page may take a moment to update.