
On this page
Start here
Quick answer
Do not cap, plug, clamp, block, or otherwise disable a dripping water-heater temperature-and-pressure relief valve or its discharge pipe. From a safe position, identify whether water is coming from the discharge opening, the valve connection, or another nearby fitting; note whether it is a small intermittent drip or a hot, continuous discharge; and keep people away from the hot-water path. A relief valve can be responding to pressure or temperature, a thermal-expansion condition, debris, a failed valve, or a tank or connection problem. Arrange prompt qualified water-heater service rather than adjusting pressure, temperature, gas, or electrical components yourself.
Before you begin
Safety first
- Never cap, plug, clamp, block, disconnect, or disable the relief valve or discharge pipe. Do not operate the lever, adjust pressure or temperature, open panels, touch hot water, or work on gas, electrical, or pressurized components.
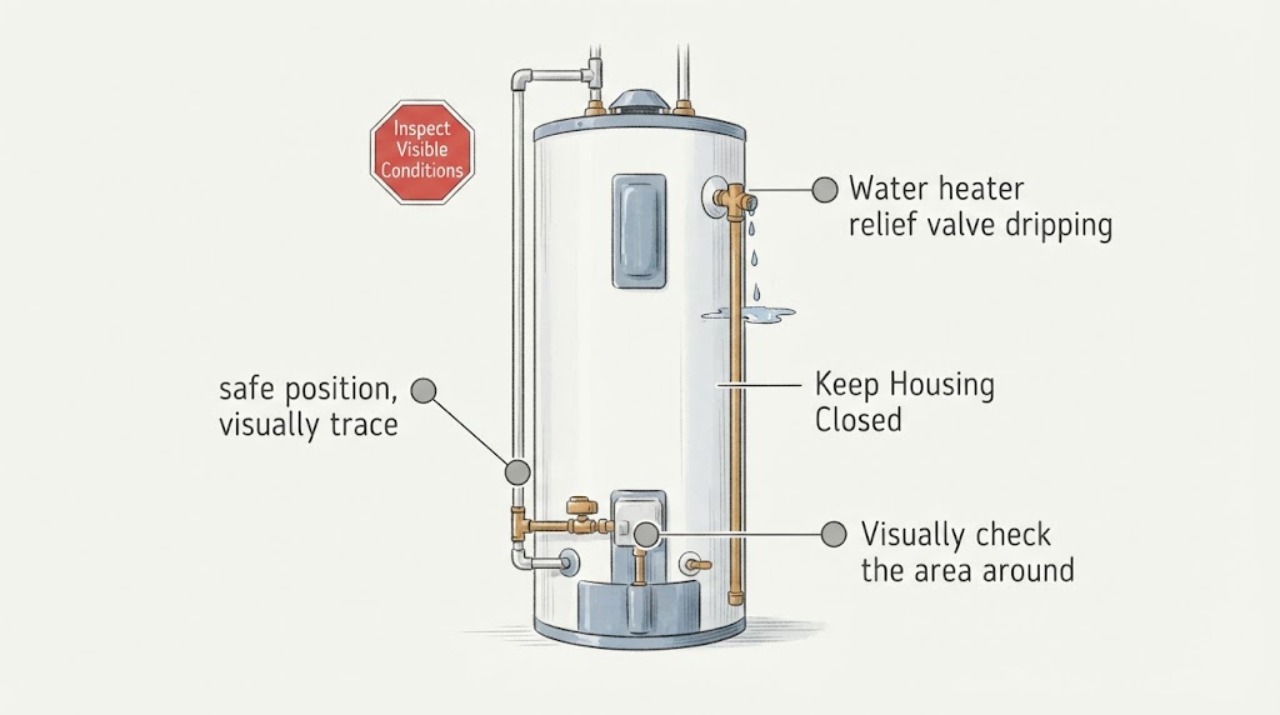
Work through in order
Diagnostic checks
Use only checks that match the exact appliance or system and its official guide.
-
Check 1
From a dry, safe position, visually trace the water without touching the heater: follow it from the relief-valve discharge opening, the threaded valve connection, the tank opening, or a nearby pipe or fitting.
Expected result: Record the apparent source, whether the discharge tube is present and unobstructed, and whether water is running onto electrical equipment, flooring, or a drain pan.
Next step: Take a photo from a safe distance and give the source description to a qualified water-heater professional; do not move, cap, or disconnect the discharge line.
Stop if: Stop immediately and keep clear for hot water, steam, active flooding, wet electrical equipment, a bulging or damaged tank, or water approaching a burner or electrical control.
Why this matters
Why: Water from the discharge opening may reflect a relief event, while water at the connection or tank opening may indicate a fitting or tank problem; water from another fitting may not be a relief-valve fault.
-
Check 2
Without placing a hand in the water or near the outlet, observe the drip pattern for a short safe period and note whether it occurs after hot-water use, during recovery, continuously, or as a sudden stream.
Expected result: Classify the visible pattern as occasional weeping, repeated dripping, a steady flow, or a large hot discharge, and note any unusual noise or odor.
Next step: Keep the area isolated and arrange professional service with the timing and pattern; do not test by lifting the valve lever or changing the thermostat.
Stop if: Stop observing and leave the area if the discharge becomes hot or forceful, the tank makes abnormal sounds, or there is steam, gas odor, smoke, or a burn risk.
Why this matters
Why: Timing after heating or hot-water use can be a clue for pressure or thermal expansion; a large hot discharge can indicate a temperature or control problem and should be treated as urgent.
-
Check 3
Visually check the area around the water heater for a drain pan, floor drain, water staining, corrosion, scale, damaged insulation, or signs that the tank or piping is moving; do not remove panels or insulation.
Expected result: Record whether water is contained, spreading, staining the tank or floor, or collecting near wiring, controls, the burner, or other equipment.
Next step: Keep people away, preserve photos, and request qualified service; do not drain, move, tilt, or dismantle the heater as a homeowner test.
Stop if: Stop immediately for active flooding, a softening floor, tank bulging, structural damage, wet electrical parts, or any gas or combustion concern.
Why this matters
Why: Containment and visible damage change the urgency, and water at the tank body or nearby controls may indicate a broader equipment or installation problem rather than a replaceable valve alone.
-
Check 4
Read the water-heater nameplate and valve tag from outside the equipment without touching hot surfaces, and record the fuel type, model information, visible valve markings, and whether a thermal-expansion tank or pressure-control equipment is visibly installed.
Expected result: Note whether the equipment is gas, electric, or another type; whether the valve or discharge pipe appears altered; and whether the visible expansion or pressure equipment is damaged or absent.
Next step: Send the information to the manufacturer or qualified technician and wait for model-specific instructions.
Stop if: Stop if reading the information would require removing a cover, touching hot equipment, entering a confined area, or approaching an active discharge.
Why this matters
Why: The equipment identity and visible installation context help a professional choose the correct rated valve and investigate pressure or expansion, but they do not justify a homeowner pressure adjustment or part substitution.
-
Check 5
Confirm the immediate safety state without manipulating the relief valve: note whether the discharge path remains open, the heater is accessible to children or pets, and the leak can be isolated from occupied areas without contact.
Expected result: Treat a blocked discharge path, hot water, ongoing flow, exposed electrical equipment, or a trip or burn hazard as a failed safety condition.
Next step: Keep the area clear and call qualified water-heater service; use urgent local help for immediate fire, gas, electrical, burn, or flooding danger.
Stop if: Stop all homeowner troubleshooting for any blocked outlet, attempted cap or plug, unsafe pressure condition, or active hazard.
Why this matters
Why: A relief valve must remain capable of releasing pressure, and a persistent or forceful discharge needs professional assessment rather than suppression.
Use your observations
Decision map
Find the observation that best matches what you see, then follow the next safe action.
-
PATH 01Next step
What you see
Water is coming from the relief-valve discharge pipe as a small intermittent drip and there is no immediate hot-water or electrical hazard.
Do this next
Keep the discharge path open and schedule prompt professional diagnosis of pressure, thermal expansion, debris, and valve condition; do not suppress the drip.
-
PATH 02Next step
What you see
A large or hot discharge, steam, abnormal tank noise, or a temperature-control concern is present.
Do this next
Stay clear and seek urgent qualified water-heater service or emergency help as appropriate; do not operate the relief lever or change controls.
-
PATH 03Next step
What you see
Water is escaping at the valve connection, tank opening, body of the heater, or another fitting rather than the discharge opening.
Do this next
Treat it as a possible connection or tank leak and arrange professional assessment; do not tighten, remove, reseal, or replace parts while the heater is hot or pressurized.
-
PATH 04Next step
What you see
The discharge tube is capped, blocked, altered, missing, or routed toward a hazard.
Do this next
Do not operate or modify the setup; keep clear and request qualified service to restore a safe, compliant discharge path.
Helpful context
Understand the symptom
Why a relief-valve drip matters
The temperature-and-pressure relief valve is a safety device, not an ordinary faucet. A small intermittent discharge can be associated with pressure or thermal expansion, while a large or hot discharge can signal a temperature or equipment problem. A leak at the valve connection or tank opening has a different meaning from water leaving the discharge pipe, so the source and pattern should be recorded before service.
Keep the safety path open
The discharge path must remain able to release water. Do not attach a cap, plug, valve, clamp, hose restriction, or container that blocks the outlet. Do not touch the valve or discharge water to test temperature, operate the relief lever, change the water-heater setting, or alter household pressure unless a qualified professional directs a safe procedure for the exact equipment.
Only after diagnosis
Potential parts
- water heater relief valve
Consider a replacement valve only if a qualified professional confirms that the existing valve is faulty and identifies the exact rated valve for the heater and installation.
Temperature and pressure ratings, probe length, connection, and discharge arrangement must match the heater and manufacturer requirements; never substitute a generic valve. - water heater expansion tank
Consider an expansion tank only if a qualified professional confirms a closed-system or thermal-expansion condition and designs the correction for the building's water system.
Sizing, location, precharge, and pressure must be specified for the actual system; do not adjust or install one as a homeowner response to a dripping relief valve. - relief valve discharge tube
Consider a discharge-tube replacement only if a professional confirms that the tube is missing, damaged, incorrectly routed, or incompatible with the heater and relief valve.
The discharge path must remain open, properly supported, and suitable for hot discharge; never use a cap, plug, shutoff, reducer, or obstructing fitting.
When checks do not resolve it
Need a professional?
Arrange prompt qualified water-heater service for any relief-valve drip. Seek urgent help for a hot or forceful discharge, steam, tank bulging, active flooding, gas odor, smoke, wet electrical equipment, or immediate burn or fire risk.
Safety scope: Never cap, plug, clamp, block, disconnect, or disable the relief valve or discharge pipe. Do not operate the lever, adjust pressure or temperature, open panels, touch hot water, or work on gas, electrical, or pressurized components.
Have this ready
- Provide the leak source, drip pattern and timing, photos from a safe distance, heater fuel type and model information, visible valve and discharge-tube condition, and any recent plumbing or pressure changes.
Common questions
FAQ
Can I cap or plug the dripping relief valve to stop the leak?
Never. The valve and discharge path are safety components. Keep them open and arrange qualified service to diagnose the cause.
Can I lift the relief-valve lever to flush out debris?
Do not operate the lever as a homeowner test unless the exact manufacturer instructions and safe conditions are confirmed by a qualified professional. The discharge may be extremely hot, and a valve that fails to reseat can create a larger leak.
Does a small drip always mean the relief valve itself is bad?
No. Pressure, thermal expansion, debris, a connection leak, a temperature-control problem, or a faulty valve can produce similar symptoms. The leak source and pattern must be assessed.
Should I adjust water pressure or the water-heater temperature?
Do not make an unsafe pressure or temperature adjustment to stop a relief-valve discharge. Give the readings and equipment information to a qualified water-heater professional.
Read the exact guide
Official sources
- Technical Bulletin 52: Leaking Temperature and Pressure Relief ValveA. O. Smith · Official manufacturer technical guidance used for the distinction between discharge, connection, and tank-opening leaks and for the pressure, temperature, and thermal-expansion mechanisms; exact equipment requires model-specific service.
- Technical Operations and Maintenance Guidelines on Common Water EquipmentU.S. Department of Energy · Government O&M guidance used for the general recommendation to report and repair leaks and to follow manufacturer specifications; it is not a homeowner pressure-adjustment procedure for a specific water heater.
Community feedback
Share a repair observation
Share a plain-text repair observation. Accepted observations are published automatically; this page may take a moment to update.